--broadcast --slow --legacy ``` ### Q: Why isn’t my smart contract working? [Section titled “Q: Why isn’t my smart contract working?”](#q-why-isnt-my-smart-contract-working) The most common issue related to smart contracts either failing to deploy OR reads/writes failing is due to Solidity and VM compiler versions. SKALE runs a slightly modified version of the Ethereum Virtual Machine, built in C++ to enable blazing fast performance, however this does mean that SKALE while EVM compatible is not 1:1 with Ethereum itself. To ensure that your contract is fully compatible with a SKALE Chain please ensure that you are: * Using Solidity version <=0.8.24 * Using EVM Compiler <= Shanghai If you are still having trouble after this, please join the SKALE Developer Success team in [Discord](https://discord.gg/skale) for support.
# Contract Factories
> Factories on a SKALE Chain
## Background [Section titled “Background”](#background) For developers building on SKALE, it is important to understand how a SKALE Chain the permission layer permission layer works for contract deployments and it’s impact on your smart contract architecture. SKALE Chains are Layer 1 blockchains with a number of unique enhancements that give businesses and developers maximum flexiblity when desigining an application or ecoystem. The permission layer is enabled by default on all SKALE Chains and should be taken into account when designing smart contracts. ## What is a factory? [Section titled “What is a factory?”](#what-is-a-factory) A factory is a smart contract that has the ability to deploy another smart contract. In some cases, this is done in a permissionless way e.g Uniswap where new Uniswap Pools create a new smart contract. In other cases, this is done in a permissioned way where a project uses a factory to create new versions or releases but it is locked down to their keys. FactoryExample.sol ```solidity /// SPDX-License-Identifier: MIT pragma solidity ^0.8.9; /// @title Clone /// @notice A simple contract that stores a clone ID /// @dev This contract is meant to be deployed by the Factory contract contract Clone { /// @notice The unique identifier for this clone /// @dev Set during contract creation and remains unchanged uint256 public cloneId; /// @notice Creates a new Clone with the specified ID /// @param _cloneId The unique identifier to assign to this clone constructor(uint256 _cloneId) { cloneId = _cloneId; } } /// @title Factory /// @notice A factory contract that creates and tracks Clone instances /// @dev Implements a simple factory pattern for deploying Clone contracts contract Factory { /// @notice The total number of clones created by this factory /// @dev Also used to assign unique IDs to new clones uint256 public cloneCount; /// @notice Array of addresses for all clones created by this factory /// @dev Stores references to all deployed Clone contracts address[] public clones; /// @notice Creates a new Clone contract instance /// @dev Increments the clone counter, deploys a new Clone with that ID, and stores its address function createClone() external { Clone clone = new Clone(++cloneCount); clones.push(address(clone)); } } ``` ## Factory Design Checklist for SKALE [Section titled “Factory Design Checklist for SKALE”](#factory-design-checklist-for-skale) The following are key concepts that should be used when designing factories for SKALE: * Can this be done WITHOUT a factory. If yes, remove the factory * Have you disabled generic deployment of the factory (i.e removing CREATE2) * Have you disabled public deployment of clones (i.e using AccessControl) * Do you have an explicit list of WHO should be able to deploy through the factory
# Using Filestorage
> Use the only native decentralized onchain filestorage
SKALE Filestorage is the only onchain and decentralized filestorage in blockchain. The following walks through an example of how to use filestorage on your sChain. > Filestorage capacity is dependent on each SKALE Chain. Different size chains and configurations result in different allocations to filestorage, which is a capped resource. Filestorage is ideal for storing static data (i.e one off sets of metadata or images) but not for data that may grow exponentially (i.e user uploads). ## Preparing Files [Section titled “Preparing Files”](#preparing-files) The following example will be showcasing how to store a static website in filestorage. ## Requirements [Section titled “Requirements”](#requirements) You will need: * An RPC Endpoint * A private key (with sFUEL) that has been provided with storage space * Files (see next section) ## 1. Prepare Files [Section titled “1. Prepare Files”](#1-prepare-files) Anything that builds into HTML, CSS, JS, and media files will work. If you haven’t already built a site, you can use the below: index.html ```html SKALE Filestorage Demo My first decentralized website!
SKALE Website ``` styles.css ```css body { background-color: #ccc; } ``` ### 2. Upload to your SKALE Chain [Section titled “2. Upload to your SKALE Chain”](#2-upload-to-your-skale-chain) Setup your project as follows: Run the following in your terminal: ```shell mkdir skale-fs-website \ && cd skale-fs-website \ && npm init -y \ && npm install @skalenetwork/filestorage.js dotenv \ && touch index.js .env \ && mkdir test-skale \ && cd test-skale ``` If you are using your own static site, copy the site into the folder called `test-skale`. If you are using the example above, run the following in your terminal: ```shell touch index.html styles.css ``` Once complete, copy the above files into their respective files. ### 3. Setup [Section titled “3. Setup”](#3-setup) Open the `index.js` file and copy in the following: index.js ```js #! /usr/bin/env node const Filestorage = require('@skalenetwork/filestorage.js'); const fs = require('fs'); const Web3 = require('web3'); const dotenv = require("dotenv"); dotenv.config(); // If not using the SDK, replace the endpoint below with your SKALE Chain endpoint let filestorage = new Filestorage('http://localhost:15000'); // If not using the SDK, replace with the SKALE Chain owner key and address. let privateKey = process.env.PRIVATE_KEY || ''; let address = process.env.ADDRESS || ''; let directoryPath = 'test-skale'; // Bytes of filestorage space to allocate to an address // reservedSpace must be >= sum of uploaded files const reservedSpace = 3 * 10 ** 8; const files = fs.readdirSync(directoryPath); async function upload() { // Owner must reserve space to an address await filestorage.reserveSpace(address, address, reservedSpace, privateKey); for(let i = 0; i < files.length; ++i) { let content; let contentPath; content = await fs.readFileSync(directoryPath + '/' + files[i]); contentPath = await filestorage.uploadFile(address, files[i], content, privateKey); } } upload(); ``` Open the `.env` file and copy in the following: ```text PRIVATE_KEY=YOUR_PRIVATE_KEY RPC_URL=RPC_URL_OF_SKALE_CHAIN ``` ### 4. Executing [Section titled “4. Executing”](#4-executing) When executing, this is done via the standard RPC\_URL endpoint of your sChain. This was added to your `.env` file above. To execute, run the following: ```shell node index.js ``` Upon executing, [Filestorage.js](https://github.com/skalenetwork/filestorage.js) is taking the files and turning them into EVM chunks which are then sent as transactions up to the SKALE Chain. ### 6. Access your website [Section titled “6. Access your website”](#6-access-your-website) The following is your endpoint: ```shell # Reverse Proxy Endpoint = mainnet.skalenodes.com # SKALE Chain Name = honorable-steel-rasalhague # Filestorage Full Path = uploader address + path + file name + file extension # Example: https://network.skalenodes.com/fs/chubby-sadr/77333da3492c4BBB9ccf3Ea5bb63d6202f86cda8/index.html http(s)://REVERSE_PROXY_ENDPOINT/fs/SKALE_CHAIN_NAME/[FILESTORAGE_FULL_PATH] ``` If connecting directly to a single node on the sChain, the following is your endpoint: ```shell # Node Domain Name = validator.com # SKALE Chain Name = elated-tan-skat # Filestorage Full Path = uploader address + path + file name + file extension # Example: https://node1.validator.com/fluffy-marsupial/77333da3492c4BBB9ccf3Ea5bb63d6202f86cda8/index.html http(s)://NODE_DOMAIN_NAME/SKALE_CHAIN_NAME/FILESTORAGE_FULL_PATH ``` Checkout [Filestorage.js](/building-applications/libraries/filestorage-js) for a deeper dive into the available functions.
# Faucet
> Gas Fees on SKALE
# Block Rotation
> How SKALE optimizes storage using block rotation for consensus and full-sync nodes.
Block rotation on a SKALE Chain limits the disk space used by consensus and full-sync nodes by pruning old blocks, ensuring efficient storage and performance. ## Storage Allocation [Section titled “Storage Allocation”](#storage-allocation) Each SKALE Chain reserves **12.6 GB** of storage for core blockchain data on consensus and full-sync nodes. This includes: * `blocks` * `transactions` and their receipts * `log blooms` (for efficient event filtering) * `"best"` — latest block info (`lastBlockHash`) * `"chainStart"` — earliest available block (`firstBlockHash`, useful after importing snapshots) ## How Block Rotation Works [Section titled “How Block Rotation Works”](#how-block-rotation-works) To stay within the 12.6 GB limit, SKALE Chains maintain a dynamic range of block data: * Only the **most recent 80–100%** of data is retained. * The **oldest 20%** is pruned as new blocks are added. * The rotation is based on **data size**, not block count. ### Example [Section titled “Example”](#example) If block storage nears the 12.6 GB cap: * The chain deletes the oldest blocks until usage returns to \~80% of the cap. * Only recent blocks remain accessible on consensus and full-sync nodes. This sliding-window model ensures that the chain operates efficiently without growing indefinitely in size. ## Benefits [Section titled “Benefits”](#benefits) * **Efficient resource use** — prevents storage bloat. * **High performance** — reduces read/write overhead. * **Scalability** — supports many lightweight SKALE Chains running in parallel. ## Full Historical Access [Section titled “Full Historical Access”](#full-historical-access) If your app or service requires the entire blockchain history (e.g. for analytics, block explorers, or archival indexing), use a **SKALE Archive Node**, which: * Stores all past blocks * Maintains full transaction and log history * Is not affected by block rotation *** Want to run a SKALE Archive Node or build on top of historical data? Reach out on [SKALE’s Discord](https://discord.gg/skale) or explore the [developer docs](https://docs.skale.network/). ## API Changes [Section titled “API Changes”](#api-changes) | Calls | Changes | | ----------------------------------------- | ------------------------------------------------ | | eth\_getBlockByNumber/eth\_getBlockByHash | may return null | | eth\_getBlockTransactionCountByNumber | may return null | | eth\_getBlockTransactionCountByHash | may return null | | eth\_getUncleCountByBlockNumber | may return null | | eth\_getUncleCountByBlockHash | may return null | | eth\_getTransactionByBlockHashAndIndex | may return null | | eth\_getTransactionByBlockNumberAndIndex | may return null | | eth\_getUncleByBlockHashAndIndex | may return null | | eth\_getUncleByBlockNumberAndIndex | may return null | | eth\_getTransactionByHash | may return null | | eth\_getTransactionReceipt | may return null | | eth\_getFilterLogs | will treat removed blocks as if they have 0 logs | | eth\_getLogs | will treat removed blocks as if they have 0 logs |
# Consensus
> SKALE Mainnet Beta
## Protocol Overview [Section titled “Protocol Overview”](#protocol-overview) A SKALE chain is a Proof-of-Stake blockchain fully compatible with ETH mainnet. It can run ETH wallets, tools and dapps. As any Ethereum-compatible chain, SKALE chain includes `blockchain`, which is a chain of `transactions` ordered into `committed blocks`, and a computing machine denoted as `EVM`. The set of variables stored in `EVM` is denoted as `EVM state`. ``` flowchart LR b0[Tx1processed]---b1[Tx2 processed]---b2[Tx3 processed]---|EVM Processing|b3[Tx3 unprocessed] ``` EVM processes `committed blocks` one `transaction` at a time. For each `transaction` it runs instructions (`bytecode`) specified by the `transaction` and changes `EVM state`. ### Architecture overview [Section titled “Architecture overview”](#architecture-overview) The purpose of SKALE chain is to order `transactions` into `blocks` and then process them by `EVM`. SKALE chain is composed of a fixed set of `N` network `nodes` that process user `transactions` in the following phases * accept and validate user `transactions` (*submission phase*) * broadcast `transactions` to peer nodes (*broadcast phase*) * store `transactions` into `pending queues` (*pending queue phase*) * create `block proposal` for each `block number` and broadcast it to peers, collecting `2/3 N` `data availability signatures` and creating `DA proofs`. (*block proposal phase*) * broadcast `DA proofs` to peers (*DA broadcast phase*) * run `block consensus` for each `block proposal` to select a `winning proposal` (*block consensus phase*) * sign the statement on which proposal won (`block signature share`) and broadcast it to other nodes. Wait until receipt of 2/3 of `block signature shares` and merge them into `block signature`. (*block signature phase*) * commit the `winning proposal` if `node` has it, otherwise download it from other nodes and commit it. The `winning proposal` becomes a`committed block` (*block finalization phase*) * process the `committed block` through `Ethereum Virtual Machine` to transition to the new `EVM state`. (*EVM processing phase*) * store `committed blocks` and `EVM state`(*storage phase*) The diagram below illustrates typical transaction flow: ``` flowchart TD b0[Transaction submission] --> b1[Transaction broadcast] --> b2[Pending Queue] --> b3[Block Proposal] --> b31[DA Broadcast] --> b32[Block Consensus] --> b33[Block Signature] --> b34[Block Finalization] --> b4[Block Commit] --> b5[EVM Processing] --> b9[Storage phase] b6[Block Catchup] -->b4 ``` Note that in addition to normal block processing, a node can receive blocks through `block catchup` mechanism. `Block catchup` means that the `node` does not participate in `block consensus`. Instead, it simply downloads `committed blocks` from other `nodes`, verifying `block signatures`. `block catchup` typically happens when a node is powered on after being offline. `Block catchup` can also be used by `third-party nodes` that do not participate in `core chain`, such a `archive nodes`. `block consensus` and `block catchup` run in parallel. This means that every node in addition in normal `block consensus` procedure makes periodic random connections to other nodes, to attempt to download ready committed blocks. The blockchain provides a *guarantee that every transaction is included into the chain only once*. This means, in particular, that when a `node` commits a block, the `node` will remove the `transactions` included in the `block` from the `pending transaction queue`. ### SKALE node overview [Section titled “SKALE node overview”](#skale-node-overview) Each `node` runs `skaled`, SKALE software blockchain agent. `skaled` is composed of: * `Network API module` accepts `transactions` and user requests. * `Transaction validation module` validates `transactions` on receipt. * `Pending queue module` holds `transactions`. * `Transaction broadcast module` broadcasts `valid transactions` to other `nodes` in the chain * `Proposal module` creates `block proposals` for consensus * `Proposal broadcast module` broadcasts `block proposals` to peers and collects `DA proofs` * `DA proof broadcast module` broadcasts `DA proofs` to peers * `Consensus module` selects the winning `block proposal` and turns it into a `committed block`, and then creates `block signature` by assembling `signature shares`. * `Finalization module` downloads winning proposals from other `nodes`, if a node does not have a copy of winning proposal by completion `block consensus`. * `EVM module` processes the `committed block` * `Block storage module` stores `committed blocks`, deleting old blocks if `skaled` runs out of block storage space (`block rotation`) * `State storage module` stores EVM state. State information is *never deleted automatically*. Cleaning up the state is the responsibility of dapps ``` flowchart TD b1[Network API Module] -->|Txs| b2[Tx validation module] -->|Validated Txs| b3[Pending queue module] -->|Block Proposals| b5[Proposal Module] --> |DA Proofs| b6[DA proof broadcast module] --> |Proposals and DA proofs| b7[Consensus module] -->|consensus on winning proposal| b12[Finalization module] -->|committed block| b8[EVM module] b2 -->|Validated Txs| b11[Tx Broadcast Module] b8 -->|Committed Blocks| b9[Block Storage Module] b8 -->|EVM State| b10[Evm Storage module] ``` ### Security assumptions overview [Section titled “Security assumptions overview”](#security-assumptions-overview) SKALE is *provably secure*. This means one can prove two qualities of the blockchain * *consistency* - for any `block number`, `committed blocks` and `EVM state` are identical on each `node`. Note that due to network delays, some `nodes` may at a given moment have less `committed blocks` than others. Therefore, `the consistency is eventual`. * *liveliness* - the blockchain will always keep producing new `committed blocks`. Provable security means that *under certain mathematical assumptions*, SKALE chain *will always be consistent and lively, no matter what the attacker does*. The mathematical assumptions for provable security are specified below. #### Node security assumptions [Section titled “Node security assumptions”](#node-security-assumptions) We assume that out of `N` `nodes`, `t` `nodes` at maximum are Byzantine (malicious), where Simply speaking, not more than 1/3 of nodes can be malicious. For instance, if `N = 16`, the maximum number of malicious `nodes` is `5`. The identity of malicious nodes is not known. A malicious node will typically pretend being an honest node. A malicious node will attempt to break the consistency and liveliness of the network by sending malicious messages, or not sending any messages when it supposed to send a message by a protocol. It is assumed that `malicious nodes` do not control network routers and links. This means, in particular, that `malicious nodes` can not affect `messages` sent between `honest nodes`, such as corrupting or reordering them #### Network security assumptions [Section titled “Network security assumptions”](#network-security-assumptions) The algorithms used by SKALE make assumptions about *the properties of the underlying network*. SKALE assumes that *the network is asynchronous and reliable with eventual delivery guarantee*. This means that: * `nodes` are assumed to be connected by a *reliable communications links*. * Links can can be arbitrarily slow, but will eventually deliver `messages`. The asynchronous model described above is *similar to the model assumed by Bitcoin and Ethereum blockchains*. It reflects *the state of modern Internet*, where temporary network splits and interruptions are normal, but always resolve eventually. Since real Internet sometimes drops messages on the way without delivering them, *the eventual delivery guarantee is achieved in practice by retransmissions*. The `sending node` will make *multiple attempts to transfer* `message` to the `receiving node`, until the transfer is successful and is confirmed by the `receiving node`. ### Protocol phases overview [Section titled “Protocol phases overview”](#protocol-phases-overview) #### Submission phase [Section titled “Submission phase”](#submission-phase) During submission phase a `user client` (browser or mobile app) signs a `transaction` using user `private wallet key` and submits it either directly to one of `core nodes` or to a `network proxy`. A `network proxy` is a node that load balances incoming transactions to `core nodes` attempting to load them evenly, and avoiding transaction submissions to non-responsive nodes. #### Broadcast phase [Section titled “Broadcast phase”](#broadcast-phase) During the broadcast phase, a `node` that received a `transaction` from `user client` will broadcast it to other `core nodes`. #### Pending queue phase [Section titled “Pending queue phase”](#pending-queue-phase) During the pending queue phase, a `transaction` received from `user client` or from `transaction broadcast` is validated and placed into the`pending queue`. During the validation, `transaction signature` and format are verified. Note that `pending queue` has fixed memory capacity. If the `pending queue` is full, adding a new `transaction` to the `queue` will cause some `transactions` to be dropped from the `pending queue`. Ethereum-compatible blockchains, including SKALE, drop transactions with the smallest `gas price`. #### Block proposal phase [Section titled “Block proposal phase”](#block-proposal-phase) During the block proposal phase each SKALE node will form a `block proposal`. A `block proposal` is an ordered list of `transactions`. If all `transactions` in `pending queue` can be placed into proposal without reaching `block gas limit`, then all `transactions` will be placed into `block proposal`. Otherwise, `transactions` with higher gas price will be selected from the queue to create a `block proposal` that fits the `block gas limit`. Once a `node` created a proposal, it will broadcast `compressed proposal` to all its nodes. The compressed proposal includes only the `transaction hash` (fingerprint) of each transaction. The `receiving node` decompresses `transactions` by matching `transaction hashes` to `transactions` stored in is pending queue. In the event `receiving node` does not have a matching `transaction` in its pending queue, it will ask the `sending node` for the entire `transaction`. Once the `receiving node` receives the `block proposal`, it will sign a `Data Availability Signature` and pass it to the `sending node`. Once the `sending node` collects `DA signatures` from `2/3` of nodes, it will merge the signatures into a `DA proof`. The `DA proof` proves that the proposal has been widely distributed over the network. #### DA broadcast phase [Section titled “DA broadcast phase”](#da-broadcast-phase) Once a `node` obtains a `DA proof` for its `block proposal`, it will broadcast `DA proof` to other nodes. Note that `DA proof` requirement solves two problems: First, a `block proposal` that has a `DA proof` is *guaranteed to be widely distributed*. Second, since `DA proof` creation requires a 2/3 signature of nodes, the proposal is *guaranteed to be unique*. A malicious proposal is not able to create two different proposals an obtain DA proofs for both of them. #### Block consensus phase [Section titled “Block consensus phase”](#block-consensus-phase) Once a node receives `DA proofs` from 2/3 of nodes, the node will start the block consensus phase. During block consensus phase, the `node` will vote `1` if it received `DA proof` for a particular proposal, and vote `0` otherwise. The nodes will then executed asynchronous binary consensus algorithm, also known as `Byzantine Generals problem`. The particular binary consensus algorithm implemented in SKALE is specified in Once the binary consensus completed, it guarantees that all honest node will reach consensus of `1` or `0'. If honest nodes reach `1`it is guaranteed that`1`was initially voted by at least`1’ honest nodes. That, in turn, guarantees that the `block proposal` is `DA safe`, or that it is widely distributed over the network. If a `block consensus` phase outputs `1` for several proposals, the proposal with highest priority is selected. The priority changes from one block to another so that on average each node has similar probability to win. #### Block signature phase [Section titled “Block signature phase”](#block--signature-phase) After `block consensus` decides on the winning block, each node will sign the statement specifying the winning proposal (`block signature share`) and broadcast it to other nodes. The node will then wait until receipt of 2/3 of `block signature shares` and merge the shares into `block signature`. #### Block finalization phase. [Section titled “Block finalization phase.”](#block--finalization-phase) On completion of *block signature phase*, all honest nodes will have the `block signature` but some of them may not have the block itself. This can happen due to a malicious proposer, that intentionally does not send its proposals to some of the all nodes in order to break the liveliness property of the blockchain. It can also happen due to proposer crashing, or due to slow network. Fortunately, `DA proof` requirement solves the problem. It is guaranteed, that `block proposal` that wins *block consensus phase* has `DA proof`, and is, therefore, widely distributed across the network. Therefore, during *block finalization\_phase* If a `node` does not happen to have the `winning proposal`, it will simply connect to other `nodes` to download it from them. Note that 2/3 of the nodes are guaranteed to have a copy of the proposal after *DA proof phase* #### EVM processing phase [Section titled “EVM processing phase”](#evm-processing-phase) After block finalization the block is present on the node. It will be then processed through Ethereum Virtual Machine to update `EVM state`. #### Storage phase [Section titled “Storage phase”](#storage-phase) `Committed block` will now be stored in persistent storage, and `EVM state` will be updated in persistent storage. The node will move into *block proposal phase* for the next block. ### Achieving eventual delivery by retransmissions [Section titled “Achieving eventual delivery by retransmissions”](#achieving-eventual-delivery-by-retransmissions) Since real Internet sometimes drops messages on the way without delivering them, *the eventual delivery guarantee is achieved in practice by retransmissions*. The `sending node` will make *multiple attempts to transfer* `message` to the `receiving node`, until the transfer is successful and is confirmed by the `receiving node`. Each `sending node` maintains a separate `outgoing message queue` for each `receiving node`. To schedule a `message` for delivery to a particular node, `message` is placed into the corresponding `outgoing message queue`. Each `outgoing message queue` is serviced by a separate program `thread`. The `thread` reads `messages` from the `queue` and attempts to transfer them to the `destination node`. If the `destination node` temporarily does not accept `messages`, the `thread` will keep initiating transfer attempts until the `message` is delivered. The `destination node` can, therefore, temporarily go offline without causing `messages` to be lost. Since there is a dedicated `message sending thread` for each `destination node`, `messages` are sent independently. Failure of a particular `destination node` to accept `messages` will not affect receipt of `messages` by other `nodes`. In the remainder of this document, anywhere where it is specified that a `message` is sent from `node` `A` to `B`, we mean reliable independent delivery as described above. ### Consensus state [Section titled “Consensus state”](#consensus-state) Each node stores *consensus state*. For each round of consensus, consensus state includes the set of proposed blocks, as well as the state variables of the protocols used by the consensus round. The state is stored in non-volatile memory and preserved across reboots. ### Reboots and crashes [Section titled “Reboots and crashes”](#reboots-and-crashes) During `_A_`, a node will temporarily become unavailable. After a reboot, messages destined to the node will be delivered to the node. Therefore, a reboot does not disrupt operation of asynchronous consensus. Since consensus protocol state is not lost during a reboot, a node reboot will be interpreted by its peers as a temporarily slowdown of network links connected to the node. A is an event, where a node loses all of parts of the consensus state. For instance, a node can lose received block proposals or values of protocol variables. A hard crash can happen in case of a software bug or a hardware failure. It also can happen if a node stays offline for a very long time. In this case, the outgoing message queues of nodes sending messages to this node will overflow, and the nodes will start dropping older messages. This will lead to a loss of a protocol state. ### Default queue lifetime [Section titled “Default queue lifetime”](#default-queue-lifetime) This specification specifies one hour as a default lifetime of a message which has been placed into an outgoing queue. Messages older than one hour may be dropped from the message queues. A reboot, which took less than an hour is, therefore, guaranteed to be a a normal reboot. ### Limited hard crashes [Section titled “Limited hard crashes”](#limited-hard-crashes) Hard crashes are permitted by the consensus protocol, as long as not too many nodes crash at the same time. Since a crashed node does not conform to the consensus protocol, it counts as a Byzantine node for the consensus round, in which the state was lost. Therefore, only a limited number of concurrent hard crashes can exist at a given moment in time. The sum of crashed nodes and byzantine nodes can not be more than `t` in the equation (1). Then the crash is qualified as a limited hard crash. During a limited hard crash, other nodes continue block generation and consensus. The blockchain continues to grow. When a crashed node is back online, it will sync its blockchain with other nodes using a catchup procedure described in this document, and start participating in consensus. ### Widespread crashes [Section titled “Widespread crashes”](#widespread-crashes) A widespread crash is a crash where the sum of crashed nodes and Byzantine nodes is more than $t$. During a *widespread crash* a large proportion of nodes or all nodes may lose the state for a particular round and consensus progress may stall. The blockchain, therefore, may lose its liveliness. Security of the blockchain will be preserved, since adding a new block to blockchain requires a supermajority threshold signature of nodes, as described later in this document. The simplest example of a widespread crash is when more than 1/3 of nodes are powered off. In this case, consensus will stall. When the nodes are back online, consensus will start working again. In real life, a widespread crash can happen due to to a software bug affecting a large proportion of nodes. As an example, after a software update all nodes in an schain may experience the same bug. ### Failure resolution protocol [Section titled “Failure resolution protocol”](#failure-resolution-protocol) In a case of a catastrophic failure a separate failure resolution protocol is used to restart consensus. First, nodes will detect a catastrophic failure by detecting absence of new block commits for a long time. Second, nodes will execute a failure recovery protocol that utilizes Ethereum main chain for coordination. Each node will stop consensus operation. The nodes will then sync their blockchains replicas, and agree on time to restart consensus. Finally, after a period of mandatory silence, nodes will start consensus at an agreed time point in the future. ### Blockchain architecture [Section titled “Blockchain architecture”](#blockchain-architecture) Each node stores a sequence of blocks. Blocks are constructed from transactions submitted by users. The following properties are guaranteed: * `_block sequence_` - each node stores a block sequence `*B~i~*` that have positive block IDs ranging from 0 to `HEAD` * `_genesis block_` - every node has the same genesis block that has zero block id. * `_liveliness_` - the blockchain on each node will continuously grow by appending newly committed blocks. If users do not submit transactions to the blockchain, empty blocks will be periodically committed. Periodic generation of empty blocks serves as a beacon to monitor liveliness of the blockchain. * `_fork-free consistency_` - due to network propagation delays, blockchain lengths on two nodes `*A*` and `*B*` may be different. For a given block id, if both node `*A*` and node `*B*` possess a copy of a block, the two copies are guaranteed to be identical. ### Honest and Byzantine Nodes [Section titled “Honest and Byzantine Nodes”](#honest-and-byzantine-nodes) An honest node is a node that behaves according to the rules described in this document. A Byzantine node can behave in arbitrary way, including doing nothing at all. The goal of a Byzantine node is to either violate the liveliness property of the protocol by preventing the blockchain from committing new blocks or violate the consistency property of the protocol by making two different nodes commit two different blocks having the same block ID. It is assumed that out of `*N*` total nodes, $t$ nodes are Byzantine, where less the following condition is satisfied. or The above condition is well known in the consensus theory. There is a proof that shows that secure asynchronous consensus is impossible for larger values of $t$. It is easy to show that if a security proof works for a certain number of Byzantine nodes, it will work for a fewer Byzantine nodes. Indeed, an honest node can always be viewed as a Byzantine node that decided to behave honestly. Therefore, in proofs, we always assume that the system has the maximum allowed number of Byzantine nodes In this case the number of honest nodes is Note, that it is beneficial to select `*N*` in such a way that is divisible by `3`. Otherwise an increase in `*N*` does not lead to an increase in the maximum allowed number of Byzantine nodes. As an example, for we get too so an increase in `*N*` does not improve Byzantine tolerance. In this specification, we assume that the `*N*` is always selected in such a way that is divisible by 3. In this case, expressions simplify as follows ### Mathematical properties of node voting [Section titled “Mathematical properties of node voting”](#mathematical-properties-of-node-voting) Consensus uses voting rounds. It is, therefore, important to proof some basic mathematical properties of voting. Typically, a node will vote by signing a value and transmitting it to other nodes. To count votes, a receiving node will count received signatures for a particular value `v`. The number of Byzantine nodes is less than a simple majority of honest nodes. This directly follows from the fact that and, therefore, a simple majority of honest nodes is We define *supermajority* as a vote of at least nodes. *A vote of all honest nodes is a supermajority*. Proof: this comes from the fact that If a particular message was signed by a supermajority vote, at least a simple majority of honest nodes signed this message Even if all Byzantine nodes participate in a supermajority vote, the number of honest votes it needs to receive is which is exactly the simple majority of honest nodes `*s*`. If honest nodes are required to never sign conflicting messages, two conflicting messages can not be signed by a supermajority vote. Proof: lets `*A*` and `*B*` be two conflicting messages. Since a particular honest node will sign either `*A*` or `*B*`, both `*A*` and `*B*` can not get simple majority of honest nodes. Since a supermajority vote requires participation of a simple majority of honest nodes, both `*A*` and `*B*` can not reach a supermajority, even if Byzantine nodes vote for both. A supermajority vote, is, therefore, an important conflict avoidance mechanism. If a message is signed by a supermajority vote, it is guaranteed that no conflicting messages exist. As an example, if a block is signed by a supermajority vote, it is guaranteed that no other block with the same block ID exists. ### Threshold signatures [Section titled “Threshold signatures”](#threshold-signatures) Our protocol uses threshold signatures for supermajority voting. Each node is supposed to be in possession of BLS private key share `*PKS~I~*`. Initial generation of key shares is performed using joint-Feldman Distributed Key Generation (DKG) algorithm that is described in this document. DKG algorithm is executed when an schain is created. Nodes are able to collectively issue supermajority threshold signatures on messages, where the threshold value is equal to the supermajority vote . For instance for `N = 16`, the threshold value is `11`. BLS threshold signatures are implemented as described in the paper of by Boldyreva. BLS threshold signatures require a choice of elliptic curve and group pairing. We use elliptic curve (altBN256) and group pairing (optimal-Ate) implemented in Ethereum Constantinople release. To verify the signature, one uses BLS public key `PK`. This key is computed during the initial DKG algorithm execution. The key is stored in SKALE manager contract on Ethereum mainnet and is available to anyone. ### Transactions [Section titled “Transactions”](#transactions) Each user transaction `T` is assumed to be an Ethereum-compatible transaction, represented as a sequence of bytes. ### Block format: header and body [Section titled “Block format: header and body”](#block-format-header-and-body) Each block is a byte string, which includes a header followed by a body. ### Block format: header [Section titled “Block format: header”](#block-format-header) Block header is a JSON object that includes the following: * `*BLOCK~ID~*` - integer id of the current block, starting from 0 and incremented by 1 * `*BLOCK PROPOSER*` - integer id of the node that proposed the block. * `*PREVIOUS BLOCK HASH*` - SHA-3 hash of the previous block * `*CURRENT BLOCK HASH*` - the hash of the current block * `*TRANSACTION COUNT*` - count of transactions in the current block * `*TRANSACTION SIZES*` - an array of transaction sizes in the current block * `*CURRENT BLOCK PROPOSER SIG*` - ECDSA signature of the proposer of the current block * `*CURRENT BLOCK T~SIG~*` - BLS supermajority threshold signature of the current block Note: All integers in this spec are unsigned 64-bit integers unless specified otherwise. ### Block format: body [Section titled “Block format: body”](#block-format-body) `BLOCK BODY` is a concatenated transactions array of all transactions in the block. ### Block format: hash [Section titled “Block format: hash”](#block-format-hash) Block hash is calculated by taking 256-bit Keccak hash of block header concatenated with block body, while omitting `CURRENT BLOCK HASH`, `CURRENT BLOCK SIG`, and `CURRENT BLOCK TSIG` from the header. The reason why these fields are omitted is because they are not known at the time block is hashed and signed. Note: Throughout this spec we use SHA-3 as a secure hash algorithm. ### Block verification [Section titled “Block verification”](#block-verification) A node or a third party can verify the block by verifying a threshold signature on it and also verifying the previous block hash stored in the block. Since the threshold signature is a supermajority threshold signature and since any honest node will only sign a single block at a particular block ID, no two blocks with the same block ID can get a threshold signature. This provides security against forks. ### Block proposal format [Section titled “Block proposal format”](#block-proposal-format) A block starts as a block proposal. A block proposal has the same structure as a block, but has the threshold signature element unset. Node concurrently make proposals for a given block ID. A node can only make one block proposal for a given block ID. Once a block proposal is selected to become a block by consensus, it is signed by a supermajority of nodes. A signed proposal is then committed to the end of the chain on each node. ### Pending transactions queue [Section titled “Pending transactions queue”](#pending-transactions-queue) Each node will keep a pending transactions queue. The first node that receives a transaction will attempt to propagate it to all other nodes in the queue. A user client software may also directly submit the transaction to all nodes. When a node commits a block to its blockchain, if will remove the matching transactions from the transaction queue. ### Gas fees [Section titled “Gas fees”](#gas-fees) Each transaction requires payment of a gas fee, compatible with ETH gas fee. The gas fee can be paid in native currency of the SKALE chain (sFUEL) or in Proof of Work. The gas price is adjusted after each committed block. It is decreased if the block has been underloaded, meaning that the number of transactions in the block is less than 70 percent of the maximum number of transactions per block, and is increased if the block has been overloaded. ### Compressed block proposal communication [Section titled “Compressed block proposal communication”](#compressed-block-proposal-communication) Typically pending queues of all nodes will have similar sets of messages, with small differences due to network propagation times. When node `*A*` needs to send to node `*B*` a block proposal `*P*`, `*A*` does need the send the actual transactions that compose `*P*`. `*A*` only needs to send transaction hashes, and then `*B*` will reconstruct the proposal from hashes by matching hashes to messages in its pending queue. In particular, for each transaction hash in the block proposal, the receiving node will match the hash to a transaction in its pending queue. Then, for transactions not found in the pending queue, the receiving node will send a request to the sending node. The sending node will then send the bodies of these transactions to the receiving node. After that the receiving node will then reconstruct the block proposal. ## Consensus data structures and operation [Section titled “Consensus data structures and operation”](#consensus-data-structures-and-operation) ### Blockchain [Section titled “Blockchain”](#blockchain) For a particular node, the blockchain consists of a range of committed blocks `*B~i~*` starting from `*B~0~*` end ending with `*B~TIPID~*`, where `*TIP~ID~*` is the ID of the largest known committed block. Block ids are sequential positive integers. Blocks are stored in non-volatile storage. ### Consensus rounds [Section titled “Consensus rounds”](#consensus-rounds) New blocks a created by running consensus rounds. Each round corresponds to a particular `*BLOCK~ID~*`. At the beginning of a consensus round, each node makes a block proposal. When a consensus round completes for a particular block, one of block proposals wins and is signed using a supermajority signature, becoming a committed block. Due to a randomized nature of consensus, the is a small probability that consensus will agree on an empty block instead of agreeing on any of the proposed blocks. In this case, an empty block is pre-committed to a blockchain. ### Catchup agent [Section titled “Catchup agent”](#catchup-agent) There are two ways, in which blockchain on a particular node grows and `*TIP~ID~*` is incremented: Normal consensus operation: during normal consensus, a node constantly participates in consensus rounds, making block proposals and then committing the block after the consensus round commits. Catchup: a separate catchup agent is continuously running on a node. The catchup engine is continuously making random sync connections to other nodes. During a sync both nodes sync their blockchains and block proposal databases. If during catchup, node `*A*` discovers that node `*B*` has a larger value of `*TIP~ID~*`, `*A*` will download the missing blocks range from `*B*`, and commit it to its chain after verifying supermajority threshold signatures on the received blocks. Note that both normal and catchup operation append blocks to the blockchain. The catchup procedure intended to catchup after hard crashes. When the node comes online from a hard crash, it will immediately start participating in the consensus for new blocks by accepting block proposals and voting according to consensus mechanism, but without issuing its own block proposals. Since a block proposal requires hash of the previous block, a node will only issue its own block proposal for a particular block id once it a catch up procedure moves the `*TIP~ID~*` to a given block id. Liveliness property is guaranteed under hard crashes if the following is true: normal consensus guarantees liveliness properly, catch-up algorithm guarantees eventual catchup, and if the number of nodes in a hard crashed state at a given time plus the number of Byzantine nodes is less or equal `*N ⅓*`. Since the normal consensus algorithm is resilient to having Byzantine nodes, normal consensus will still proceed if we count crashed nodes as Byzantine nodes and guarantee that the total number of Byzantine nodes is less than . When a node that crashed joins the system back, it will immediately start participating in the new consensus rounds. For the consensus rounds that it missed, it will use the catchup procedure to download blocks from other nodes. ## Normal consensus operation [Section titled “Normal consensus operation”](#normal-consensus-operation) ### Block proposal creation trigger [Section titled “Block proposal creation trigger”](#block-proposal-creation-trigger) A node is required to create a block proposal directly after its `*TIP~ID~*` moves to a new value. `*TIP~ID~*` will be incremented by $1$ once a previous consensus round completes. `*TIP~ID~*` will also move, if the catchup agent appends blocks to the blockchain. ### Block proposal creation algorithm [Section titled “Block proposal creation algorithm”](#block-proposal-creation-algorithm) To create a block a node will: 1. examine its pending queue, 2. if the total size of of transactions in the pending queue `TOTAL SIZE` is less or equal than `MAX BLOCK SIZE`, fill in a block proposal by taking all transactions from the queue, 3. otherwise, fill in a block proposal by of `MAX BLOCK SIZE` by taking transactions from oldest received to newest received, 4. assemble transactions into a block proposal, ordering transactions by sha-3 hash from smallest value to largest value, 5. in case the pending queue is empty, the node will wait for `BEACON TIME` and then, if the queue is still empty, make an empty block proposal containing no transactions. Note that the node does not remove transactions from the pending queue at the time of proposal. The reason for this is that at the proposal time there is no guarantee that the proposal will be accepted. `MAX BLOCK SIZE` is the maximum size of the block body in bytes. Currently we use `MAX BLOCK SIZE = 8 MB`. FUTURE: We may consider self-adjusting block size to target a particular average block commit time, such as `1s`. `BEACON TIME` is time between empty block creation. If no-one is submitting transactions to the blockchain, empty beacon blocks will be created. Beacon blocks are used to detect normal operation of the blockchain. The current value of `BEACON TIME` is `3s`. ### Block proposal reliable communication algorithm [Section titled “Block proposal reliable communication algorithm”](#block-proposal-reliable-communication-algorithm) Once a node creates a block proposal it will communicate it to other nodes using the data data availability protocol described below. The data availability protocol guarantees that if the the protocol completes successfully, the message is transferred to the supermajority of nodes. The five-step protocol is described below: 1. Step 1: the sending node `*A*` sends the proposal `*P*` to all of its peers 2. Step 2: each peer on receipt of `*P*` adds the proposal to its proposal storage database `PD` 3. Step 3: the peer than sends a receipt to back to `*S*` that contains a threshold signature share for `*P*` 4. Step 4: `*A*` will wait until it collects signature shares from a `supermajority` of nodes (including itself) `*A*` will then create a supermajority signature `*S*`. This signature serves as a receipt that a supermajority of nodes are in possession of `*P*` 5. Step 5: `*A*` will send the supermajority signature to each of the nodes. *Data Availability Receipt Requirement* In further consensus steps, any node voting for proposal `*P*` is required to include `*S*` in the vote. Honest nodes will ignore all votes that do not include the supermajority signature `*S*`. The protocol used above guarantees data availability, meaning that any proposal `*P*` that wins consensus will be available to any honest nodes. This is proven in steps below. Liveliness. If `*A*` is honest, than the five-step protocol above will always complete. By completion of the protocol we mean that all honest nodes will receive `*S*`. Byzantine nodes will not be able to stall the protocol. By properties of the send operation discussed in Section 1.2 all sends in Step 1-3 are performed in parallel. In step 4 node `*A*` waits to receive signature shares for the supermajority of nodes. This step will always take fine time, even if Byzantine nodes do not reply. This comes from the fact that there is a supermajority of honest nodes. In step 5 `*S*` will be added to outgoing message queues of all nodes. Since honest nodes do accept messages, `*S*` will ultimately be delivered to all honest nodes as described in Section 1.2. If a proposal has a supermajority signature, it is was communicated to and stored on the simple majority of honest nodes. The proof directly follows from Lemma 3, and from the fact that an honest node `*B*` only signs the proposal after `*B*` has received and stored the proposal. If a proposal wins consensus and is to be committed to the blockchain, then any honest node `*X*` that does not have the proposal can efficiently retrieve it. First, a proposal will not pass consensus without having a supermajority signature. This comes from the fact that all nodes voting for the proposal will need to include `*S*` in the vote. By the properties of binary Byzantine agreement protocol of Mostéfaoui at al., a proposal can win consensus only if at least one honest node votes for the proposal. A proposal without a signature will never win consensus, since an honest node will never vote for it. Therefore, if a proposal won consensus, it is guaranteed to have a supermajority signature. Second by previous lemma, if a proposal has a supermajority signature, any honest node can retrieve it. This completes the proof. The protocol discussed above is important because it guarantees that if a proposal wins consensus, all honest nodes can get this proposal from other honest nodes and add it to the blockchain. ### Pluggable Binary Byzantine Agreement [Section titled “Pluggable Binary Byzantine Agreement”](#pluggable-binary-byzantine-agreement) The consensus described above uses an Asynchronous Binary Byzantine Agreement (ABBA) protocol (ABBA). We currently use ABBA from Mostéfaoui et. all. Any other ABBA protocol `*P*` can be used, as long as it has the following properties * Network model: `*P*` assumes asynchronous network messaging model described in Section 1.2 * Byzantine nodes: `*P*` assumes less than one third of Byzantine nodes, as described by Equation (1). * Initial vote: `*P*` assumes, that each node makes an initial vote `yes(1)` or `no(0)`. * Consensus vote: `*P*` terminates with a consensus vote of either `yes` or `no`, where if the consensus vote is `yes`, its is guaranteed that at least one honest node voted yes. Note that, an ABBA protocol typically outputs a random number `*_COMMON COIN_*` as a byproduct of its operation. We use this `*_COMMON COIN_*` as a random number source. ### Consensus round [Section titled “Consensus round”](#consensus-round) A consensus round `*R*` is executed for each `*BLOCK~ID~*` and has the following properties: * For each `*R*` nodes will execute `*N*` instances of ABBA. * Each `*ABBA~i~*` corresponds to a vote on block proposal from the node `*i*` * Each `*ABBA~i~*` completes with a consensus vote of `yes` or `no` * Once all `*ABBA~i~*` complete, there is a vote vector `*v~i~*`, which includes `yes` or `no` for each proposal. * If there is only one `yes` vote, the corresponding block proposal `*P*` is committed to the blockchain * If there are multiple `yes` votes, `*P*` is pseudo-randomly picked from the `yes`-voted proposals using pseudo-random number `*R*`. The winning proposal index the remainder of division of `*R*` by $n\_~~win~~$, where $n\_~~win~~$ is the total number of `yes` proposals. * The random number `*R*` is the sum of all ABBA `*_COMMON COIN_*`. * In the rare case when all votes are `no`, an empty block is committed to the blockchain. The probability of an all-no vote is very small and decreases when `*N*` increases. This is analyzed in detail in the following sections. Liveliness: each consensus round `*R*` will always produce a block in a finite time. The proof follows from the fact that each `*R*` runs `*N*` parallel versions of `*ABBA*` binary consensus, and from the liveliness property of the `*ABBA*` consensus Consistency: each consensus round will produce the same result `*P*` on all nodes This follows from the consistency property of the ABBA consensus and from the fact that the consensus round algorithm is deterministic and does not depend on the node where it is executed. Data Availability: the winning proposal `*P*` is available to any honest node. This follows from the fact, that ABBA will not return consensus `yes` vote unless at least one honest node initially votes `yes`, and from the fact that an honest node will not vote `yes` unless it has a data availability proof (threshold signature `*S*`). ## Consensus round vote trigger [Section titled “Consensus round vote trigger”](#consensus-round-vote-trigger) Each node `*A*` will vote for ABBAs in a consensus round `*R*` immediately after proposal phase completes, meaning that two processes complete: 1. `*A*` receives a supermajority of block proposals for this round, including data availability signatures 2. `*A*` transmits its block proposal to a supermajority of nodes Liveliness: the block proposal phase will complete in finite time, and the node will proceed with voting Indeed, since a supermajority of nodes are honest, and since every honest node sends its block proposal and data availability signature to all other nodes, at some point in time `*A*` will receive proposals and data availability signatures from a supermajority of nodes. Also, since a supermajority of destination nodes are honest, at some point in time the node will transmit its block proposal to a supermajority of nodes. It will vote `yes` for each block proposal that it received, and `no` for each block proposal that it did not receive. Vote of each honest node will include `yes` votes and `no` votes This simply follows from the fact, that node `*A*` votes immediately after receiving a supermajority of block proposals, and from the fact that `*A*` votes yes for each block proposal that it received ## Finalizing Winning Block Proposal [Section titled “Finalizing Winning Block Proposal”](#finalizing-winning-block-proposal) Once consensus completes on a particular node `*A*` and the winning block proposal, the node will execute the following algorithm to finalize the proposal and commit it to the chain. 1. `*A*` will check if it has received the winning proposal `*P*` 2. if `*A*` has not received the proposal, it will download it from its peer nodes using the algorithm described later in this document. It is possible to do it because of Lemma 11. 3. `*A*` will then sign a signature share for `*P*` and send it to all other nodes 4. `*A*` will then wait to receive signature shares from a supermajority of nodes, including itself 5. Once `*A*` has received a supermajority of signature shares, it will combine them into a threshold signature. 6. `*A*` will then commit the `*P*` to the blockchain together with the threshold signature of `*P*` The proposal download algorithm is specified below. The proposal assumes that the proposal is split in $N-1$ chunks of equal size except the last chunk the size of which will be the remainder of The purpose of the algorithm is to minimize network traffic. . `*A*` sends a message to each peer `*i*` , requesting for chunk `*i*` . `*A*` waits until it receives a `supermajority - 1` of responses . `*A*` then enumerates missing chunks . `*A*` then randomly assigns each missing chunk to a servers, and empty chunks to each server that did not get a missing chunk assigned, and sends the corresponding requests to each server. . `*A*` waits until receives `supermajority -1` of responses . If `*A*` received all chunks, the algorithm is complete. Otherwise it goes back to step 3. FUTURE: we may implement more advanced algorithms based on erasure codes. ### Purging old transactions [Section titled “Purging old transactions”](#purging-old-transactions) For each node, 33 percent of the storage is assigned to blockchain, 33 percent to EVM and 33 to the rest of the system, such as consensus state. If blockchain storage is exhausted, the old blocks will be deleted to free storage in increments of 1024 blocks. If EVM/Solidity storage is exhausted, EVM will start throwing \“OutOfStorage\” errors until storage is freed. If consensus storage is exhausted, the consensus agent will start erasing items such as messages in the message outgoing queues, in the order of item age, from oldest to newest. ## EVM/Solidity [Section titled “EVM/Solidity”](#evmsolidity) ### EVM compatibility [Section titled “EVM compatibility”](#evm-compatibility) The goal is to provide EVM/Solidity compatibility, except the cases documented in this specification. The compatibility is for client software, in particular Metamask, Truffle, Web3js and Web3py. ### EVM execution [Section titled “EVM execution”](#evm-execution) Once a block is finalized on the chain, it is passed to EVM, and each transaction is sequentially executed by the EVM one after another. We currently use unmodified Ethereum EVM, therefore there should not be compatibility issues. Once Ethereum finalizes EWASM version of EVM, we will be able to plug in in. ### EVM storage [Section titled “EVM storage”](#evm-storage) EVM has pluggable storage backend database to store EVM/Solidity variables we simplified and sped up the storage by using LevelDB from Google. Each variable in EVM is stored as a key value in LevelDB where the key is the sha3 hash of the virtual memory address and the value is the 256 bit value of the variable. In EVM all variables have 256 bits. ### EVM gas calculations and DOS protection [Section titled “EVM gas calculations and DOS protection”](#evm-gas-calculations-and-dos-protection) We do not charge users gas for transactions. We do have a protection against Denial of Service attacks. Each transaction needs to submit proof of work (PoW) proportional to the amount of gas that the transaction would have used if we would charge for transactions. We are currently using the same PoW algorithm as Ethereum. This PoW is calculated in the browser or other client that submits a transaction and is passed together with the transaction. If the transaction does not include the required PoW it will be rejected. We are still researching the formula for `k`. Ideally `k` should go down if the chain is underloaded and increase if the chains starts to be overloaded. ## Ethereum clients [Section titled “Ethereum clients”](#ethereum-clients) ### Compatibility [Section titled “Compatibility”](#compatibility) The goal is to provide compatible JSON client API for client software such as Web3js, Web3py, Metamask and Truffle. ### FUTURE: Multi-node requests [Section titled “FUTURE: Multi-node requests”](#future-multi-node-requests) Existing clients such Web3js connect to a single node, which creates security problem for Solidity read requests that read variables. Transactions involve a consensus of the entire blockchain, but Solidity read requests interact with a single node. Therefore, an malicious node, such as Infura, can prove a user incorrect information on, e.g. the amount of funds the user has in possession. Therefore, in the future we will need to add multi-node requests where the first node that receives the request passes it to all others and collects a tsig.
# DDoS Protection
> Explore the configurable chain DDoS Protection System
Besides limiting the gas consumption rate on SKALE Chains, each chain also comes with a configurable DDOS protection system that allows the Chain to detect peak (per second) and long load (per minute) JSON-RPC calls and WS/WSS connections. The protection enables the chain to survive in high load situations by banning caller origins for a preset number of seconds. An example configuration is: ```json "unddos": { "origins": [ { "origin": [ "192.168.1.1", "127.0.0.*", "::1" ], "ban_lengthy": 0, "ban_peak": 0, "max_calls_per_minute": 1000000000, "max_calls_per_second": 1000000000, "max_ws_conn": 65535 }, { "origin": [ "*" ], "ban_lengthy": 120, "ban_peak": 15, "max_calls_per_minute": 5000, "max_calls_per_second": 1500, "max_ws_conn": 20 } ] } ``` The first “origins” block configures allowed unlimited load from specified IP origins. The second origins block configures all call origins allowed, but allow 1500 JSON-RPC calls per second and 5000 calls per minute. If the calls exceed the per second limit, “ban\_peak” bans the caller for 15 seconds. If the calls exceed the per minute limit, “ban\_lengthy” bans the caller for 120 seconds. And finally, “max\_ws\_conn” allows for 20 concurrent connections from a single IP. The configuration settings can be expanded to limit specific JSON-RPC calls, like eth\_blockNumber. For example: ```json { "origins": [ { "ban_lengthy": 120, "ban_peak": 15, "custom_method_settings": { "eth_blockNumber": { "max_calls_per_minute": 150000, "max_calls_per_second": 5000 } }, "max_calls_per_minute": 15000, "max_calls_per_second": 500, "max_ws_conn": 50, "origin": ["*"] } ] } ``` And DDoS protection can be completely disabled with the following config: ```json "unddos": { "enabled": false, } ```
# Distributed Key Generation with BLS
> How Distributed Key Generation (DKG) works on SKALE
## Overview [Section titled “Overview”](#overview) Distributed Key Generation aims to solve the problem of getting n parties able to cryptographically sign and verify signatures in the presence of some number t attackers in a decentralized network. To do so, this algorithm generates a public key, and a secret key of which no single party knows, but has some share of. ## Generating Contributions [Section titled “Generating Contributions”](#generating-contributions) Assume that there are n players P\_1, P\_2, …, P\_n, and that the system should be t-secure - that is, all honest players will succeed in carrying out the algorithm in the case of at most t corrupted parties. Each player randomly generates a secret polynomial P(x) of degree t, whose constant coefficient is their secret key. Note that one chooses degree t, since t + 1 points are required to reconstruct P. The goal here is to get other parties to agree that a player has a valid secret key, in a way that reconstructing our secret key is impossible. To do so, the player broadcasts a public polynomial P\_g(x), which is generated by mapping P(x)’s coefficients to points on an elliptic curve (for generator g and coefficient x, use xg). Then, they compute the secret key contribution P(j) and send it to player j for j = 1, …, n. ## Verification and Complaints [Section titled “Verification and Complaints”](#verification-and-complaints) Each player maps the outputs they receive onto points on the elliptic curve, and checks it against the corresponding public polynomial’s output. In this way, it’s verified that the player has generated a valid polynomial/output pair without exposing the polynomial itself. If a player is unable to send their output to a recipient within a given time, or the recipient computes the output to be invalid, the recipient makes a complaint. Typically in DKG, the justification process for the complaint may involve having the output in question broadcasted to all players to verify for themselves. In SKALE’s implementation however, you use SKALE Manager which lives on the Ethereum mainnet to compute/verify each output being complained about and slash accordingly, and restart the DKG process. This has the added benefit of giving economic incentive to act honestly, and is necessary because unlike traditional DKG, there is a need to identify and replace all malicious players. ## Computing the public/private keys [Section titled “Computing the public/private keys”](#computing-the-publicprivate-keys) Summing the public polynomials of all members results in the group’s public polynomial, whose constant coefficient is the public key; similarly, the sum of all secret polynomials results in the group’s secret polynomial. If each player sums the secret key contributions they received, they get an output of the sum of all player’s secret polynomials - or, an output of the group’s secret polynomial. This is their secret key share. Note that the group’s secret key is created by the sum of all players’ polynomial’s constant values, and that given enough secret key shares (t + 1), one can reconstruct the the group’s secret key by recreating the group’s private polynomial by way of interpolation. The following is a visual representation of the entire process made with Manim.    ## BLS Signatures [Section titled “BLS Signatures”](#bls-signatures) ### Theory [Section titled “Theory”](#theory) BLS relies on the existence of an efficient bilinear pairing e: G x G -> G\_T for some elliptic curve G and finite field G\_T, where the discrete log problem is hard on G, and whose details are technical and are therefore left out. The bilinearity condition provides that e(ag, bg) = e(g, g)^{ab}. Note that through this mapping, one can solve the decisional Diffie-Hellman problem – given xg, yg, and zg for generator g, check that xy = z. Using this pairing, you can write e(xg, yg) = e(g, g)^{xy} = e(g, xyg), which you can compare with e(g, zg). However, finding the actual values of x, y, and z are hard due to the discrete log problem. ### Signatures and Properties [Section titled “Signatures and Properties”](#signatures-and-properties) One can take advantage of the pairing’s properties to generate fast, compact, and aggregatable signatures. 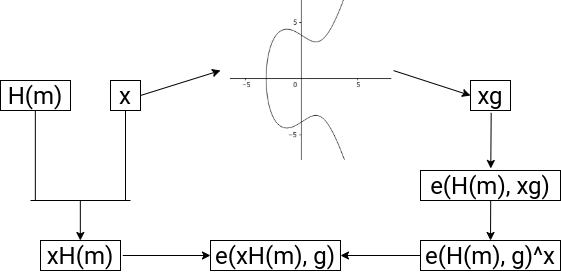 Firstly, the verification and signing process is very straightforward. Given a private key x and public key xg, suppose we wish to generate a signature for message m. First, we generate the hash of the message H(m) which is on the curve G, and publish xH(m). Then, verification is of the form e(xH(m), g) = e(H(m), xg), which is true by the bilinearity condition. Now suppose you wish to verify multiple signatures for a single message. By the properties of this mapping, you know that e(A, B + C) = e(A, B) \* e(A, C). Using this property, you can efficiently verify all by first obtaining the sum of the signatures S, then verifying that e(g, S) = the product of all (e(H(m\_i), x\_ig)). When taking this into account with the fact that BLS signatures are very short (roughly half the bits of DSA or ECDSA for similar security), BLS signatures for multiple parties save a lot of storage and computation by only needing to store and verify one value. ### Significance with DKG [Section titled “Significance with DKG”](#significance-with-dkg) Pairing DKG and BLS has a lot of nice properties. First of all, through DKG, you actually able to generate and distribute usable BLS keys. Secondly, the way DKG’s distributed secret shares and BLS’s signing algorithm interact is efficient. Suppose you run DKG, resulting in the group’s secret polynomial being f(x), and secret key shares thus being f(i) for i . Note that you wish to keep f(i) values secret, otherwise, f(x) can be created via polynomial interpretation. Now, you generate signatures , and if you attain at least t signatures, you can run polynomial interpolation in the exponent to gain In this way, you have generated a signature that’s equivalent to a signature generated by the group’s private key - as if it was signed by f(0) in the first place - in an efficient manner and without having exposed any secret key shares. ### Polynomial Interpolation [Section titled “Polynomial Interpolation”](#polynomial-interpolation) There are several methods of executing polynomial interpolation in the exponent. In our purposes, we choose to implement an algorithm, since it’s actually faster than otherwise more efficient algorithms in SKALE’s use case with smaller numbers. To do so, one uses Lagrange polynomials. The key idea is that given points (, ) for i from 1 to t, one wishes to express the final polynomial p(x) as the sum of \* , where one sets up the Lagrange polynomial to output 1 if its input is i, and 0 if its input is j from 1 to t for j not equal to i. In this way, p(x) is a polynomial that hits all of the desired points. Mathematically, let be Here, only required to compute , and to extrapolate p(0), raise it to the power; that is, for secret shares s\_k and group secret s = p(0). ## Known Attacks [Section titled “Known Attacks”](#known-attacks) ### Joint-Feldman Protocol / Output Manipulation [Section titled “Joint-Feldman Protocol / Output Manipulation”](#joint-feldman-protocol--output-manipulation) In the SKALE DKG implementation, the Joint-Feldman protocol is used. In its traditional form, this protocol is vulnerable to an attack in which one malicious player purposefully generates outputs which receive complaints, which a secondary malicious player can then use the broadcasted information to generate their polynomial in such a way that biases the final result’s random distribution. However, since this implementation verifies complaints through SKALE Manager, there is no such issue since no information is exposed. Furthermore, because of SKALE’s well-formed check for points on the elliptic curve doesn’t check that points are actually of the desired subgroup, there exists another attack in theory which involves the addition of elements of a different subgroup to submitted secret key shares. In this way, there is a chance with t - 1 malicious players that the generated public key is unusable. Again, however, SKALE’s use case makes this attack unfeasible, since the smallest subgroup of the elliptic curve in use is of order 10069, and SKALE Network has much less players than that order, which makes the attack impossible. Thus, the Joint-Feldman protocol makes sense for SKALE Network since it’s more lightweight than otherwise more secure DKG algorithms. ### Front-Running Attack [Section titled “Front-Running Attack”](#front-running-attack) SKALE Manager was previously vulnerable to a front-running attack for which a malicious node would not send any data, then at the moment the receiver rightfully complains about a lack of data, the node would front-run the data. At this point, SKALE Manager would see the receiver’s complaint as incorrect, and therefore slash the honest node. This has been resolved by adding strict time slots for broadcasting and complaining, and future threshold encryption will add further protection.
# Intro to Elliptic Curve Cryptography
> Introduction to Elliptic Curve Cryptography
This document introduces the fundamental math behind elliptic curves, and the ideas behind how this math can be used in cryptography. Then, this document discusses elliptic curve signatures, and explains the significance behind BLS signatures. ## One-way Functions and Private/Public Keys [Section titled “One-way Functions and Private/Public Keys”](#one-way-functions-and-privatepublic-keys) One of the big ideas of cryptography is that there are certain \`one-way’ functions which, given an input, is easy to compute an output for, but is much more difficult to do the reverse. These allow secure information transfer information. As a basic example, suppose you have a bucket of blue paint. Then, one such function might take an input in the form of a bucket of paint of some color, and mixing it with the blue paint. It’s easy for you to do so and create an output of a different color, but it will be hard to take this output and separate the two paints. This is where elliptic curves come in. An elliptic curve is an equation of the form  Note that the curve is symmetric about the x-axis due to the term. Given two points P, Q on such a curve, the line crossing through them is guaranteed to hit a third point on the curve. In the edge case that this line is vertical, one can say that there is a point at infinity at which all vertical lines intersect, and in the case that , one takes the tangent line, which will again only intersect the curve one more time. If you take this third point and reflect it over the x-axis to get R, and define according to this process, then + is a group operation on this elliptic curve. Being a group operation means that this binary operation satisfies certain properties; namely, there exists an identity element P (in this case, the point at infinity) that satisfies (think adding zero), and for every element a, there is an inverse element -a, such that . To put it simply, one can use + in similar ways as regular addition. What this means is that one can create an especially nice one-way function. First, let’s take the points on an elliptic curve modulo a prime; then, choose a generator g, which, when added to itself enough times, runs through all points; then, given an input of integer x, define the output as g + g + … + g = xg. If you recall the operation, xg is just straightforward algebra to compute. One can speed it up by thinking about x in binary; to compute 12g for example, first compute 2g, then 4g, 8g, and finally 12g. This is allowed by group properties. Yet, given xg and g, it becomes extremely hard to compute x. In fact, one can’t do that much better than just multiplying g over and over and hoping to get xg. This is called the elliptic curve discrete logarithm problem (ECDLP). Thus, it makes sense for one to create a secret key x, and set their public key as xg. In this way, no one can compute the secret key given the public key. However, one can use the secret key to show others that knowledge the secret key, without actually showing the secret key; in other words, securely proving the identity. Due to how secure ECDLP is, the amount of valuable resources saved by how efficient and compact elliptic curves can be compared to other systems, and other algebraic properties of this curve that become important in the upcoming algorithms, ECC has become the method of choice by most cryptocurrencies. ## Elliptic Curve Signatures [Section titled “Elliptic Curve Signatures”](#elliptic-curve-signatures) ### ECDSA [Section titled “ECDSA”](#ecdsa) To see how ECC is implemented, let’s look at the problem of signatures. We want to create a method so that a person can generate signatures which can be used to verify that person’s consent, but it must be so that everybody else can verify that the signature did indeed come from that person, and it must be infeasible (such as being equivalent to solving ECDLP) to replicate another person’s signature. To get an idea of how this is possible, consider using your secret information to generate some kind of output, and publishing enough information so that one can compute the same output in a different manner using the published information; however, having the secret information be unrecoverable given the published information. In this way, we can use this output and published information as a signature, so that others can use this computation to verify it, without knowing the secret information used to create it in the first place. In the Elliptic Curve Discrete Signature Algorithm (ECDSA)’s case, suppose one wishes to sign a message with secret key x and public key xg. First, generate a random number k and compute , and let r be the x-coordinate of this point. Then, for a hashed message h, compute . The signature is (r, s). 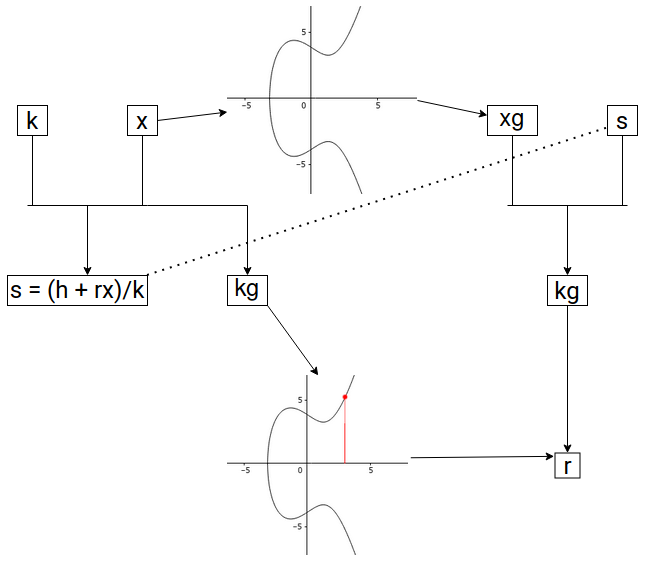 The main idea outlined before is present here; using this secret k, you can created R = kg, which can be computed in two different ways. To see this, for verification, use the published information h, r, s, and xg. Then, compute . Finally, using R, one can recover the x-coordinate r, and verify it’s indeed in (r, s). Although verification is straightforward, to replicate the signature (r, s) is infeasible without knowledge of k and x. ### BLS Signatures [Section titled “BLS Signatures”](#bls-signatures) However, in the case that multiple signatures are required, there arises an issue of computation and space. Specifically, suppose you want to collect several signatures from different nodes for some message. Then, you must collect each individual’s signature, and verify them one-by-one. Boneh-Lynn-Shacham (BLS) signatures solves this issue. This algorithm still follows the main idea outlined before; however, by using properties unique to elliptic curves (whose details are omitted for the sake of brevity, but available in the DKG/BLS documentation), you are able to generate quickly computable, compact, and aggregatable signatures. Given signatures , you can combine them together to generate an aggregated signature of the same size. You only need to store and verify this single signature to check that all n signatures are valid. Other advantages include being deterministic, so you don’t run into the issue of having the same signature that may be present in ECDSA, and being significantly more compact for the same level of security in the case of just one signature as compared to signatures seen in ECDSA, RSA, etc. Hence, in use cases where space and computation are expensive, BLS signatures become advantageous. To see further details of BLS, see the DKG/BLS documentation.
# Gas Fees
> Gas Fees on SKALE
# Precompiled Contracts
> Precompiled Contracts on SKALE
Every SKALE Chain comes with a set of precompiled contracts in addition to the precompiled contracts included with Ethereum (e.g *ecrecover*, *sha256*, *modexp*, etc.). | Address | Function | Sender Who May Call | Description | | ------- | ------------------------ | ------------------- | ------------------------------------------------------------------------------------------------------------------------- | | 0x0A | readChunk | Any | Reads chunk from file from specific position with specific length | | 0x0B | createFile | Filestorage Only | Creates an address for an empty file | | 0x0C | uploadChunk | Filestorage Only | Uploads 1MB chunk of data from specific position in specific file by file owner | | 0x0D | getFileSize | Any | Returns size of file | | 0x0E | deleteFile | Filestorage Only | Deletes file from filestorage system | | 0x0F | createDirectory | Filestorage Only | Creates directory in filestorage system | | 0x10 | deleteDirectory | Filestorage Only | Deletes directory in filestorage system | | 0x11 | calculateFileHash | Any | Calculates and writes SHA256 hash of file in same directory *\.\_hash* | | 0x12 | logTextMessage | Any | Logs a message:- 0 - Normal - 1 - Debug - 2 - Trace - 3 - Warning - 4 - Error - 5 - FatalUsed for IMA SKALE Chain Testing | | 0x13 | getConfigVariableUint256 | Any | Returns SKALE Chain config uint256 for IMA SKALE Chain contracts. Used for reading BLS common public key | | 0x14 | getConfigVariableAddress | Any | Returns SKALE Chain config address for IMA SKALE Chain testing | | 0x15 | getConfigVariableString | Any | Returns SKALE Chain config string for IMA SKALE Chain testing | | 0x16 | fnReserved0x16 | Any | Reserved | | 0x16 | getConfigPermissionsFlag | Any | Returns SKALE Chain config boolean for IMA SKALE Chain testing | | 0x18 | getBlockRandom | Any | Return a random number based on BLS threshold signature common coin of the current block | | 0x19 | getIMABLSPublicKey | Any | Returns relevant BLSPublicKey according to block timestamp |
# The SKL Token
> A conceptual overview and introduction into the SKL Token
The SKL token is an ERC-777 hybrid utility token natively deployed to Ethereum that allows its holders to: * Delegate SKL tokens to validators which are then staked into the delegated proof of stake SKALE Network * Stake SKL tokens as a validator to run a SKALE Supernode * Pay for SKALE Chains in accordance with SKALE Network’s economic model * Participate in SKALE Network governance via the SKALE DAO for those who are activley delegated to a validator The SKL token is native to Ethereum, but available across multiple chains. The following are the official deployments: | Chain | Address | Notes | | ------------- | ----------------------------------------------------------------------------------------------------------------------- | ----------------------------------- | | Ethereum | | This is the original deployed token | | SKALE Europa | | ERC-20 bridged in from Ethereum | | SKALE Nebula | | ERC-20 bridge in from Europa | | SKALE Calypso | | ERC-20 Bridge in from Europa | ## Governance [Section titled “Governance”](#governance) If you hold and delegate SKL tokens you can vote on governance proposals that affect the economic operations of the SKLAE Network. This includes proposals for sChain pricing, network inflation, and more. See [the forum post introducing governance](https://forum.skale.network/t/a-proposal-for-skale-networks-on-chain-governance-system/447) for more. When you vote on a proposal you use your SKL tokens to signal approval or opposition of the active proposal up for vote. The more SKL tokens you have, the more influence you can vote with. ## Tokenomics [Section titled “Tokenomics”](#tokenomics) SKL was created with a max supply of 7,000,000,000 tokens. For the SKL tokenomics chart and issuance schedule, please see the main SKALE website [here](https://skale.space/tokenomics). For a more in-depth chart on how the SKL supply changes over time and to see what is minted, you can see the [SKL Supply UI](https://skl-supply-ui.pages.dev/).
# Snapshots
> SKALE Chain Snapshots
## Introduction [Section titled “Introduction”](#introduction) One of the main features of SKALE Network is node rotation, and this is performed through a BLS Snapshot process. Briefly, if node `A` leaves a SKALE Chain for any reason (e.g. random rotation, node exit, etc.), another node `B` will be chosen to replace it. Once node `B` is chosen, it needs all the information about previous blocks, transactions, etc. from the SKALE chain. SKALE Network solves this by periodically performing snapshots of the SKALE chain file system on each node so that nodes can share the latest snapshot with incoming node `B`. Additionally, a node can be restarted from a snapshot it the node was offline for a long period of time, if it cannot catch up with other nodes using SKALE Consensus’ catch-up algorithm. ## Design [Section titled “Design”](#design) Skaled uses the btrfs file system to create snapshots. Assumptions: 1. First block on SKALE chain occurred at 2. node does snapshot every seconds (configurable number, stored in SKALE chain config, so it is similar for all nodes in SKALE chain ) Assume `k` snapshots were already done. Lets see when `k+1`-th will be done and ready to be used: 1. `k+1`-th snapshot will be done once another block’s B timestamp crosses boundary 2. Node updates `last_snapshotted_block_with_hash` with `k`-th snapshot block number. 3. If it is time to do snapshot and node already has 3 snapshots stored it deletes the latest of them. 4. Node creates a snapshot `S_latest`. 5. Node updates `last_snapshot_creation_time with` `B`’s timestamp. 6. Node calculates `S_latest`’s hash in separate thread (computes hash of every file in this snapshot including filestorage), assuming it will be successfully calculated before next snapshot is done. So `k+1`-th snapshot will be ready to be used only when `k+2`-th snapshot will be performing. 7. Node updates `stateRoot` field with `k`-th snapshot hash To start from a snapshot, a node must confirm whether a snapshot is valid. To prevent downloading of snapshots from malicious nodes, the following procedure was designed: 1. Node `A` chooses a random node from SKALE chain and requests the last snapshot block number. 2. Node `A` requests all nodes from the SKALE chain to send a snapshot hash signed with its corresponding BLS key. 3. Once node `A` receives all hashes and signatures, `A` tries to choose a hash `H` similar on at least 2/3 + 1 nodes, then `A` collects their BLS signatures into one and verifies it. (If steps 1 – 3 fails, a node will not start.) 4. Node `A` chooses a random node from those 2/3 + 1 nodes and downloads a snapshot from it, computes its hash and confirms whether it is similar to `H`. If it is similar then a node starts from this snapshot, otherwise node `A` will attempt to download a snapshot from another node. NOTE: `stateRoot` is needed to determine whether there are any node software issues. Each time a new block is passed from consensus, a node compares its own stateRoot with the stateRoot of the incoming block (so snapshot hashes of the last block from different nodes are compared). If the stateRoots fail to match, then a software issue is assumed and the node must restart from a snapshot. ## JSON-RPC Snapshot Methods [Section titled “JSON-RPC Snapshot Methods”](#json-rpc-snapshot-methods) ### skale\_getSnapshot [Section titled “skale\_getSnapshot”](#skale_getsnapshot) Parameters * `blockNumber`: integer, a block number * `autoCreate`: `Boolean`, create snapshot if it does not exist Returns * `dataSize`: integer, the size of snapshot in bytes * `maxAllowedChunkSize`: integer, the maximum chunk size in bytes Example ```sh // Request curl -X POST --data '{ "jsonrpc": "2.0", "method": "skale_getSnapshot", "params": { "blockNumber": 68, "autoCreate": false }, "id": 73 }' // Result { "id": 73, "dataSize": 12345, "maxAllowedChunkSize": 1234 } ``` ### skale\_downloadSnapshotFragment [Section titled “skale\_downloadSnapshotFragment”](#skale_downloadsnapshotfragment) Returns a snapshot fragment. Parameters * `blockNumber`: a block number, or the string “latest” * `from`: a block number * `size`: integer, the size of fragment in bytes * `isBinary`: `Boolean` Returns * `size`: integer, the size of chunk in bytes * `data`: `base64`, btrfs data Example ```sh // Request curl -X POST --data '{ "jsonrpc": "2.0", "method": "skale_downloadSnapshotFragment", "params": { "blockNumber": "latest", "from": 0, "size": 1024, "isBinary": false }, "id": 73 }' // Result { "id": 73, "size": 1234, "data": "base64 here" } ``` ### skale\_getSnapshotSignature [Section titled “skale\_getSnapshotSignature”](#skale_getsnapshotsignature) Returns signature of snapshot hash on given block number. Parameters * `blockNumber`: integer, a block number Returns * `X`: string, X coordinate of signature * `Y`: string, Y coordinate of signature * `helper`: integer, minimum number such that Y=(X+helper)^3 is a square in Fq * `hash`: string, hash of a snapshot on given block number * `signerIndex`: integer, receiver’s index in SKALE chain Example ```sh // Request curl -X POST --data '{ "jsonrpc": "2.0", "method": "skale_getSnapshotSignature", "params": [ 14 ], "id": 73 }' // Result { "id": 73, "X": 3213213131313566131315664653132135156165496800065461326, "Y": 3164968456435613216549864300564646631198986113213166, "helper": 1, "hash": aef45664dcb5636, "signerIndex": 1 } ``` ### skale\_getLatestSnapshotBlockNumber [Section titled “skale\_getLatestSnapshotBlockNumber”](#skale_getlatestsnapshotblocknumber) Returns the latest snapshotted block’s number. Parameters NULL Returns * `blockNumber`: integer, the latest snapshotted block’s number Example ```sh // Request curl -X POST --data '{ "jsonrpc": "2.0", "method": "skale_getLatestSnapshotBlockNumber", "params": { }, "id": 73 }' // Result { "id": 73, "blockNumber": 15 } ```
# Introduction to Threshold Schemes
> Introduction to Threshold Schemes
schemes are used to divide a secret across some n players such that if k or more players can use their information to recreate the secret, however, less than k players can’t recover anything. The fundamental idea behind the following schemes is based on the idea of polynomials; it’s necessary to have at least k points to recover a polynomial of degree k - 1. Use cases of such algorithms include being able to generate group signatures for when at least k players agree. In the following, the basic ideas behind how such an algorithm would work is introduced. Then the main features of DKG are discussed, and show how it’s reliable and secure in a practical scenario. ## Shamir’s Secret Sharing [Section titled “Shamir’s Secret Sharing”](#shamirs-secret-sharing) **Shamir’s Secret Sharing (SSS)** is one of the first algorithms of its kind, and thus implements many fundamental ideas. In SSS, you assume the use of a central dealer. Then, you randomly generate a k-1-degree polynomial p(x) over some finite field, whose constant coefficient is the group’s secret value (you use a finite field instead of all integers because otherwise, if some attacker recovers some number of points less than k, they can mathematically rule out many potential values for the group’s secret value). Finally, you distribute the value p(i) to player i, for i = 1, …, n. If k players wish to recover the secret, they share their points and run polynomial interpolation, which is detailed in another documentation. ## Improving SSS to Distributed Key Generation [Section titled “Improving SSS to Distributed Key Generation”](#improving-sss-to-distributed-key-generation) Although SSS demonstrates the key ideas behind secret distribution, there are several practical issues. Most notably, all players are assumed to be honest, a centralized dealer who knows all information is needed. To solve these issues, you first look at decentralization. The main idea behind having a polynomial of which players have some inputs of is central, so we wish to keep this idea. However, instead of explicitly generating the centralized polynomial, you instead have each player generate their own polynomial , and let the group’s polynomial p(x) be the sum of each player’s polynomial. In this way, no one is able to know the group’s secret value or polynomial without knowing everyone’s polynomial. Then, to distribute the shares p(i) of the group’s polynomial, each player i sends to player j for all j. In this way, player j can recover their share . Now, for resistance against attackers. To solve this problem, we use elliptic curves. So, let g be a generator of an elliptic curve over some field. The main idea that using the ability to `encrypt` polynomials. Consider Then, let be . Due to ECDLP, f\_i(x) is unrecoverable from g\_i(x). However, given g\_i(x) and f\_i(j) from player i, you can verify that player i gave you a valid output by checking that . Further, note that the sum of all results in a polynomial g(x), whose constant coefficient is the encrypted version of the p(x)’s constant coefficient, the group’s secret key; in other words, the group’s public key. Thus, instead of needing to trust that is a correct output, you first require that all players broadcast their encrypted polynomials, or public polynomials. Then, you can verify against . Finally, if this verification fails, you issue a complaint, for which you then run a process in which you expose the information to all other players for each to decide who is correct. This provides the ability to ensure that the values we receive are correct without knowing the sender’s polynomial. With this step, this completely outlines Distributed Key Generation (DKG). In summary, DKG is able to distribute a secret across some players in the presence of attackers in a decentralized network. To see how SKALE specifically implements DKG, or how we can use the generated secret values in signatures without revealing the group’s secret value, see the DKG/BLS documentation.
# Access Control
> Managing Control and Access to a SKALE Chain
While SKALE Chains themselves are Layer 1 blockchains, the architectural design intentionally allows for a semi-permissioned access control layer that is manageable by the chain owners or operators. This allows for maximum flexibility where an individual chain can be locked down to only allow a single application or group of applications to deploy, be 100% public for anyone, or allow various factories to be used by different wallets. Access Control to a SKALE Chain is managed by the Config Controller smart contract which is predeployed on a SKALE Chain. Config Controller makes use of [OpenZeppellin’s Access Control](https://openzeppelin.com) to handle roles, events, and management automatically. ## Access via Accounts [Section titled “Access via Accounts”](#access-via-accounts) The most straightforward and common way to access a SKALE Chain for deployment is by having an externally owned account (EOA) added to the chain allow list. An account that is added to this list is given `DEPLOYER_ROLE` which allows it to directly bypass all restrictions and deploy ANY smart contract to a SKALE Chain as long as it fits within the block gas limit. See [how to add address to whitelist](#add-to-whitelist) and [how to remove from whitelist](#remove-from-whitelist) to understand how to manage your access control layer. ## Access via Factories [Section titled “Access via Factories”](#access-via-factories) Another common method for deployment is via factories. SKALE Chain owners and operators can deploy popular generic factories such as CREATE2Factory, SingletonFactory, and CreateX to their chain and allow developers to use them when deploying to their chain. Additionally, developers themselves can create contracts to deploy other contracts making specific factories for their uses. ### Open Factory Usage [Section titled “Open Factory Usage”](#open-factory-usage) Open factory usage is where the SKALE Chain owner or operator grants `DEPLOYER_ROLE` to a smart contract that is acting as the factory. This then allows ANY account or smart to use the whitelisted factory to deploy a smart contract through. **Example: SushiSwap** On the [SKALE Europa Hub](https://portal.skale.space/chains/europa), SushiSwap which is based off of Uniswap; has a factory contract that creates liquidity pairs. This contract is dedicated to SushiSwap and allows for liquidity pairs (which are smart contracts) to be created by anyone via the UniswapV2/V3 factories that are deployed as part of SushiSwap’s core architecture. Danger Open factory usage is generally not recommended on a SKALE Chain with zero gas, however, is necessary and even useful in some cases. Generic factories should not be opened up for public usage on a sChain with the permission layer enabled and zero gas fees to avoid spam. This then allows anyone to deploy a smart contract via the factory regardless of their direct status on the allow list. ### Closed Factory Usage [Section titled “Closed Factory Usage”](#closed-factory-usage) Closed factory usage is where the SKALE Chain owner or operator allows a specific account or set of accounts to deploy through a factory. The unique part about this design is: 1. The accounts whitelisted on the specific factory **DO NOT** have the ability to deploy directly to the blockchain or through other factories 2. Accounts provided with `DEPLOYER_ROLE` generally on the blockchain can deploy via the contract IF the contract allows generic deployment rights 3. Accounts without `DEPLOYER_ROLE` cannot deploy through the factory IF the factory does not have `DEPLOYER_ROLE` directly; sufficiently securing the contract and chain from spam ## Public Access [Section titled “Public Access”](#public-access) SKALE Chains by default come with the permission layer enabled. However, the permission layer can be enabled/disabled at any time by the SKALE Chain owner or operator. You can enable and disable the permission layer through the Config Controller smart contract. * Ethers v6 ```ts // Using Ethers v6 import { Contract, JsonRpcProvider, Wallet } from "ethers"; const CONFIG_CONTROLLER_ABI = [ "function enableFreeContractDeployment() external", "function disableFreeContractDeployment() external" ]; const CONFIG_CONTROLLER_PREDEPLOYED_ADDRESS = "0xD2002000000000000000000000000000000000d2"; async function main() { const provider = new JsonRpcProvider("https://mainnet.skalenodes.com/v1/"); const wallet = new Wallet(process.env.PRIVATE_KEY, provider); const contract = new Contract(CONFIG_CONTROLLER_PREDEPLOYED_ADDRESS, CONFIG_CONTROLLER_ABI, wallet); // Allow anyone to deploy const res = await contract.enableFreeContractDeployment(); // Disable deployments, role based allowances are enabled const res = await contract.disableFreeContractDeployment(); } main() .catch((err) => { console.error(err); process.exitCode = 1; }); ``` ## Managing Access [Section titled “Managing Access”](#managing-access) ### Add to Whitelist [Section titled “Add to Whitelist”](#add-to-whitelist) The following is how to add an address to the SKALE Chain whitelist: * Ethers v6 ```ts // Using Ethers v6 import { Contract, JsonRpcProvider, Wallet } from "ethers"; const WALLET_TO_WHITELIST = "0x..."; const CONFIG_CONTROLLER_ABI = [ "function addToWhitelist(address addr) external" ]; const CONFIG_CONTROLLER_PREDEPLOYED_ADDRESS = "0xD2002000000000000000000000000000000000d2"; async function main() { const provider = new JsonRpcProvider("https://mainnet.skalenodes.com/v1/"); const wallet = new Wallet(process.env.PRIVATE_KEY, provider); const contract = new Contract(CONFIG_CONTROLLER_PREDEPLOYED_ADDRESS, CONFIG_CONTROLLER_ABI, wallet); const res = await contract.addToWhitelist(WALLET_TO_WHITELIST); console.log(`Wallet ${WALLET_TO_WHITELIST} whitelisted on sChain at ${res}`); } main() .catch((err) => { console.error(err); process.exitCode = 1; }); ``` ### Remove from Whitelist [Section titled “Remove from Whitelist”](#remove-from-whitelist) The following is how to remove an address from the SKALE Chain whitelist: * Ethers v6 ```ts // Using Ethers v6 import { Contract, JsonRpcProvider, Wallet } from "ethers"; const WALLET_TO_REMOVE = "0x..."; const CONFIG_CONTROLLER_ABI = [ "function removeFromWhitelist(address addr) external" ]; const CONFIG_CONTROLLER_PREDEPLOYED_ADDRESS = "0xD2002000000000000000000000000000000000d2"; async function main() { const provider = new JsonRpcProvider("https://mainnet.skalenodes.com/v1/"); const wallet = new Wallet(process.env.PRIVATE_KEY, provider); const contract = new Contract(CONFIG_CONTROLLER_PREDEPLOYED_ADDRESS, CONFIG_CONTROLLER_ABI, wallet); const res = await contract.removeFromWhitelist(WALLET_TO_REMOVE); console.log(`Wallet ${WALLET_TO_REMOVE} removed on sChain at ${res}`); } main() .catch((err) => { console.error(err); process.exitCode = 1; }); ``` ### Add Admin for Contract [Section titled “Add Admin for Contract”](#add-admin-for-contract) The following is how to add an admin which can manage a smart contract whitelist: * Ethers v6 ```ts // Using Ethers v6 import { Contract, JsonRpcProvider, Wallet } from "ethers"; const ADMIN_WALLET_ADDRESS = "0x..."; // your eth address const FACTORY_ADDRESS = "0x..."; // the contract deploying other contracts const CONFIG_CONTROLLER_ABI = [ "function addAllowedOriginRoleAdmin(address admin, address deployer) external" ]; const CONFIG_CONTROLLER_PREDEPLOYED_ADDRESS = "0xD2002000000000000000000000000000000000d2"; async function main() { const provider = new JsonRpcProvider("https://mainnet.skalenodes.com/v1/"); const wallet = new Wallet(process.env.PRIVATE_KEY, provider); const contract = new Contract(CONFIG_CONTROLLER_PREDEPLOYED_ADDRESS, CONFIG_CONTROLLER_ABI, wallet); const res = await contract.addAllowedOriginRoleAdmin(ADMIN_WALLET_ADDRESS, FACTORY_ADDRESS); console.log(`Wallet ${ADMIN_WALLET_ADDRESS} can now manage ${FACTORY_ADDRESS} on sChain at ${res}`); } main() .catch((err) => { console.error(err); process.exitCode = 1; }); ``` ### Remove Admin from Contract Whitelist [Section titled “Remove Admin from Contract Whitelist”](#remove-admin-from-contract-whitelist) The following is how to remove an admin from managing a smart contract whitelist: * Ethers v6 ```ts // Using Ethers v6 import { Contract, JsonRpcProvider, Wallet } from "ethers"; const ADMIN_WALLET_ADDRESS = "0x..."; // your eth address const FACTORY_ADDRESS = "0x..."; // the contract deploying other contracts const CONFIG_CONTROLLER_ABI = [ "function removeAllowedOriginRoleAdmin(address admin, address deployer) external" ]; const CONFIG_CONTROLLER_PREDEPLOYED_ADDRESS = "0xD2002000000000000000000000000000000000d2"; async function main() { const provider = new JsonRpcProvider("https://mainnet.skalenodes.com/v1/"); const wallet = new Wallet(process.env.PRIVATE_KEY, provider); const contract = new Contract(CONFIG_CONTROLLER_PREDEPLOYED_ADDRESS, CONFIG_CONTROLLER_ABI, wallet); const res = await contract.removeAllowedOriginRoleAdmin(ADMIN_WALLET_ADDRESS, FACTORY_ADDRESS); console.log(`Wallet ${ADMIN_WALLET_ADDRESS} can no longermanage ${FACTORY_ADDRESS} on sChain at ${res}`); } main() .catch((err) => { console.error(err); process.exitCode = 1; }); ``` ### Add to Contract Whitelist [Section titled “Add to Contract Whitelist”](#add-to-contract-whitelist) The following is how to add an address to the SKALE Chain whitelist: * Ethers v6 ```ts // Using Ethers v6 import { Contract, JsonRpcProvider, Wallet } from "ethers"; const WALLET_TO_WHITELIST = "0x..."; const FACTORY_ADDRESS = "0x..."; const CONFIG_CONTROLLER_ABI = [ "function allowOrigin(address transactionOrigin, address deployer) external" ]; const CONFIG_CONTROLLER_PREDEPLOYED_ADDRESS = "0xD2002000000000000000000000000000000000d2"; async function main() { const provider = new JsonRpcProvider("https://mainnet.skalenodes.com/v1/"); const wallet = new Wallet(process.env.PRIVATE_KEY, provider); const contract = new Contract(CONFIG_CONTROLLER_PREDEPLOYED_ADDRESS, CONFIG_CONTROLLER_ABI, wallet); const res = await contract.allowOrigin(WALLET_TO_WHITELIST, FACTORY_ADDRESS); console.log(`Wallet ${WALLET_TO_WHITELIST} whitelisted on sChain at ${res}`); } main() .catch((err) => { console.error(err); process.exitCode = 1; }); ``` ### Remove from Contract Whitelist [Section titled “Remove from Contract Whitelist”](#remove-from-contract-whitelist) The following is how to remove an address from the SKALE Chain whitelist: * Ethers v6 ```ts // Using Ethers v6 import { Contract, JsonRpcProvider, Wallet } from "ethers"; const WALLET_TO_WHITELIST = "0x..."; const FACTORY_ADDRESS = "0x..."; const CONFIG_CONTROLLER_ABI = [ "function forbidOrigin(address transactionOrigin, address deployer) external" ]; const CONFIG_CONTROLLER_PREDEPLOYED_ADDRESS = "0xD2002000000000000000000000000000000000d2"; async function main() { const provider = new JsonRpcProvider("https://mainnet.skalenodes.com/v1/"); const wallet = new Wallet(process.env.PRIVATE_KEY, provider); const contract = new Contract(CONFIG_CONTROLLER_PREDEPLOYED_ADDRESS, CONFIG_CONTROLLER_ABI, wallet); const res = await contract.forbidOrigin(WALLET_TO_WHITELIST, FACTORY_ADDRESS); console.log(`Wallet ${WALLET_TO_WHITELIST} can no longer deploy via ${FACTORY_ADDRESS} on sChain at ${res}`); } main() .catch((err) => { console.error(err); process.exitCode = 1; }); ```
# Customize SKALE Chain
> Explore the various configuration and features available to configure on your sChain
This page explores the various ways that SKALE Chains can be configured. Want to customize your chain in a way not found here? Head over to the [SKALE Forum](https://forum.skale.network) and share your ideas or join the SKALE team in [Discord](https://discord.gg/skale) to share your idea(s)! ## State Configuration [Section titled “State Configuration”](#state-configuration) One of the most important decisions made when creating a new SKALE Chain is where the state is going to be allocated. There are three areas that node storage is allocatable too: 1. **Consensus Database**: the area of the node responsible for storing block data 2. **Contract Storage**: the area of the node that stores active contract state 3. **Filestorage**: the area of the node responsible for storing files uploaded or replicated via SKALE Filestorage The following configurations are available:  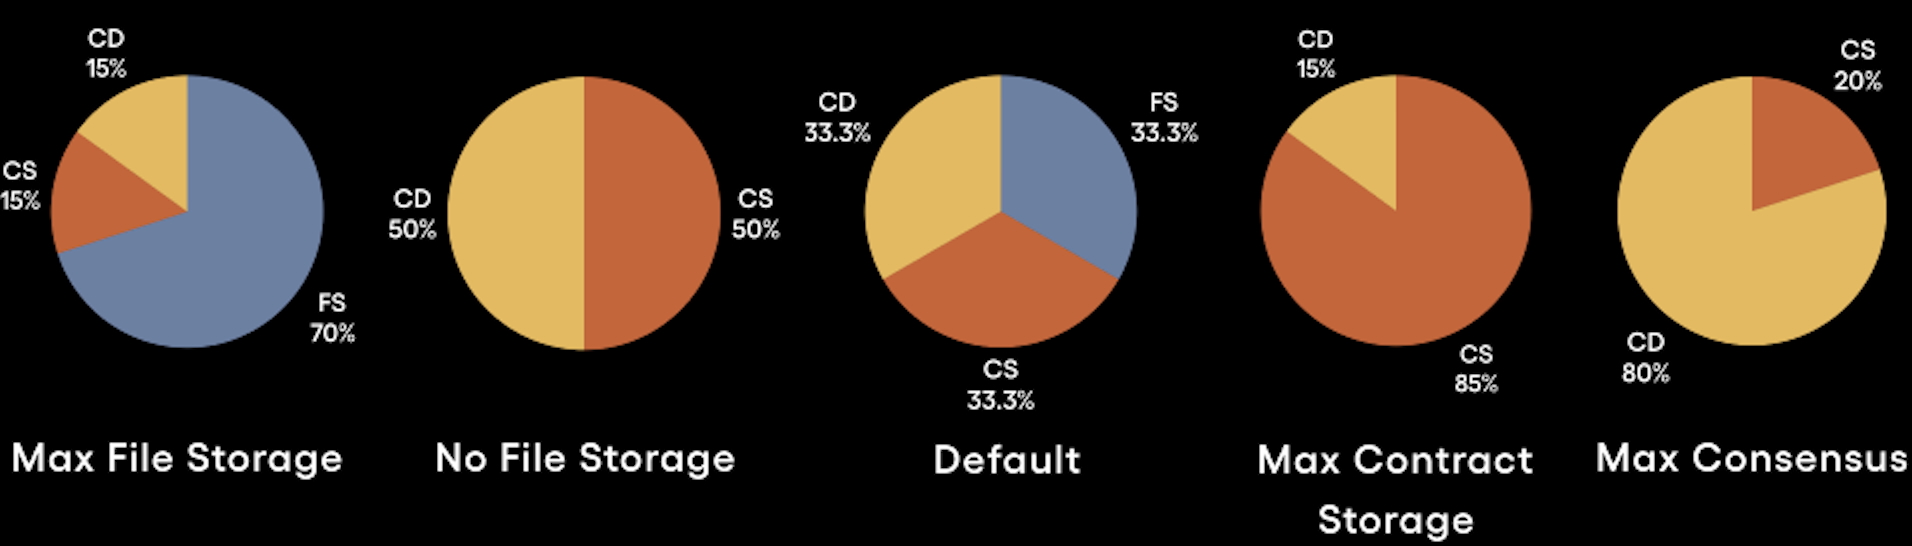 ## Transaction Processing [Section titled “Transaction Processing”](#transaction-processing) SKALE Chains have two options when it comes to transaction processing. * **Standard Processing**: allows for a single transaction per account/wallet per block. Great for chains interested matching Ethereum’s transaction processing architecture * **Multi-transaction Mode (Recommended)**: great for chains catering to high-throughput applications
# Intro to SKALE Chains
> Introduction to SKALE Chain Technology
The SKALE Network is home to a unique type of decentralized and distributed compute system known as a SKALE Chain. Uniquely designed to offer both permissioned and permisionless compute; sChains are themselves are Layer 1 blockchains with additional layers of modular management and functionality enabling them to exist as an Appchain or as an ecosystem chain like a hub. When a new SKALE Chain is created, the owner of the chain is provided elevated privledges which they can use to setup the chain to their unique needs. Privledges can be provided to others, secured via multisigs, or renounced entirely. This section of the documentation explores a variety of critical operations that should be taken when a new SKALE Chain is created. ## SKALE Chain Setup Guide [Section titled “SKALE Chain Setup Guide”](#skale-chain-setup-guide) The following is the step-by-step operation for SKALE Chain setup and creation: 1. Follow the [Setup Requirements](/run-a-skale-chain/setup-requirements) 2. Determine which features you want to [customize on your sChain](/run-a-skale-chain/customize-schain) 3. SKALE Chain Creation. Join us in [Discord](https://discord.gg/skale) to request a sChain
# Managing sFUEL Distribution
> Options for distributing sFUEL to developers and users of your SKALE Chain
The default gas token of a SKALE Chain is SKALE Fuel (sFUEL). This gas token allows for a SKALE Chains to be fully Ethereum Virtual Machine (EVM) compatible while also offering [zero gas fees](/building-applications/gas-fees) to developers and end-users. While gasless transactions are recommended for most applications due to simple management; SKALE Chains running with sFUEL active will need to ensure developers and/or end-users can access the gas token to execute transactions. ## Etherbase [Section titled “Etherbase”](#etherbase) For SKALE Chain owners and operators, accessing sufficient sFUEL is critical. All SKALE Chains come predeployed with a smart contract called **Etherbase** which is important for two reasons: 1. A large allocation of sFUEL is stored in this contract upon creation of the SKALE Chain, ensuring sufficient quantities are available for operators 2. sFUEL when consuemd in a transaction is automatically recycled into Etherbase ensuring that a SKALE Chain doesn’t run out of gas * Ethers v6 ```ts // Using Ethers v6 import { Contract, JsonRpcProvider, Wallet, parseEther } from "ethers"; const ETHERBASE_ABI = [ "function partiallyRetrieve(address payable receiver, uint256 amount) external", ]; const ETHERBASE_PREDEPLOYED_ADDRESS = "0xd2bA3e0000000000000000000000000000000000"; async function main() { const provider = new JsonRpcProvider("https://mainnet.skalenodes.com/v1/"); const wallet = new Wallet(process.env.PRIVATE_KEY, provider); const contract = new Contract(ETHERBASE_PREDEPLOYED_ADDRESS, ETHERBASE_ABI, wallet); // Allow anyone to deploy const res = await contract.partiallyRetrieve(wallet.address, parseEther("25")); console.log("Res: ", res); // Transaction Hash, once confirmed wallet.address native balance increases by 25 } main() .catch((err) => { console.error(err); process.exitCode = 1; }); ``` ## sFUEL Station [Section titled “sFUEL Station”](#sfuel-station) SKALE Chains can request being added to the [sFUEL Station](https://sfuelstation.com). The sFUEL Station is currently availalable on SKALE Hub testnet and mainnet Chains: Calypso, Europa, Nebula, and Titan. The sFUEL Station allows users to put in their wallet and attain a small allocation of sFUEL to get started on a particular sChain.
# Pricing and Payments
> Pricing information and payment flows for SKALE Chains
Having a dedicated SKALE Chain is similar to having dedicated resources on a cloud provider. Similar to your cloud provider, you have expenses owed in return for the compute provided. SKALE has a unique pricing structured that is governed by the [SKALE DAO](https://snapshot.box/#/s:skale.eth). ## SKALE Chain Types [Section titled “SKALE Chain Types”](#skale-chain-types) The modular design of SKALE Supernodes allows for a single supernode to support many SKALE Chains of varying sizes. The SKALE Network currently has one official size accepted by the DAO and a second size actively in discussion. | Chain Name | Node Resources | Cost per Month\* | | ----------------- | -------------- | ---------------- | | Hub Chain | 1/8 | $7200\* | | Performance Chain | 1/32 | $7200\* | ## Pricing Model [Section titled “Pricing Model”](#pricing-model) SKALE utilizes a subscription-based pricing model, similar to cloud computing, unlike most blockchains that use pay-per-transaction gas fees. **Key Benefits** * Flat Fees - fees are predictable based on the SKALE Chain Size. This ensures stability and easy to predicte operating expenses * Top Tier Unit Economics - with fees being prepaid and all usage being free, the cost per transaction drastically decreases * Improved UX - users shouldn’t suffer or have to jump through a dozen hoops (KYC, Buying Tokens, etc.) just to use your chain and/or application. Prepaid blockchains make free onboarding or freemium experiences a reality in Web3. * Optional Prepayment - chain owners can easily pre-pay for their SKALE Chain for up to 24 months to lock in the current pricing ## How to Pay [Section titled “How to Pay”](#how-to-pay) **Notes** * Payments occur on the [SKALE Europa Hub](https://portal.skale.space/chains/europa) and are due before on the 1st of each month. * The official paymaster smart contract is `[0x0d66cA00CbAD4219734D7FDF921dD7Caadc1F78D](https://elated-tan-skat.explorer.mainnet.skalenodes.com/address/0x0d66cA00CbAD4219734D7FDF921dD7Caadc1F78D)` ### Payment Guide [Section titled “Payment Guide”](#payment-guide) 1. Head over to 2. Select your SKALE Chain 3. Click **Manage**  5. Connect a Wallet 6. Input the amount of months you want to pay for Caution Reminder, paying for SKALE Chains is non-refundable. 7. Follow the prompts, bridge SKL tokens if needed, and pay for your SKALE Chain
# sChain Ownership
> A deep dive into the ownership structure of a SKALE Chain
## sChain Ownership Structure [Section titled “sChain Ownership Structure”](#schain-ownership-structure) By default, on all SKALE V2 Chains; the SKALE Chain ownership structure is a unique combination of predeployed smart contracts, multisignature wallets (across multiple networks), and cold wallets. The structure looks like the following: — Ownership Structure Text, Replace with Diagram There is a smart contract predeployed on every SKALE Chain that is created called **Marionette**. Marionettee is essentially a simple smart contract that has proxied access control and is by default given `DEFAULT_ADMIN_ROLE` on other predeployed smart contracts on the SKALE Chain like Etherbase, Filestorage, Config Controller, etc. Marionette has a role called `PUPPETTEER_ROLE` which allows others to execute dynamic smart contract calls through it. By default, when the chain is created there are two addresses given `PUPPETTEER_ROLE`: 1. The local multisignature wallet deployed on the SKALE Chain which is also a predeployed smart contract 2. The external Gnosis SAFE smart contract address deployed on Ethereum Mainnet which is generally considered to be the “SKALE Chain Owner” Additionally, by default in this setup MessageProxyForSchain is provided with IMA\_ROLE and is needed to allow the Gnosis SAFE on Ethereum Mainnet to post data all the way to Marionette.
# Setup Requirements
> Requirements for setting up a SKALE Chain
## Requirements [Section titled “Requirements”](#requirements) 1. A **[Gnosis SAFE](https://safe.global/)** address on the Ethereum Mainnet, dedicated to SKALE Chain Ownership 2. A **cold wallet** address from a member of the ownership or management group who is technical enough to utilize a cold wallet 3. Send 0.01 ETH to your Gnosis SAFE address 4. Determine the [configurations](/run-a-skale-chain/customize-schain) for how you want to customize your SKALE Chain 5. Reach out to the SKALE Team in [Discord](https://discord.gg/skale) for support creating your sChain
# Using Multisig Wallet CLI
> Explore how to use the multisigwallet CLI to manage your SKALE Chain
The [multisigwallet CLI](https://github.com/skalenetwork/multisigwallet-cli) is a command line interface tool that helps handle encoding function data specifically on SKALE Network contracts. Due to the unique [ownership structure](/run-a-skale-chain/schain-ownership) of a SKALE Chain, this CLI supports with management of your SKALE Chain both from the sChain side and from Mainnet via Gnosis SAFE. ## Installing the CLI? [Section titled “Installing the CLI?”](#installing-the-cli) To install the CLI: 1. Visit the [releases](https://github.com/skalenetwork/multisigwallet-cli/releases), download the most recent version by clicking **Assets** and then downloading the zip. 2. Unpack the zip 3. Ensure [Yarn](https://yarnpkg.com/getting-started/install) is installed 4. Run `yarn install` in your command prompt You are now ready to use the CLI! ## Using Gnosis SAFE [Section titled “Using Gnosis SAFE”](#using-gnosis-safe) ### Encode Function Data [Section titled “Encode Function Data”](#encode-function-data) Returns encoded data for interaction with schain through gnosis safe on mainnet. ```bash npx msig encodeData [options] [params...] ``` Required arguments: * `` - Destination schain name * `` - Destination contract that you wanna call * `` - Function that you wanna call on the destination contract Optional arguments: * `[params...]` - Arguments for the destination function To execute via SAFE, see [using SAFE](/run-a-skale-chain/using-safe). ## Using the MultisigWallet on sChain [Section titled “Using the MultisigWallet on sChain”](#using-the-multisigwallet-on-schain) ### Global options [Section titled “Global options”](#global-options) * `-a, --account ` - Account number from which the transaction should be performed, by default it’s 1. The account is associated with a private key in `.env` * `--custom` - For custom abi, set filepath to ABI into `.env` ### Call [Section titled “Call”](#call) Returns the result of executing the transaction, using call. ```bash npx msig call [options] [params...] ``` Required arguments: * `` - Destination contract that you wanna call * `` - Function that you wanna call on the destination contract Optional arguments: * `[params...]` - Arguments for the destination function ### Recharge [Section titled “Recharge”](#recharge) Allows to recharge the sFUEL balance of the MultiSigWallet contract ```bash npx msig recharge [options] ``` Required variables: * `ENDPOINT` - Endpoint of the SKALE chain * `PRIVATE_KEY_1` - Originatior private key (owner of the MultiSigWallet) Required arguments: * `` - Amount of sFUEL in wei ### Submit Transaction [Section titled “Submit Transaction”](#submit-transaction) Allows an owner to submit and confirm a transaction. `` must be written in `PascalCase`. `` must be written in `camelCase` and function parameters must be written separated by spaces. ```bash npx msig submitTransaction [options] [params...] ``` Required variables: * `ENDPOINT` - Endpoint of the SKALE chain * `PRIVATE_KEY_1` - Originatior private key (owner of the MultiSigWallet) Required arguments: * `` - Name of the contract in pascal case * `` - Name of the function that you wanna call on the destination contract Optional arguments: * `[params...]` - Arguments for the destination function Usage example: ```bash npx msig submitTransaction ConfigController addToWhitelist ``` ### Submit Transaction with Data [Section titled “Submit Transaction with Data”](#submit-transaction-with-data) Allows an owner to submit and confirm a transaction with custom data. ```bash npx msig submitTransactionWithData [options] ``` Required variables: * `ENDPOINT` - Endpoint of the SKALE chain * `PRIVATE_KEY_1` - Originatior private key (owner of the MultiSigWallet) Required arguments: * `` - Destination contract that you wanna call * `` - Encoded data of function selector and params ### Confirm Transaction [Section titled “Confirm Transaction”](#confirm-transaction) Allows an owner to confirm a transaction. ```bash npx msig confirmTransaction [options] ``` Required variables: * `ENDPOINT` - Endpoint of the SKALE chain * `PRIVATE_KEY_1` - Originatior private key (owner of the MultiSigWallet) Required arguments: * `` - Transaction id ### Revoke Confirmation [Section titled “Revoke Confirmation”](#revoke-confirmation) Allows an owner to revoke a confirmation for a transaction. ```bash npx msig revokeConfirmation [options] ``` Required variables: * `ENDPOINT` - Endpoint of the SKALE chain * `PRIVATE_KEY_1` - Originatior private key (owner of the MultiSigWallet) Required arguments: * `` - Transaction id ### Execute Transaction [Section titled “Execute Transaction”](#execute-transaction) Allows an owner on the MultisigWallet to execute a confirmed transaction. ```bash npx msig executeTransaction [options] ``` Required variables: * `ENDPOINT` - Endpoint of the SKALE chain * `PRIVATE_KEY_1` - Originatior private key (owner of the MultiSigWallet) Required arguments: * `` - Transaction id ### Get Confirmations [Section titled “Get Confirmations”](#get-confirmations) Returns a list (i.e array) with the owner addresses who confirmed the transaction. ```bash npx msig getConfirmations [options] ``` Required variables: * `ENDPOINT` - Endpoint of the SKALE chain * `PRIVATE_KEY_1` - Originatior private key (owner of the MultiSigWallet) Required arguments: * `` - Transaction id ### Get Confirmation Count [Section titled “Get Confirmation Count”](#get-confirmation-count) Returns number of confirmations of a transaction (i.e how many times the transaction has been confirmed). ```bash npx msig getConfirmationCount [options] ``` Required variables: * `ENDPOINT` - Endpoint of the SKALE chain * `PRIVATE_KEY_1` - Originatior private key (owner of the MultiSigWallet) Required arguments: * `` - Transaction id ### Is Transaction Confirmed [Section titled “Is Transaction Confirmed”](#is-transaction-confirmed) Returns the confirmation status of transactions. If transaction ID was provided, than execution will return only status for that transaction. ```bash npx msig isConfirmed [options] ``` Required variables: * `ENDPOINT` - Endpoint of the SKALE chain * `PRIVATE_KEY_1` - Originatior private key (owner of the MultiSigWallet) Optional arguments: * `[transactionId]` - Transaction id ### Get Owners [Section titled “Get Owners”](#get-owners) Returns list of owners on MultisigWallet on sChain. ```bash npx msig getOwners [options] ``` Required variables: * `ENDPOINT` - Endpoint of the SKALE chain * `PRIVATE_KEY_1` - Originatior private key (owner of the MultiSigWallet) ### Get Balance of MultisigWallet [Section titled “Get Balance of MultisigWallet”](#get-balance-of-multisigwallet) Returns the sFUEL balance of address. ```bash npx msig getBalance [options] ``` Required variables: * `ENDPOINT` - Endpoint of the SKALE chain * `PRIVATE_KEY_1` - Originatior private key (owner of the MultiSigWallet) Required arguments: * `` - The address of which to return the sFUEL balance
# Using SAFE
> Guidance on using SAFE to manage a SKALE Chain
The Ethereum-based SAFE can be used to manage a SKALE Chain, IF set as the SKALE Chain owner during creation. It operates using SKALE’s Native IMA bridge to execute on a SKALE Chain. Caution SKALE only supports SAFE ownership assigned to Ethereum SAFE’s. While SAFE does support cross-chain address ownership (in many cases), utilizing an address that is not attainable on Ethereum may result in issues with sChain operations. ## Sending Transactions on sChain [Section titled “Sending Transactions on sChain”](#sending-transactions-on-schain) Sending transactions to your SKALE Chain requires encoding the function data to execute via both Marionette and IMA. The recommended way for this is to [use the multisigwallet CLI](/run-a-skale-chain/using-multisig-wallet-cli) from SKALE. ### Prepare Transaction Data [Section titled “Prepare Transaction Data”](#prepare-transaction-data) > This uses the [encodeData](/run-a-skale-chain/using-multisig-wallet-cli#encode-function-data) command from MultisigWallet CLI The following example will help you grant a specific role to an externally owned account (EOA) on your SKALE Chain. This can be useful in the early days of setting up your chain to help distribute sFUEL with scripts as needed. | Name | Value | | ------------------- | ------------------------------------------------------------------ | | Contract Name | Etherbase | | Role | ETHER\_MANAGER\_ROLE | | Role Id (keccak256) | 0xe0ba7b49edc651b7ad93b374c67f1e9a0d37370168bbb86b81c569ebfa15f046 | | Receiver | 0xa9E1712086412A157A2A187A111bFAb203C73F6E | | SKALE Chain Name | juicy-low-small-testnet | ```shell npx msig encodeData juicy-low-small-testnet Etherbase grantRole 0xe0ba7b49edc651b7ad93b374c67f1e9a0d37370168bbb86b81c569ebfa15f046 0xa9E1712086412A157A2A187A111bFAb203C73F6E ``` ```shell # Output 0x9448920200000561bf78bd39c8e04acfad7995005495094c7d395d405c3288f009efc402000000000000000000000000d2c0deface000000000000000000000000000000000000000000000000000000000000000000000000000000000000000000006000000000000000000000000000000000000000000000000000000000000000e0000000000000000000000000d2ba3e00000000000000000000000000000000000000000000000000000000000000000000000000000000000000000000000000000000000000000000000000000000000000000000000000000000000000006000000000000000000000000000000000000000000000000000000000000000442f2ff15de0ba7b49edc651b7ad93b374c67f1e9a0d37370168bbb86b81c569ebfa15f046000000000000000000000000a9e1712086412a157a2a187a111bfab203c73f6e00000000000000000000000000000000000000000000000000000000 ``` Caution The above example uses **Europa Testnet** sChain Name. Your SKALE Chain name will be a unique identifier. Make sure to use the right SKALE Chain name otherwise the transaction will fail and consume gas. The output should change slightly to match your sCHain Name. ### Submit Transaction to SAFE [Section titled “Submit Transaction to SAFE”](#submit-transaction-to-safe) 1. Go to [SAFE App](https://safe.global) or your preferred frontend for SAFE. 2. Press **New Transaction** and then **Transaction Builder** 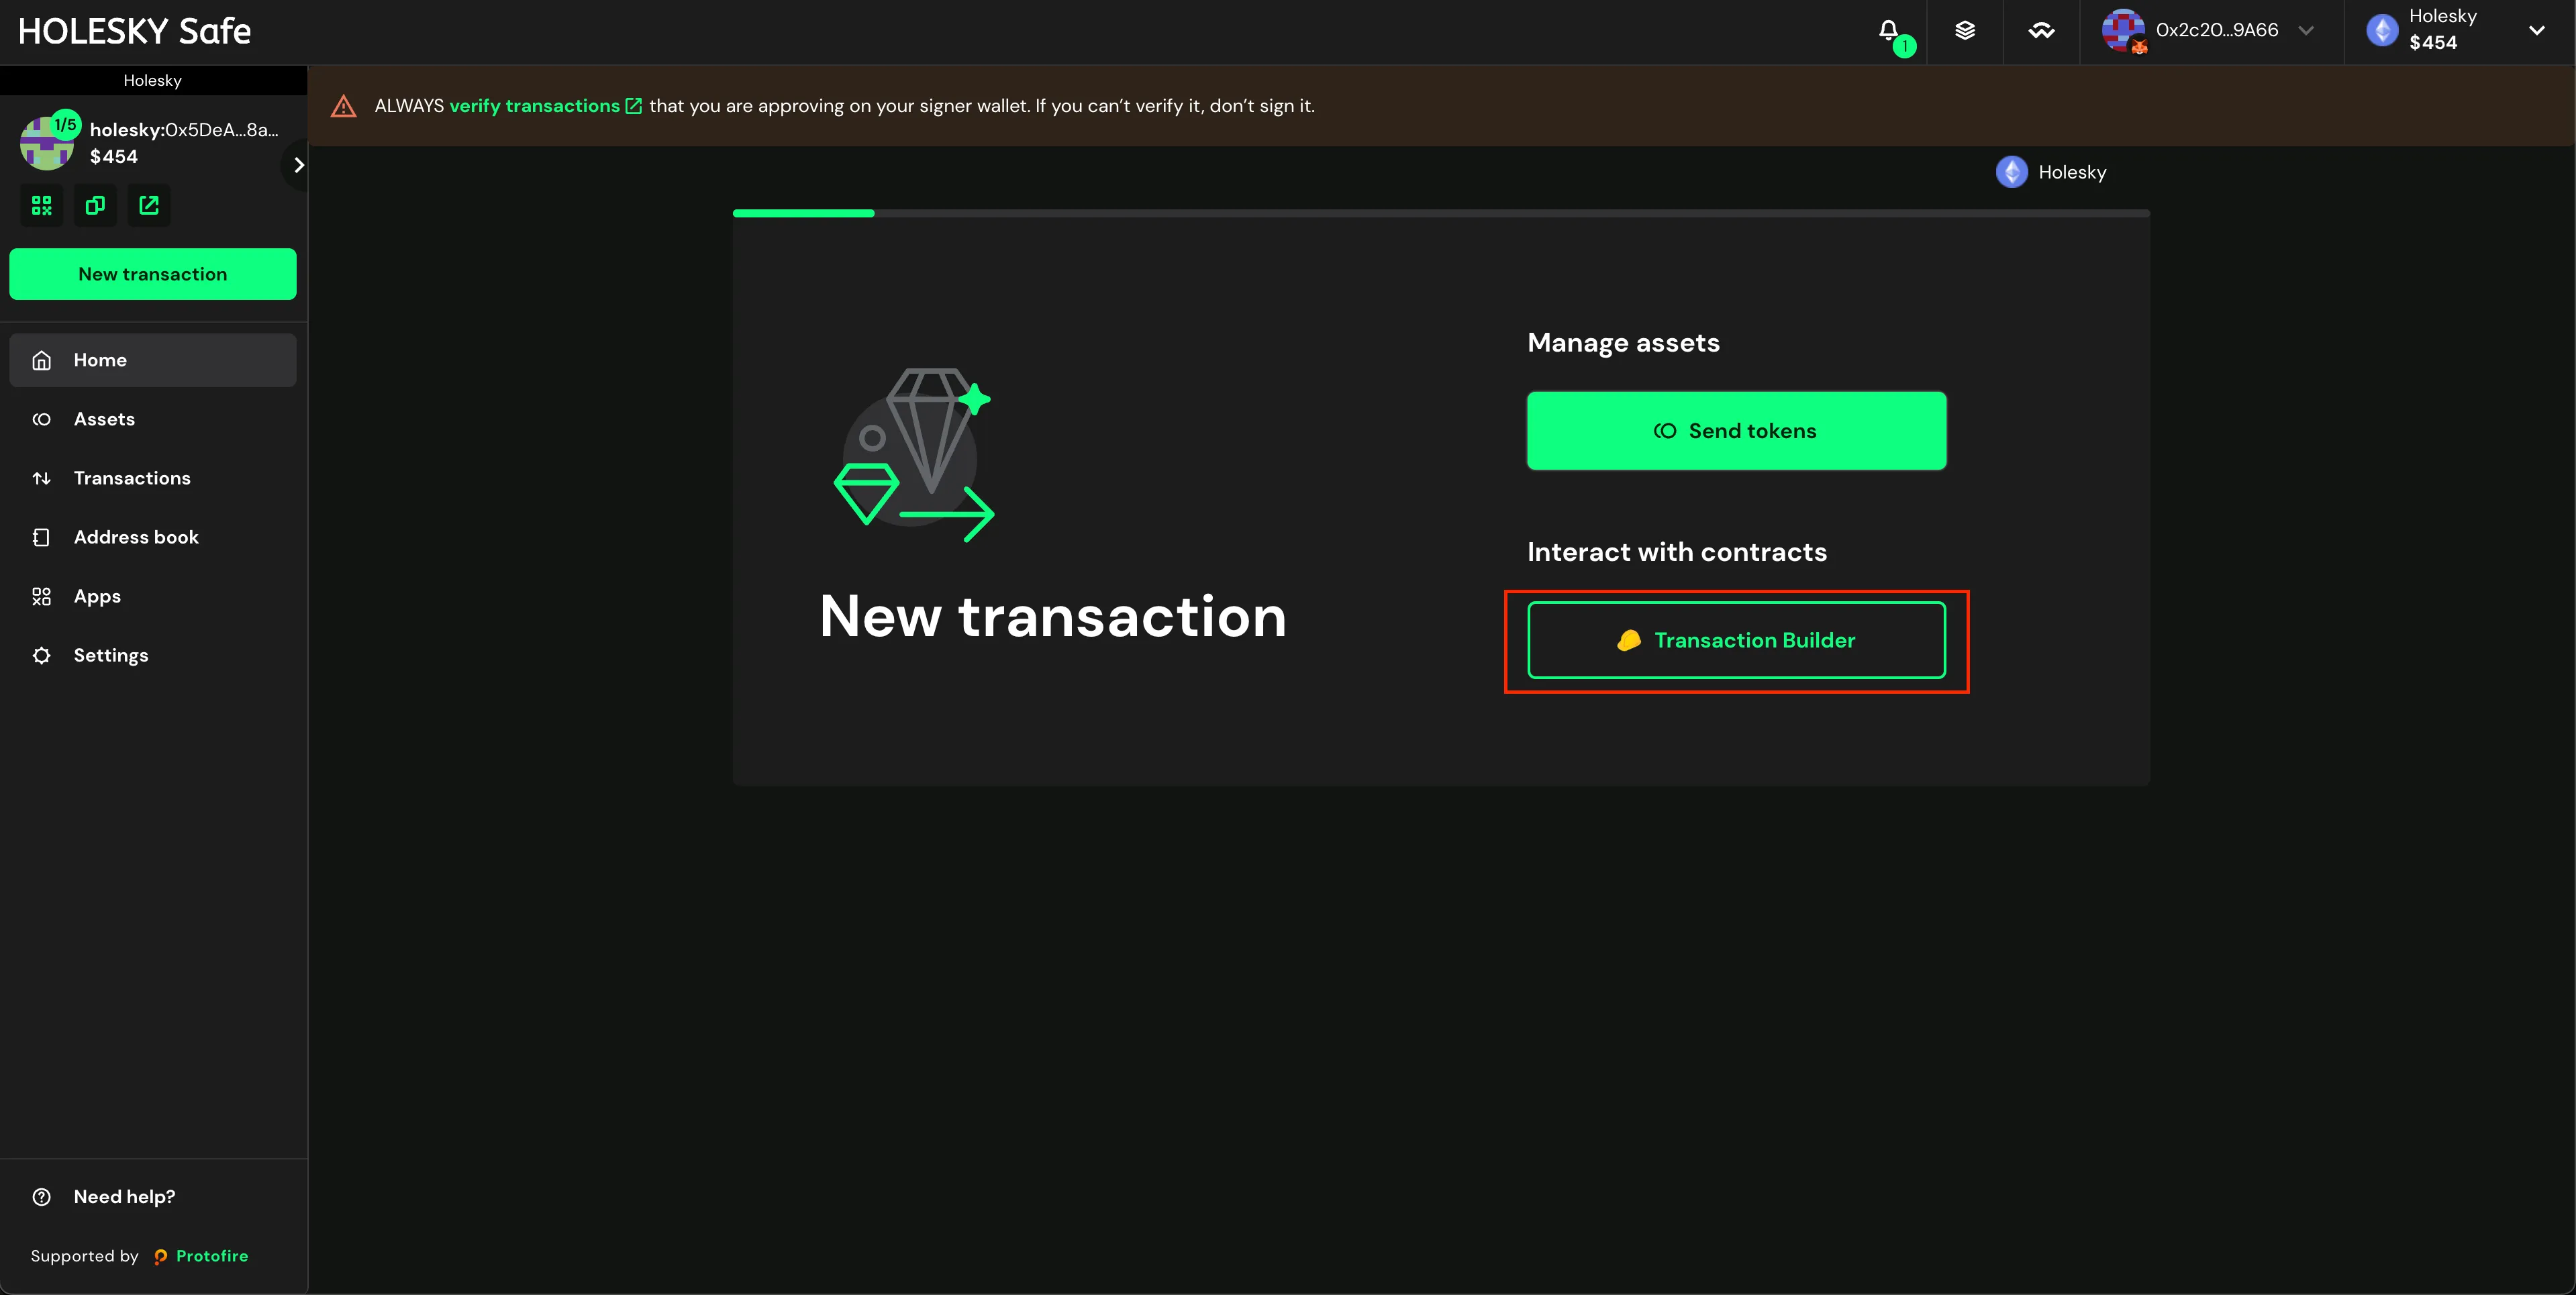 3. Enable the toggle **Custom Data** 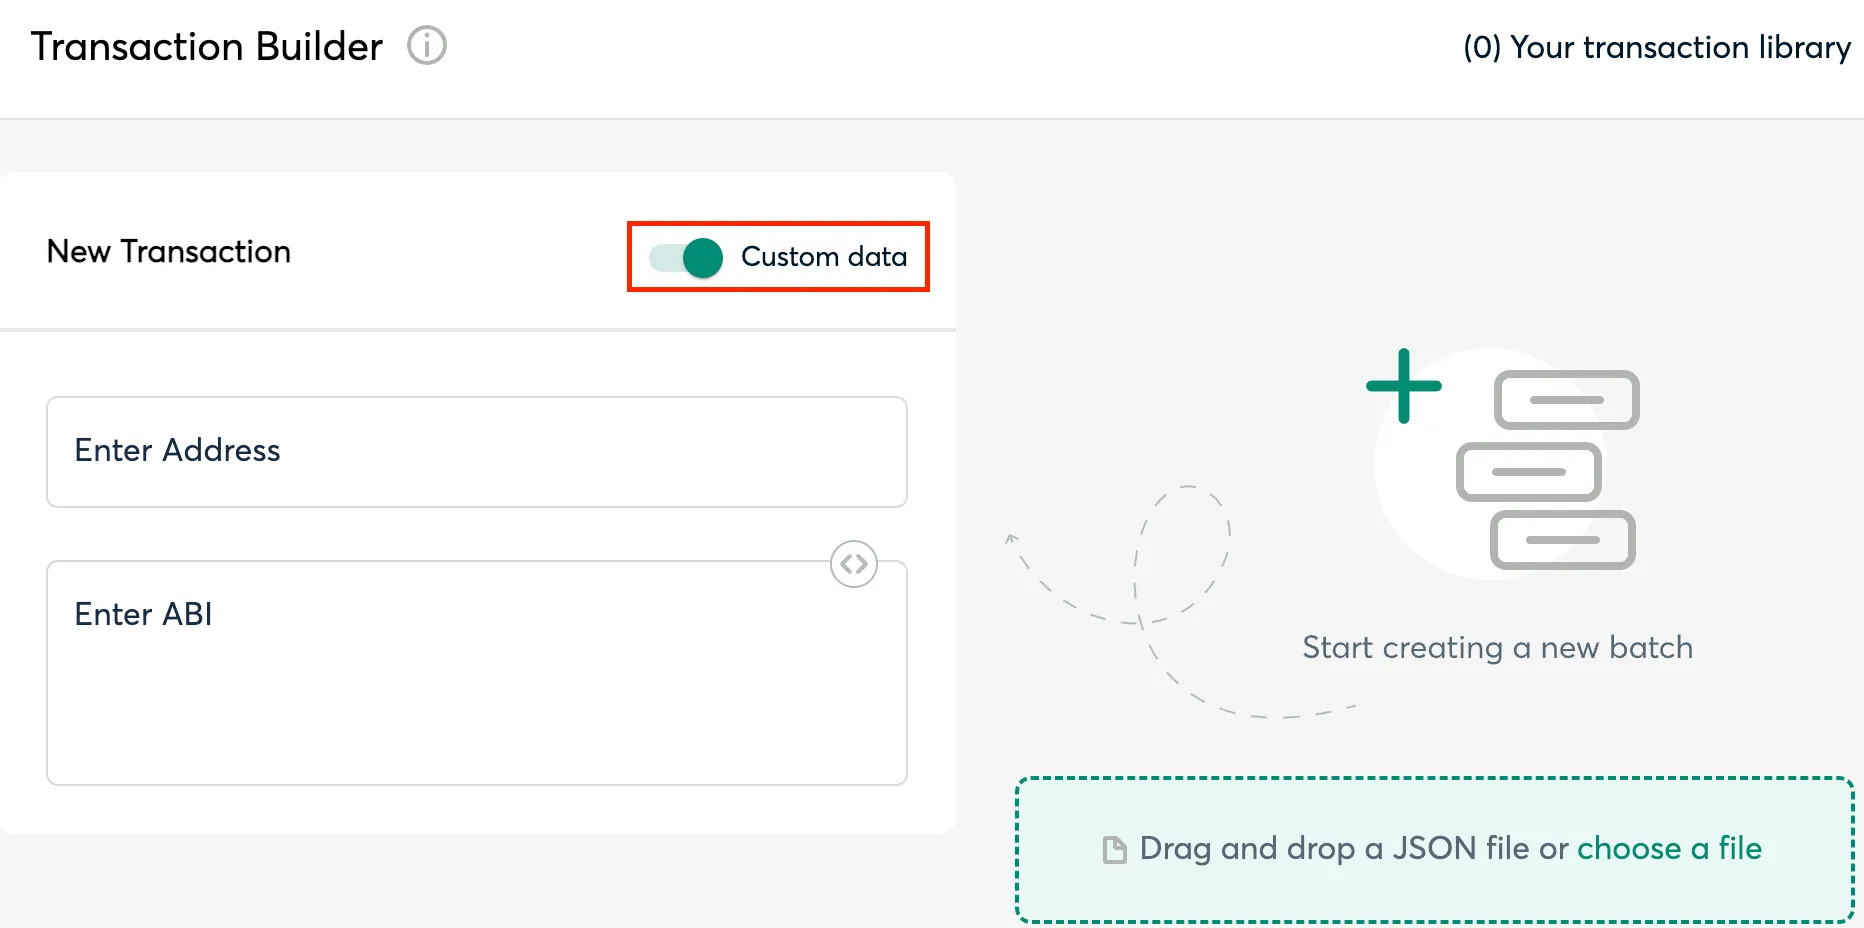 4. Input the MessageProxy address for your correct environment into the **Contract Address** field and select **Use Implementation ABI** **MessageProxy Contract Addresses** | Network | Contract Address | | ------------------------ | ------------------------------------------ | | Ethereum Mainnet | 0x8629703a9903515818C2FeB45a6f6fA5df8Da404 | | Ethereum Holesky Testnet | 0x682ef859e1cE314ceD13A6FA32cE77AaeCE98e28 | 5. Input **0** for ETH Value 6. Input the above **Output** from the `npx msig...` command into the **Data (Hex Encoded)** field (see image). 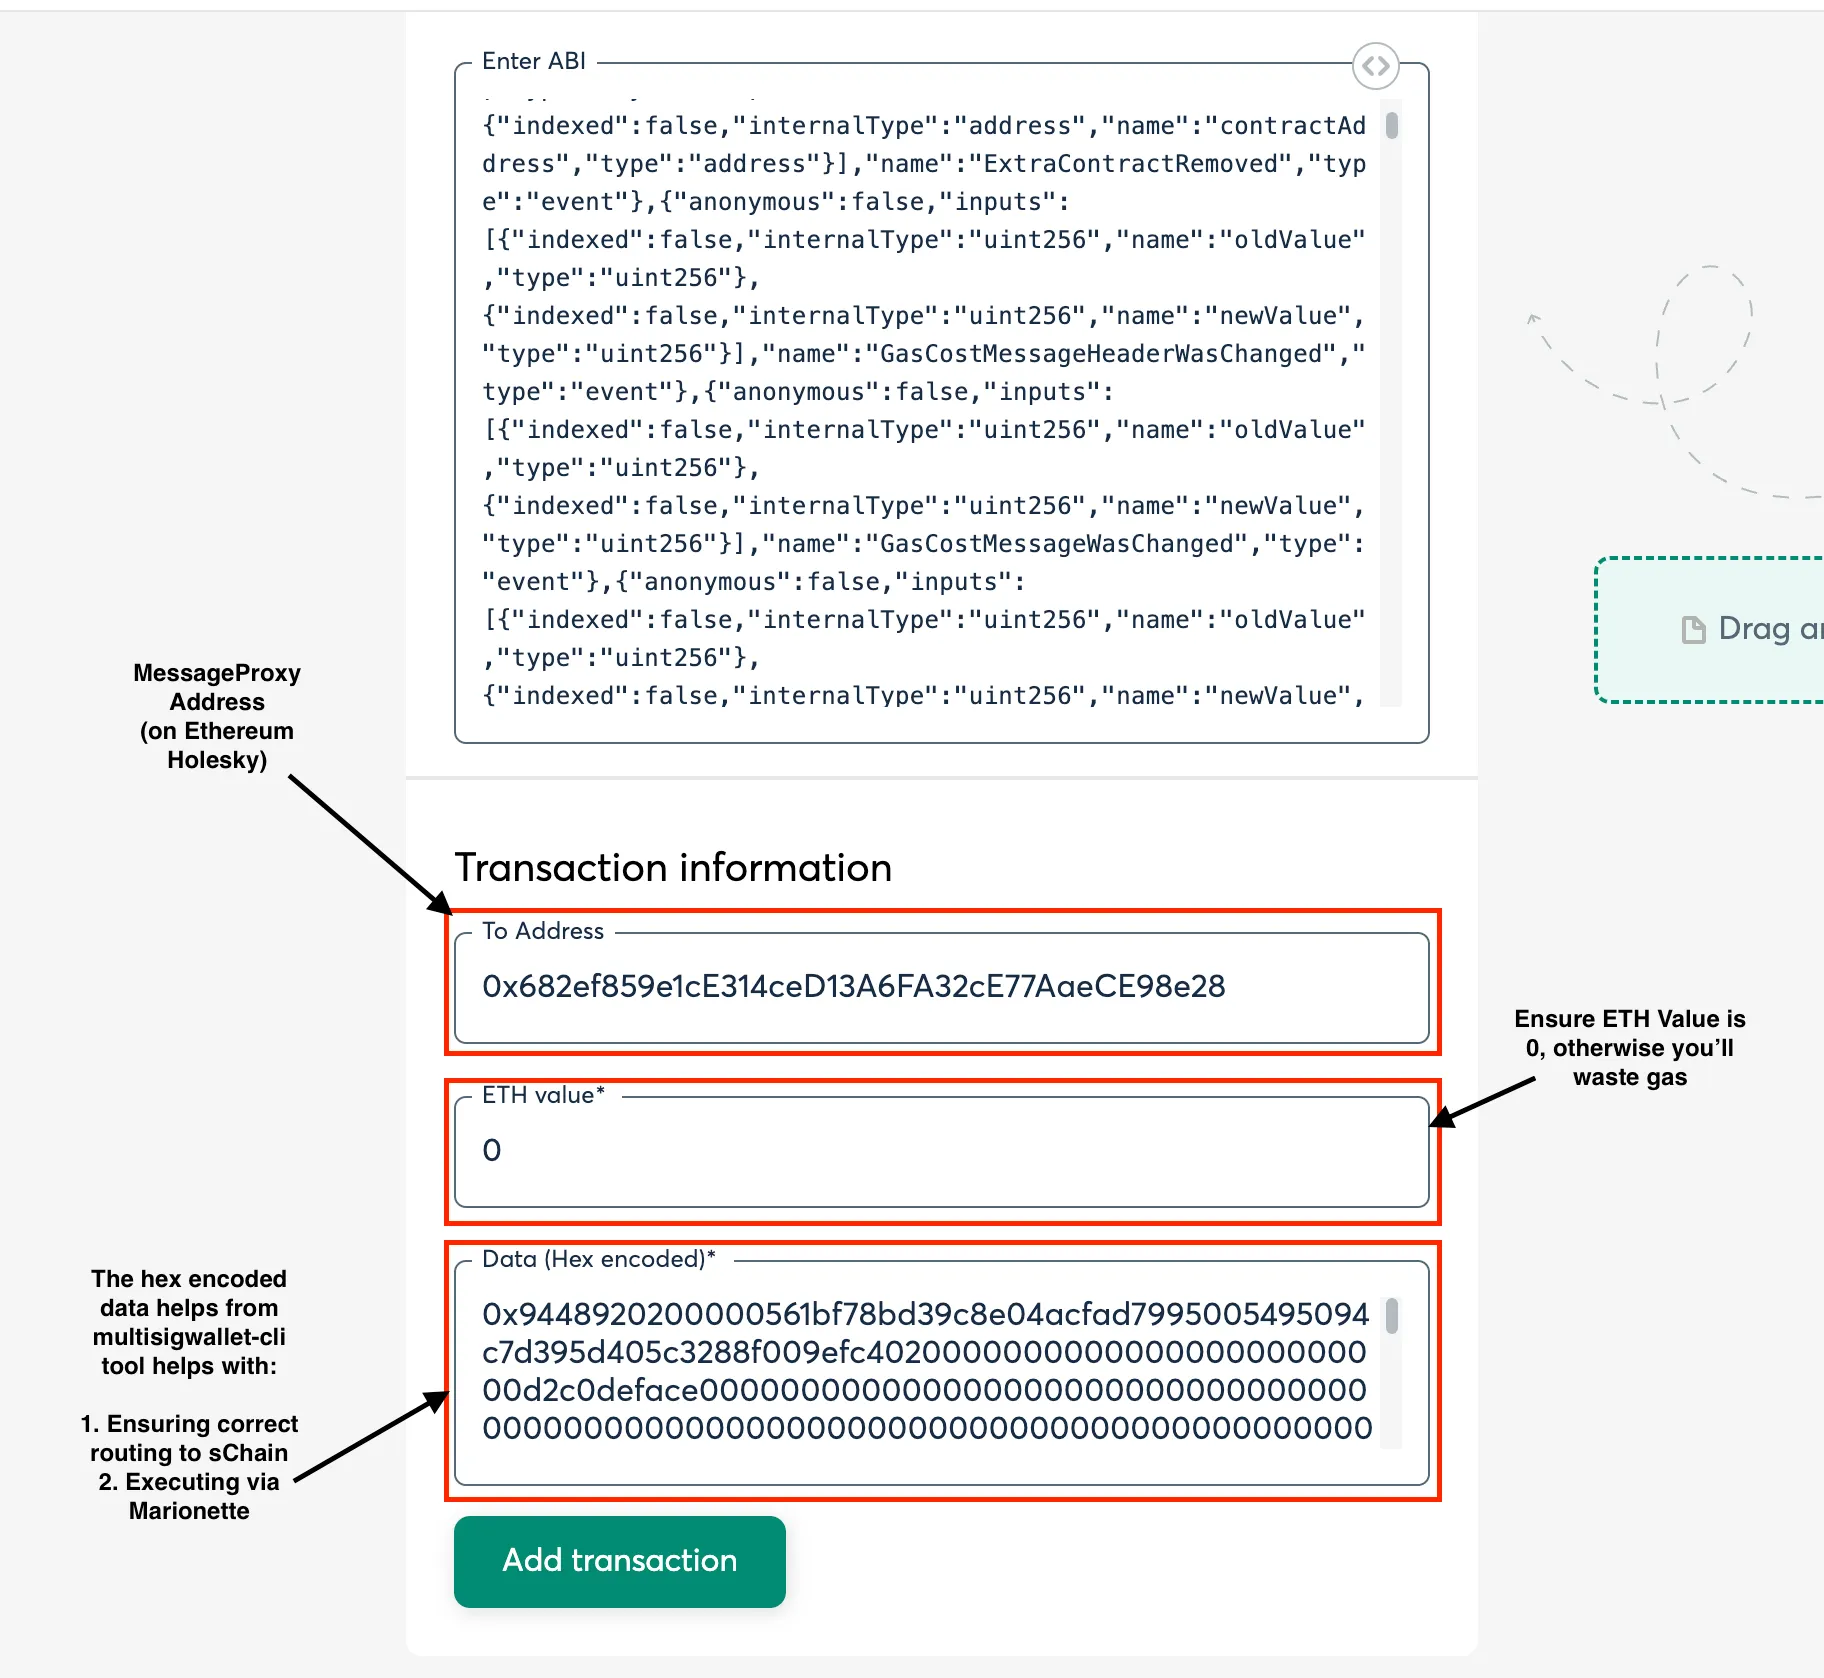 7. Click **Add transaction**, scroll down, and click **Create Batch**, then click **Send Batch**. [Tenderly](https://tenderly.co/) simulation is generally available, even on testnet, and is encouraged to be used to see all the changes occuring on the Ethereum side before they occur. ### Executing the Transaction [Section titled “Executing the Transaction”](#executing-the-transaction) Executing the transaction is equivalent to sending a transaction to the blockchain. As this requires the SKALE Network validators to pickup the message from Ethereum and post it to the SKALE Chain, please allow time for the Ethereum transaction to be included and for the message to post to SKALE.
# Compliance Requirements
> Requirements for Validator Compliance
The following document outlines compliance requirements for SKALE Network supernodes. Failure to follow these requirements will result in a supernode forfeiting bounty for each month that it’s not in compliance as well as SKALE Chain payment claims. Please be sure to follow the entire proper setup and backup procedures described in Validator Denali Upgrade documentation to ensure your supernode is operating as intended. ## Compliance Requirements [Section titled “Compliance Requirements”](#compliance-requirements) The following compliance requirements are required to ensure all supernodes meet a standard of performance. Caution Failure to meet ANY ONE of the following Denali compliance requirements will result in a supernode being marked “Out of Compliance” by the NODE Foundation and the supernode may be forced to forfeit monthly bounties if it is unable to return to “In Compliance” by the time the monthly `getBounty` is called. ## General Check [Section titled “General Check”](#general-check) Supernode operators can use this general PASS/FAIL check to confirm whether a supernode meets the compliance requirements. ## Wallet Balances [Section titled “Wallet Balances”](#wallet-balances) * At least 0.5 ETH in self-recharging validator wallet (should be >= NODES\_NUMBER \* 0.5) * At least 1 ETH in each supernode wallet ## Hardware [Section titled “Hardware”](#hardware) * A Linux x86\_84 machine * At least 8 physical cores (benchmark AWS t2.2xlarge) * At least 32 GB RAM * At least 100 GB root storage (not tested at the moment, recommended) * At minimum, separate not mounted block device - 2 Tb TB (1.9 TB actual measure) attached and unformatted non-boot storage (Note that separate not mounted block device - 2Tb TB storage results in < separate not mounted block device - 2Tb TB actual physical storage) * At least 16 GB swap Test: `http://YOUR_SKALE_NODE_IP:3009/status/hardware` Example response: ```shell {"data": {"cpu_total_cores": 8, "cpu_physical_cores": 8, "memory": 33675792384, "swap": 67350032384, "system_release": "Linux-5.4.0-1045-aws", "uname_version": "#47~18.04.1-Ubuntu SMP Tue Apr 13 15:58:14 UTC 2021", "attached_storage_size": 214748364800}, "error": null} ``` ## Networking [Section titled “Networking”](#networking) * Non-expired SSL certificates for each supernode. * The certificate file should be issued in PEM format, issued by a trusted authority, and contain a full certificate chain. * Certificate should always be renewed to avoid expiry * Don’t touch machine firewall (iptables installed by skale supernode software automatically sets machine firewall rules), external VPC or networking firewall ensure **some\_port\_range**. ## Servers [Section titled “Servers”](#servers) ### SGXWallet [Section titled “SGXWallet”](#sgxwallet) * 1 SGX server for up to 5 SKALE supernodes (not tested, but required) * 6 cores (not tested, but required) * 8GB RAM (not tested, but required) Test: `http://YOUR_SKALE_NODE_IP:3009/status/sgx` Example response: ```shell {"data": {"status": 0, "status_name": "CONNECTED", "sgx_wallet_version": "1.75.0"}, "error": null} ``` ### ETH Mainnet Endpoint [Section titled “ETH Mainnet Endpoint”](#eth-mainnet-endpoint) After the merge a Mainnet supernode operator must run both an execution client and a consensus client at the same time. We highly recommend using Prysm as a consensus client because it’s the one which SKALE software is being tested on. You can find complete installation instructions [here](https://docs.prylabs.network/docs/install/install-with-script). Test: `http://YOUR_SKALE_NODE_IP:3009/status/endpoint` Example Response: ```shell {"data": {"block_number": 8728517, "syncing": false, "trusted": true, "client": "Geth/v1.10.2-stable-c2d2f4ed/linux-amd64/go1.16"}, "error": null} ``` ## Software [Section titled “Software”](#software) Latest Mainnet software versions are defined [here](https://github.com/skalenetwork/skale-network/tree/master/releases): * Supernode software versions must be updated to the latest Denali requirements * SGXWallet software versions must be updated to the latest Denali requirements * SGX container should be up and running and should be responding to health check request * FILEBEAT\_HOST should be defined in .env and the filebeat container should be up and running. The supernode must be sending logs to elastic server * All skale-containers are always running on the supernode * filebeat * skale-admin * bounty * transaction-manager * nginx * skale-api * celery * schain (if selected for SKALE Chain) Test: `http://YOUR_SKALE_NODE_IP:3009/status/meta-info` Example response: ```shell {"data": {"version": "1.1.0", "config_stream": "1.2.1", "docker_lvmpy_stream": "1.0.1-stable.1"}, "error": null} ``` Test: `http://YOUR_SKALE_NODE_IP:3009/status/schain-containers-versions` Example response: ```shell {"data": {"skaled_version": "3.5.12-stable.1", "ima_version": "1.0.0-develop.148"}, "error": null} ``` Test: `http://YOUR_SKALE_NODE_IP:3009/status/core` Example response: ```shell {"data": [{"image": "skalenetwork/schain:3.5.12-stable.1", "name": "skale_schain_beautiful-al-anz", "state": {"Status": "running", "Running": true, "Paused": false, "Restarting": false, "OOMKilled": false, "Dead": false, "Pid": 21709, "ExitCode": 0, "Error": "", "StartedAt": "2021-04-26T14:49:51.705052477Z", "FinishedAt": "0001-01-01T00:00:00Z"}}, ... ``` BTRFS kernel module must be enabled. `http://YOUR_SKALE_NODE_IP:3009/status/btrfs` returns information about btrfs kernel module (enabled/disabled). Public IP must be the same as the registered supernode IP. `http://YOUR_SKALE_NODE_IP:3009/status/public-ip` returns public ip address (source of the packets that your supernode is sending to other supernodes) IMA Container must pass healthcheck. `http://YOUR_SKALE_NODE_IP:3009/status/ima` returns information about basic ima healthcheck ## Networking [Section titled “Networking”](#networking-1) * Check key-cert pair validity using `http://YOUR_SKALE_NODE_IP:3009/status/ssl` * Test ssl certificates using `skale ssl check` * Don’t touch machine firewall (iptables installed by supernode software automatically sets machine firewall rules), external VPC or networking firewall ensure Ports open on **80, 311, 443,** 3009, 8080, 9100, 10000–18192, and ICMP IPv4 (in other words, not closed by an external firewall).
# Validator FAQ
> Frequently Asked Quesitons related to SKALE Network Validators
### Are network incentives setup to be mining pool resistant? [Section titled “Are network incentives setup to be mining pool resistant?”](#are-network-incentives-setup-to-be-mining-pool-resistant) Yes — SKALE is a Delegated Proof of Stake Network; meaning there are no direct mining capabilities. Additionally, the concept of pooling mining power has been eliminated on SKALE entirley where every Supernode has equal earning power simply by supplying compute to the network and meeting the decentralized SLA. To learn more checkout the article on the [SKALE Blog](https://skale.space/blog/eliminating-mining-pools) about Eliminating Mining Pools. ### Are you aware of Intel SGX-related attacks like Plundervolt, cache attacks, and other vulnerabilities? [Section titled “Are you aware of Intel SGX-related attacks like Plundervolt, cache attacks, and other vulnerabilities?”](#are-you-aware-of-intel-sgx-related-attacks-like-plundervolt-cache-attacks-and-other-vulnerabilities) The SKALE team stays abreast of any and all security issues related to Intel SGX and takes all measures necessary to counteract them. Intel is very good at providing BIOS updates to address any security holes and prevent these types of attacks. The validator also shares security responsibility for ensuring that their service providers consistently use the latest BIOS version. The SKALE team will keep validators abreast of security issues, recommend best practices, and work closely with validators to address these issues and more. ### Why the specific requirements for the disk storage and memory? [Section titled “Why the specific requirements for the disk storage and memory?”](#why-the-specific-requirements-for-the-disk-storage-and-memory) The SKALE Network is designed to be highly performant with high throughput and low latency. On-chain storage is also an optional offering by the network and so disk storage needs to be above a certain amount in order to support this capability. Nodes operate in a virtualized manner, meaning that one SKALE Supernode can service many chains. The network can support a variety of chain sizes where different chain sizes use some different fractional portion of a Supernode. The network currently operates with virtualized nodes consuming 1/8th of a Supernode. We should also mention the future that the SKALE Network is building towards is one where decentralized solutions will make use of a number of chains – not unlike the way cloud applications today make use of multiple microservice meshes and/or database clusters, each one optimized for the app features or capabilities it is supporting. ### Has the Intel SGX technology been adequately vetted? [Section titled “Has the Intel SGX technology been adequately vetted?”](#has-the-intel-sgx-technology-been-adequately-vetted) Yes, the SKALE technology team has analyzed the benefits and operation of the Intel SGX chipset in depth, is aware of any perceived vulnerabilities, and is satisfied the technology meets the security and data protection requirements of the network. ### Some networks that use BLS signatures use Ledger as opposed to Intel SGX. Why the difference? [Section titled “Some networks that use BLS signatures use Ledger as opposed to Intel SGX. Why the difference?”](#some-networks-that-use-bls-signatures-use-ledger-as-opposed-to-intel-sgx-why-the-difference) Most often the case is that these other networks are applying BLS multisignature aggregation. Simply put, every validator generates a BLS signature and then performs operations with this signature. The network protocol aggregates all signature operations into one. What you gain from this process is compressed data, since instead of multiple ECDSA keys, you have a single aggregated signature, and nothing more. This use is suitable for Ledger hardware. SKALE’s process is drastically different. SKALE uses BLS threshold signatures – a different and much more complicated process than BLS signature aggregation. To make a threshold signature work – such that only **t of n** operators are needed to perform an operation – one needs a trusted process to construct a BLS public key based on secret shares from each of the operators. This is called DKG or distributed key generation and requires much more complicated processing than what Ledger-based solutions can provide. Whereas Ledger-based networks are simply storing a BLS signature for the purposes of multi-signature aggregation, Intel SGX is being used for DKG and related threshold operations. Another critical distinction is that BLS signature aggregation is performed per validator, whereas BLS threshold signature operations are done per SKALE Chain and on a frequent basis. If a validator node is supporting 128 SKALE chains, then the node core has to generate 128 BLS threshold public keys and 128 BLS threshold private keys via distributed key generation. If a validator is using a single Intel SGX server to support 16 nodes and each node is running 128 chains, then it needs to generate and maintain 2048 public and private BLS threshold keys. When a node is swapped into a new SKALE chain, the DKG process is re-initiated with all nodes within the chain group, resulting in new public and private key generation for that specific SKALE chain. Given this increased frequency of digital key generation and complexity of BLS threshold cryptography, the use of Intel SGX is an optimal solution for addressing the performance and data security requirements of the network. ### What are the hardware requirements for being a validator node? [Section titled “What are the hardware requirements for being a validator node?”](#what-are-the-hardware-requirements-for-being-a-validator-node) Validators need to provision and operate their own server or servers with sufficient network capacity and data center operational integrity. Servers can operate in a public or private cloud setting or on locally provisioned hardware, provided they meet SLA requirements. A particular requirement for servers is that they operate Intel SGX. Intel SGX (Software Guard Extensions) is a set of instructions that increases the security of application code and data, providing added protection from disclosure or modification. Developers can partition sensitive information into enclaves, which are areas of execution in memory with more security protection. It is recommended that all nodes in a validator set be Intel SGX servers although it’s also possible to set up a network nodes with a certain ratio of Intel SGX servers to non-SGX servers. Other node requirements include Ubuntu 22.04 or above, 200GB of attached storage, and 32GB RAM. ### What type of validators is the network looking for? [Section titled “What type of validators is the network looking for?”](#what-type-of-validators-is-the-network-looking-for) The SKALE Network is open to any validator as long as they meet the technical requirements and staking commitment. Validators should have the desire and resources to run Supernodes as well as personnel capable of operating the SKALE Supernodes with proper global coverage. ### What is the Service Level Agreement (SLA) threshold? [Section titled “What is the Service Level Agreement (SLA) threshold?”](#what-is-the-service-level-agreement-sla-threshold) The SLA threshold is a high percentage uptime and low latency response time. If a validator cannot meet the SLA requirements for a particular epoch (as determined by the network monitoring procedures), they will not be eligible to participate in the awards from the bounty pool. ### Is there a minimum delegation requirement? [Section titled “Is there a minimum delegation requirement?”](#is-there-a-minimum-delegation-requirement) No — there is no minimum delegation requirement for a validator. Validators can chose to self-delegate or choose to bring on delegators, in which case, validators can set minimum delegation amount for accepting delegations. ### Does the network have support for validator commissions and delegation of investor stakes? [Section titled “Does the network have support for validator commissions and delegation of investor stakes?”](#does-the-network-have-support-for-validator-commissions-and-delegation-of-investor-stakes) Yes — validators can raise stake from delegators and have this reflected via contracts running the network. Commissions can be set for the monthly bounties such that payouts can be split into both commissions (to the validator) and delegator awards (to stakers). The commission rate that is set is solely at the discretion of validators and on what the market will bear. ### Is there any unbonding or undelegation period? [Section titled “Is there any unbonding or undelegation period?”](#is-there-any-unbonding-or-undelegation-period) Yes — the unbonding period for SKL tokens is the time between an undelegation request and the epoch at whicher the current delegation ends. Example: Delegator delegates 100,000 SKL to Validator 1 on January 5th. Validator 1 accepts delegation on January 25th. Delegation goes into affect February 1. The delegation remains in affecet and and will automatically re-delegate on April 1. If an undelegation request is made anytime between February 1 and April 1 (\~3 days before is the recommended deadline to request undelegation); then the unboding period is the time between undelegation request and April 1. ### Is there a Minimum Staking Requirement (MSR)? Why is there an MSR? [Section titled “Is there a Minimum Staking Requirement (MSR)? Why is there an MSR?”](#is-there-a-minimum-staking-requirement-msr-why-is-there-an-msr) Yes, the MSR for a single Supernode is currently **20,000,000 SKL**. A key requirement for an effective security and execution layer is a proper incentive structure that addresses both penalties and rewards. With respect to the former, every validator node should have significant value staked into a network. Staking is an enforcer of good behavior in that if a validator decides to collude or go byzantine and gets caught, it will lose its stake and be removed from the network. ### How does the network mitigate security risks? [Section titled “How does the network mitigate security risks?”](#how-does-the-network-mitigate-security-risks) Security and validity of transactions in a chain or subchain in a second layer primarily rests with the performance and behavior of the validator nodes. To make sure the validation layer is operating properly, a network first has to have a large number of validator nodes. A small number of nodes in a network is inherently risky and fragile. In addition and as a requirement for a secure and robust network, it ideally needs to provide for: 1. The random selection of chain validator sets 2. The rotation of nodes in and out of chains on a frequent basis. Without randomness and rotation, there is a far greater risk of bribery of and/or collusion between validators, vastly reducing the security and integrity of the chains within a network.
# Changing Node IP
> Explores how to handle management of IP addresses with SKALE Nodes.
Caution You can’t change your node IP address at this time. What is possible is to remove the node with the incorrect/old IP address and register a new node under the correct/new IP while keeping the old SGX key. Please contact the core team before proceeding for further guidance. It is recommended to use a **permanent IP that can dynamically point to a node’s machine IP (for example, elastic IP)** so you can update machines if needed without having to change the IP recorded in SKALE Manager during node registration. Important If you must change your node IP in SKALE Manager, you must perform a node exit and re-registration between the time after getBounty is called and before 72 hours (3 days) elapses in the next month. Also, performing a node exit could be expensive to the node operator if it’s currently supporting SKALE Chains. To perform a node exit, and register a new machine and IP: 1. Be sure to backup SKALE Node and SGX Wallet. 2. Be sure you have your SGX Backup key. 3. Execute `skale exit start` on the exiting node during the time window between getBounty and 72 hours from the UTC start of the month. 4. Verify the exit process by executing `skale exit status`. (You don’t need to wait for exit to finalize) 5. Create a new node machine (`skale node init .env`, `skale wallet info`). 6. From the old machine, move your node address funds to the new node wallet address `skale wallet send [new_address] [amount]`. 7. Unlink the old node address `sk-val validator unlink-address [OLD_NODE_ADDRESS]` 8. Link the new node to the validator ID `skale node signature [VALIDATOR_ID]`, `sk-val validator link-address [NEW_NODE_ADDRESS] [NEW_NODE_SIGNATURE]` 9. Register the node with under the new IP `skale node register --name [NODE_NAME] --ip [NODE_IP] --port [PORT]`. To perform a node exit, keep the original node machine and its data and update the IP, follow these steps (NOT RECOMMENDED): 1. Perform the general node exit procedure steps 1 and 2 above. 2. Be sure you have securely saved the sgx\_key\_name before moving to step 3. 3. Remove .skale directory, remove all old containers, volumes, etc 4. Do skale node init again. 5. Go to `~/.skale/node_data/node_config.json` and replace `sgx_key_name` field with the old one. 6. Link the node to the validator ID again. 7. Register node with a new IP.
# Node SSL Setup
> Document walks a validate through how to setup SSL for a node.
## Introduction [Section titled “Introduction”](#introduction) Node SSL certificates support secure communication with sChain endpoints. By default, each node of a SKALE Chain listens on HTTP and WS ports. If SSL certs exist on the node, then HTTPS and WSS ports are also turned on. Node SSL certificates aren’t required to start a node, register it, or create sChains. However, dApp developers using SKALE Chains need HTTPS/WSS endpoints to work with toolings such as API based wallets and other integrations. Therefore, SSL certificates are required for SKALE Network validator nodes. ## Node SSL onboarding [Section titled “Node SSL onboarding”](#node-ssl-onboarding) Here’s an example of a step-by-step process of setting up validator node SSL. ### Prerequisites [Section titled “Prerequisites”](#prerequisites) To upload SSL certificates to the node, you’ll have to do a few steps on your side which may vary depending on your domain name provider, certificate authority, etc. [See here for reference example](#reference-letsencrypt-tutorial) of how use free Let’s Encrypt certificates. The steps include: * getting domain names for each node. * issuing SSL certificates for them. * uploading certificates to the node. * setting up domain name for the node in the SKALE Manager smart contracts. 1. Domain name and redirects The first thing you will need is the domain name. You’ll need one per node, so it makes sense to set up a subdomain for each one and set up redirects. Let’s say you own `awesome-validator.com` and run two nodes with the following IP addresses, names, and redirects: | Node name | Node IP | Redirect | | --------- | ---------- | ---------------------------- | | node-0 | 123.1.23.5 | node-0.awesome-validator.com | | node-1 | 5.46.34.25 | node-1.awesome-validator.com | 2. Verify redirects You can verify that redirects work by sending a request to the watchdog API on 3009 port using your domain name. 3. Issue SSL certificates Once you have all redirects for your nodes, you can move to the SSL certificates. You will need SSL certs issued by one of the [Trusted CAs](#trusted-authorities). Once you’ve decided on the certificate issuer, you have several options - issue a separate certificate for each subdomain (node-0.awesome-validator.com, node-1.awesome-validator.com) or issue a single Wildcard SSL for all nodes (\*.awesome-validator.com). As a result, you should have 2 main files saved and copied to the respective nodes: * Certificate file (usually called something like fullchain.pem or cert.pem) * Private key file (usually called something like privkey.pem, pk.pem) 4. Upload certificates to the SKALE Node Once you copied the certificate and private key file, all you have to do is to run the following command: ```shell skale ssl upload -c $PATH_TO_CERT_FILE -k $PATH_TO_KEY_FILE ``` Once certificates are uploaded, you can check them by running: ```shell skale ssl status ``` 5. Set domain name for your node in the SKALE Manager smart contracts To set the domain name of the registered node with SKALE manager, execute the following node-cli command on each respective node: ```shell skale node set-domain -d node-0.awesome-validator.com ``` See full reference for the `set-domain` command [https://github.com/skalenetwork/node-cli#domain-name\[here](https://github.com/skalenetwork/node-cli#domain-name%5Bhere)]. Be sure get a domain in advance to provide it when adding a new node to the network: ```shell skale node register --ip 1.2.3.4 -d node-0.awesome-validator.com --name node-0-AV ``` See full reference for the `register` command [https://github.com/skalenetwork/node-cli#node-registration\[here](https://github.com/skalenetwork/node-cli#node-registration%5Bhere)]. ## Trusted authorities [Section titled “Trusted authorities”](#trusted-authorities) When choosing CA for getting your SSL certificate, consider a source that will be trusted by most major browsers, operating systems, and other devices. Here’s a list of links that can help you with your decision: * List of major CA providers: * CAs trusted by Mozilla: * CAs trusted by Apple: , Also, here’s a list of the most popular and well-known SSL providers: * DigiCert * NameCheap Most of them usually providing you with a few options like RapidSSL and DigiCert. Warning Certificates provided by Letsencrypt are widely used now and trusted by most operating systems and devices, so it’s OK to use them for your node, but don’t forget about renewals since Letsencrypt certs expire in 3 months. You can read more about Letsencrypt security and trust here: ## Reference Letsencrypt tutorial [Section titled “Reference Letsencrypt tutorial”](#reference-letsencrypt-tutorial) This brief tutorial shows you how to generate a wildcard SSL using Letsencrypt. 1. Install Certbot 2. Run ```shell certbot certonly --standalone -d my.domain.com ``` 3. Copy .pem files to secure place ```shell cp *.pem ~/[SECURE_DIR] ```
# Node CLI
> The Node CLI offers a command line option for setting up, registering, and maintaining SKALE nodes.
The **SKALE Network Node CLI** is a command-line interface designed to interact with and manage supernodes within the SKALE Network. The Node CLI tool contains functionality to help support with managing SKALE SKALE Chain containers, setting up and managing monitoring, supernode resource allocation, and more. Access documentation for v2.0, the latest release [here](/run-a-skale-node/node-cli/releases/v2-0)
# Node CLI - v2.0
> The Node CLI offers a command line option for setting up, registering, and maintaining SKALE nodes.
## Installation [Section titled “Installation”](#installation) 1. Download the executable ```shell VERSION_NUM={put the version number here} && sudo -E bash -c "curl -L https://github.com/skalenetwork/node-cli/releases/download/$VERSION_NUM/skale-$VERSION_NUM-`uname -s`-`uname -m` > /usr/local/bin/skale" ``` 2. Apply executable permissions to the downloaded binary ```shell chmod +x /usr/local/bin/skale ``` 3. Test the Installation ```shell skale --help ``` ## Top Level Commands [Section titled “Top Level Commands”](#top-level-commands) ### Info [Section titled “Info”](#info) Prints build info. ```shell skale info ``` ### Version [Section titled “Version”](#version) Prints version number. ```shell skale version ``` **Optional Arguments** * `--short` prints the version only without additional text. ## Node Commands [Section titled “Node Commands”](#node-commands) ### Node Information [Section titled “Node Information”](#node-information) Retrieves the base info about SKALE node. ```shell skale node info ``` **Optional Arguments** * `-f/--format` accepts either **json** or **text** as valid input which formats the output accordingly ### Node Initialization [Section titled “Node Initialization”](#node-initialization) Initialize a SKALE node on current machine. Warning **Please avoid re-initialization**: First run `skale node info` to confirm current state of initialization. ```shell skale node init [ENV_FILEPATH] ``` **Required Parameters** 1. `ENV_FILEPATH` is a path to the .env file (required parameters are listed in the `skale init` command) .env ```yaml # SGX server URL SGX_SERVER_URL= # disk mount point for storing sChains data DISK_MOUNTPOINT= # stream of docker-lvmpy to use DOCKER_LVMPY_STREAM= # stream of skale-node to use CONTAINER_CONFIGS_STREAM= # RPC endpoint of the node in the network where SKALE Manager is deployed ENDPOINT= # same as ENDPOINT IMA_ENDPOINT= # URL to SKALE Manager contracts ABI and addresses MANAGER_CONTRACTS_ABI_URL= # URL to IMA contracts ABI and addresses IMA_CONTRACTS_ABI_URL= # URL to the Filebeat log server (provided by SKALE Core team) FILEBEAT_URL= # Optional - Telegram API key TG_API_KEY= # Optional - Telegram chat ID TG_CHAT_ID= # Optional - will enable monitoring containers (cadvisor, node-exporter) MONITORING_CONTAINERS= ``` ### Node Initialization from Backup [Section titled “Node Initialization from Backup”](#node-initialization-from-backup) Restores a SKALE node on another machine. ```shell skale node restore [BACKUP_PATH] [ENV_FILEPATH] ``` **Required Parameters** 1. `BACKUP_PATH` is the path to the archive with backup data generated by `skale node backup` command 2. `ENV_FILEPATH` is the path to .env file (required parameters are listed in the `skale init` command) ### Node Backup [Section titled “Node Backup”](#node-backup) Generates a backup file to restore SKALE node on another machine. ```shell skale node backup [BACKUP_FOLDER_PATH] ``` **Required Parameters** 1. `BACKUP_FOLDER_PATH` is the path to the folder where the backup tarball will be saved ### Node Signature [Section titled “Node Signature”](#node-signature) Generates a node signature that is used to link node to a specific validator. ```shell skale node signature [VALIDATOR_ID] ``` **Required Parameters** 1. `VALIDATOR_ID` - id of the validator ### Node Registration [Section titled “Node Registration”](#node-registration) ```shell skale node register ``` **Required Arguments** * `--ip` is the public IP for RPC connections and consensus * `--domain`/`-d` is the SKALE node domain name * `--name` is the SKALE node name **Optional Arguments** * `--port` is a public port, the beginning of the port range for node SKALE Chains (default: *10000*) ### Node Update [Section titled “Node Update”](#node-update) Updates a SKALE node on the current machine. ```shell skale node update [ENV_FILEPATH] ``` **Required Arguments** * `ENV_FILEPATH` is the path to env file where parameters are defined **Optional Arguments** * `--yes` executes without additional confirmation ### Node Turn-off [Section titled “Node Turn-off”](#node-turn-off) Turns off the SKALE node on current machine and optionally sets it to maintenance mode. ```shell skale node turn-off ``` **Optional Arguments** * `--maintenance-on` sets the SKALE node into maintenance mode before turning off * `--yes` executes without additional confirmation ### Node Turn-on [Section titled “Node Turn-on”](#node-turn-on) Turns on SKALE node on current machine and optionally disables maintenance mode. ```shell skale node turn-on [ENV_FILEPATH] ``` **Optional Arguments** **Required Parameters** 1. `ENV_FILEPATH` is the path to env file where parameters are defined **Optional Arguments** * `--maintenance-off` turns off maintenance mode after turning on the node * `--yes` executes without additional confirmation ### Enable Maintenance Mode [Section titled “Enable Maintenance Mode”](#enable-maintenance-mode) Enables maintenance mode on the node. ```shell skale node maintenance-on ``` **Optional Arguments** * `--yes` executes without additional confirmation ### Disable Maintenance Mode [Section titled “Disable Maintenance Mode”](#disable-maintenance-mode) ```shell skale node maintenance-off ``` ### Domain name [Section titled “Domain name”](#domain-name) Set SKALE node domain name ```shell skale node set-domain ``` **Optional Arguments** * `--domain`/`-d` the SKALE node domain name * `--yes` executes without additional confirmation ## Wallet commands [Section titled “Wallet commands”](#wallet-commands) Commands related to Ethereum wallet associated with SKALE node ### Wallet information [Section titled “Wallet information”](#wallet-information) ```shell skale wallet info ``` **Optional Arguments** * `-f/--format` formats the output. Valid inputs are **json** and **text** ### Send ETH tokens [Section titled “Send ETH tokens”](#send-eth-tokens) Sends ETH tokens from the SKALE node wallet to a specific address. ```shell skale wallet send [ADDRESS] [AMOUNT] ``` **Required Parameters** 1. `ADDRESS` is the Ethereum receiver address 2. `AMOUNT` is the Amount of ETH tokens to send **Optional Arguments** * `--yes` executes without additional confirmation ## sChain commands [Section titled “sChain commands”](#schain-commands) ### List sChains on Node [Section titled “List sChains on Node”](#list-schains-on-node) Lists the SKALE Chains served by the connected node. ```shell skale schains ls ``` ### Get sChain Config [Section titled “Get sChain Config”](#get-schain-config) ```shell skale schains config SCHAIN_NAME ``` ### Get sChain DKG Status [Section titled “Get sChain DKG Status”](#get-schain-dkg-status) Lists the DKG status for each SKALE Chain on the node. ```shell skale schains dkg ``` ### Get sChain Info [Section titled “Get sChain Info”](#get-schain-info) Shows information about a specified SKALE Chain on the node. ```shell skale schains info SCHAIN_NAME ``` **Required Parameters** 1. `SCHAIN_NAME` is a valid sChain on the node **Optional Arguments** * `--json` shows info in JSON format ### Repair sChain [Section titled “Repair sChain”](#repair-schain) Turn on repair mode for SKALE Chain ```shell skale schains repair SCHAIN_NAME ``` **Required Parameters** 1. `SCHAIN_NAME` is a valid sChain on the node **Optional Arguments** * `--yes` executes repair without additional confirmation ## Health commands [Section titled “Health commands”](#health-commands) ### List Containers [Section titled “List Containers”](#list-containers) Lists all SKALE containers running on the connected node. ```shell skale health containers ``` **Optional Arguments** * `-a/--all` lists all containers (by default - only running) ### Healthcheck for sChains [Section titled “Healthcheck for sChains”](#healthcheck-for-schains) Shows health check results for all SKALE Chains on the node. ```shell skale health schains ``` **Optional Arguments** * `--json` shows info in JSON format ### SGX Commands [Section titled “SGX Commands”](#sgx-commands) Checks status of the SGX server. Returns the SGX server URL and connection status. ```shell $ skale health sgx ``` #### Example Output [Section titled “Example Output”](#example-output) ```shell SGX server status: ┌────────────────┬────────────────────────────┐ │ SGX server URL │ https://0.0.0.0:1026/ │ ├────────────────┼────────────────────────────┤ │ Status │ CONNECTED │ └────────────────┴────────────────────────────┘ ``` ## SSL Commands [Section titled “SSL Commands”](#ssl-commands) ### SSL Status [Section titled “SSL Status”](#ssl-status) Retrieves the status of the SSL certificates on the node. ```shell skale ssl status ``` ### Upload Certificates [Section titled “Upload Certificates”](#upload-certificates) Uploads new SSL certificates. ```shell skale ssl upload ``` **Required Arguments** * `-c/--cert-path` is the path to the certificate file * `-k/--key-path` is the path to the key file **Optional Arguments** * `-f/--force` overwrites the existing certificates ## Logs Commands [Section titled “Logs Commands”](#logs-commands) ### CLI Logs [Section titled “CLI Logs”](#cli-logs) Fetch Node CLI logs. ```shell skale logs cli ``` **Optional Arguments** * `--debug` shows debug logs with a more verbose output ### Dump Logs [Section titled “Dump Logs”](#dump-logs) Dumps all logs from the connected node. ```shell skale logs dump [PATH] ``` **Required Parameters** 1. `PATH` is the required path to dump the logs to **Optional Arguments** * `--container`, `-c` - Dump logs only from specified container ## Resources Allocation Commands [Section titled “Resources Allocation Commands”](#resources-allocation-commands) ### Show Allocation File [Section titled “Show Allocation File”](#show-allocation-file) Show the resources allocation file. ```shell skale resources-allocation show ``` ### Generate/Update [Section titled “Generate/Update”](#generateupdate) Generate (or updates if already exists) the allocation file. ```shell skale resources-allocation generate [ENV_FILEPATH] ``` **Required Parameters** 1. `ENV_FILEPATH` is the path to .env file (required parameters are listed in the `skale init` command) **Optional Arguments** * `--yes` generates without additional confirmation * `-f/--force` rewrites allocation file if it exists ## Validate commands [Section titled “Validate commands”](#validate-commands) ### Validate ABI [Section titled “Validate ABI”](#validate-abi) Checks whether ABI files contain valid JSON data. ```shell skale validate abi ``` **Optional Argument** * `--json` shows the validation result in json format ## Exit codes [Section titled “Exit codes”](#exit-codes) Exit codes conventions for SKALE CLI tools. | Code | Description | | ---- | ----------------------- | | 0 | Everything is OK | | 1 | General error exit code | | 3 | Bad API response | | 4 | Script execution error | | 7 | Bad user error | | 8 | Node state error |
# SKALE Validators
> Overview of the SKALE Network Validators
SKALE is a network of Layer-1 blockchains which have zero gas fees, infinite scalability, and are built for best-in-class UX. SKALE is unique from other blockchain networks. The SKALE Network has a pool of validators that work together to secure the network. These validators provide computation power to the SKALE Network by deploying SKALE supernodes. The collection of validators and the supernode(s) they spin up represent the entire validator network that performs work for SKALE Chains (a Layer-1 Ethereum Compatible Chain). Each SKALE Chain in the network is operated by a group of virtualized nodes selected from a subset of the supernodes run by validators, utilizing either all or part of the supernode’s computational and storage resources \[multi-tenancy]. As each supernode in the network continues to participate in their assigned SKALE Chains, they are awarded bounties based on their performance at the end of each network epoch. Each supernode is monitored by their peer supernode. When a SKALE Chain has reached the end of its lifetime, the resources (computation, storage) of its virtualized nodes will be freed so that validator supernodes may participate in newly created SKALE Chains. Validator supernodes also receive direct payment from SKALE Chain pricing, which is “rent” paid by the chain owners/operators for this compute. ## SKALE Economics [Section titled “SKALE Economics”](#skale-economics) Please explore the following links to learn more about the SKALE Token Economics: * [SKALE Validator & Delegator Token Economics](https://skale.network/blog/validator-economics) * [Economics FAQ](https://skale.network/blog/skale-update-economics-faq) * [Token supply chart](https://supply.skale.network/supply/index.html) * [Metrics that matter blog](https://skale.network/blog/metrics-that-matter-for-token-launches) * [Tokenomics one-pager](https://skale.network/tokenomics) * [Token page](https://skale.network/token) ## Expectations [Section titled “Expectations”](#expectations) * Reliable connection to SKALE Network (low latency, high uptime) * Robust security practices and network architecture * Running the latest SKALE Node software releases * Participation in governance (when applicable) To promote proper behavior, SKALE uses a Proof of Stake (PoS) system, requiring each supernode to stake a set amount of SKALE tokens, which can be slashed for any network-prohibited activity. Activities not approved by the network include those which denote a failure to properly participate in each assigned SKALE Chain’s consensus, and maintain uptime and latency standards enforced by the Service Level Agreement (SLA). Network SLAs are enforced through an algorithmic peer review system whereby each supernode is appointed 24 supernode peers to monitor and log their network participation, uptime, and latency. These metrics will be collected and averaged on the Ethereum mainnet to reward or slash supernodes according to their respective performance. ## Requirements [Section titled “Requirements”](#requirements) To be added as a supernode to the SKALE Network, a prospective supernode must run the SKALE Admin, which manages all operations in the supernode and is installed with the [SKALE Node CLI](/run-a-skale-node/node-cli/overview). SKALE Admin evaluates the prospective supernode to ensure that it’s upholding network hardware requirements. If the prospective supernode passes this verification step, the SKALE Admin permits the supernode to submit a request to SKALE Manager to join the network. This request contains both the required network deposit as well as supernode metadata collected by the SKALE Daemon (for example IP address, port, public key, etc.). Once the request has been submitted to SKALE Manager on Ethereum, SKALE Manager randomly defines the prospective supernode as a ‘full node’ or a ‘fractional node’ by assigning different sizes of SKALE Chains to the prospective supernode. Full nodes have all their resources utilized for a single SKALE Chain, while fractional nodes participate in multiple SKALE Chains (multi-tenancy). ### General Hardware Requirements [Section titled “General Hardware Requirements”](#general-hardware-requirements) **Important notes:** If you have any issues, you can save the logs using the `skale logs dump` command. It’s also useful to check logs from node-cli using `skale cli logs` from the docker plugin at `/var/log/docker-lvmpy/lvmpy.log` if there are any issues. ### Block Storage [Section titled “Block Storage”](#block-storage) Docker has an easy way of limiting other machine resources such as CPU, memory, and volume. These resources are configurable through [the docker setup](https://docs.docker.com/config/containers/resource_constraints/?source=post_page-----9859682f4147----------------------). Configuring machine resources such as CPU and memory is easy to complete via the docker setup; however, configuring volume requires a few more steps. To assist with configuring volume, SKALE Labs introduced [docker-lvmpy](https://github.com/skalenetwork/docker-lvmpy), a simple volume driver for Logical Volume Manager (LVM) volumes written in Python to format and partition disk space per SKALE Chain. When a validator sets up a supernode through the CLI, SKALE Admin calls docker-lvmpy to format the external and unmounted volume. Each validator in the SKALE Network must provide a non-boot external disk space, which will be used to partition the volume by the SKALE Admin.   SKALE Admin calls docker-lvmpy to limit disk space per container (for example, 20GB) and splits the volume into 1/128 size partitions. Once LVM splits the container and allocates the new space to the SKALE Chain, docker-lvmpy informs SKALE Admin that the disk is limited based on the configured SKALE Chain size. ### SGX (HSM) [Section titled “SGX (HSM)”](#sgx-hsm) Software Guard Extension (SGX) is an Intel® technology coprocessor ledger used for memory encryption and increasing the security of application code by storing encrypted data in the processor. A SKALE node connects to the SGX wallet server, and then the SGX wallet connects to the wallet enclave (BLS signatures and ETH keys). Keys stored in the processor can’t be taken out, and they can only be encrypted or decrypted through the enclave. The key within the processor is secure in the enclave, and hackers can’t hack the enclave and receive the key. Without SGX, human confirmation is necessary for transactions made in the SKALE Network. SKALE uses SGX for securing cryptographic keys by allowing supernodes to connect hardware wallets without human interaction. SKALE uses BLS to sign blocks in consensus, and ECDSA is needed to validate regular Ethereum transactions. SKALE will have a separate wallet integration for ECDSA. SKALE will use Intel® SGX technology to store BLS signatures at the coprocessor level and let users automatically authorize transactions. Currently, other than bare-metal servers, SGX is supported for these cloud providers: * [Alibaba Cloud](https://www.alibabacloud.com/help/doc-detail/108507.html?spm=a2c5t.10695662.1996646101.searchclickresult.84d1a80dPBX0Di) * [Equinix](https://www.equinix.com/services/edge-services/smartkey/) * [IBM Cloud Data Guard](https://www.ibm.com/cloud/blog/data-use-protection-ibm-cloud-using-intel-sgx?mhsrc=ibmsearch_a\&mhq=sgx) * [Microsoft Azure](https://www.intel.com/content/www/us/en/architecture-and-technology/software-guard-extensions/microsoft-confidential-computing-sgx-video.html) (HSMs) Ledger Nano, or Trezor can support ECDSA signatures but not BLS signatures at this time, which are used by SKALE Consensus. **Advantages of SGX Wallet** * Helps developers protect sensitive data * Programmable for advanced crypto, such as BLS signatures * Doesn’t require validators to continually confirm transactions * All SKALE crypto (BLS/DKG) can be done through the SGX wallet SKALE will have two types of SGX operations: * **Local (Secure)**: Wallet running on the same server as the node * **Network**: Node talks to the SGX wallet over the SKALE Network. The validator is responsible for securing the connection.
# SKALE 3.0.3 upgrade
> SKALE node upgrade steps from 3.0.2 to 3.0.3
## Upgrade steps from 3.0.2 to 3.0.3 [Section titled “Upgrade steps from 3.0.2 to 3.0.3”](#upgrade-steps-from-302-to-303) 1. Update the following parameters to the new values ```bash CONTAINER_CONFIGS_STREAM=3.0.3 ``` 2. Execute update ```bash skale node update .env --yes ```
# SKALE 3.1.0 upgrade
> SKALE node upgrade steps from 3.0.3 to 3.1.0
## Upgrade steps from 3.0.3 to 3.1.0 [Section titled “Upgrade steps from 3.0.3 to 3.1.0”](#upgrade-steps-from-303-to-310) 1. Download new node-cli binary ```bash curl -L https://github.com/skalenetwork/node-cli/releases/download/2.5.0/skale-2.5.0-Linux-x86_64 > /usr/local/bin/skale ``` 2. Verify checksum using sha512sum command ```bash sha512sum /usr/local/bin/skale ``` Expected checksum ```bash 2a409323eae26b14e4c5c018ae0b164da81a67793bcc1fcb96a266afab4e8672c587f1a6c4fd2e4c1d8ee1644616efc2e28249549108c0711c9cdce59b9047a8 ``` 3. Make node-cli executable ```bash chmod +x /usr/local/bin/skale ``` 4. Update the following parameters to the new values ```bash CONTAINER_CONFIGS_STREAM=3.1.0 ``` 5. Execute update ```bash skale node update .env --yes --unsafe ```
# SKALE 3.1.1 upgrade
> SKALE node upgrade steps from 3.1.0 to 3.1.1
Caution The firewall mechanism was updated in version 3.1.1. As a result, please proceed with the following steps with extra caution. Ensure that you perform these actions on each node individually. ## Upgrade steps for the SGX server [Section titled “Upgrade steps for the SGX server”](#upgrade-steps-for-the-sgx-server) 1. Backup `sgx_data` folder and SGX backup key 2. Create new SGX server on Ubuntu 22.04 3. Clone sgxwallet repo ```bash git clone https://github.com/skalenetwork/sgxwallet.git && git checkout stable ``` 4. Install required packages ```bash apt-get install docker.io docker-compose build-essential ``` 5. Enable sgx ```bash cd sgxwallet && sudo ./sgx_enable ``` 6. Install sgx driver ```bash cd scripts; sudo ./sgx_linux_x64_driver_2.11.b6f5b4a.bin; cd .. ``` 7. Configure firewall between nodes and SGX server 8. Upload `sgx_data` folder to `sgxwallet/run_sgx/sgx_data` on the new server 9. Add `-b` option in `command` section of `run_sgx/docker-compose.yml` 10. Set SGX wallet version to `1.9.0-stable.2` in `run_sgx/docker-compose.yml` 11. Run sgxwallet ```bash cd run_sgx && docker-compose up -d ``` ## Upgrade steps for the node server [Section titled “Upgrade steps for the node server”](#upgrade-steps-for-the-node-server) 1. Turn off the node ```bash skale node turn-off --yes --unsafe ``` 2. Backup the node ```bash skale node backup . ``` Save the data on another machine 3. Upgrade packages ```bash sudo apt update && sudo apt upgrade sudo reboot ``` 4. Upgrade to Ubuntu 22.04 ```bash do-release-upgrade reboot ``` 5. Turn off docker-lvmpy ```bash systemctl stop docker-lvmpy && systemctl disable docker-lvmpy ``` 6. Make sure nftables is installed ```bash sudo apt install nftables docker-compose-plugin ``` 7. Disable ufw ipv6 configuration ```bash sed -i 's/IPV6=yes/IPV6=no/' /etc/default/ufw. ``` 8. Reload ufw ```bash ufw reload ``` 9. Download new node-cli binary ```bash curl -L https://github.com/skalenetwork/node-cli/releases/download/2.6.0/skale-2.6.0-Linux-x86_64 > /usr/local/bin/skale ``` 10. Verify node-cli binary hash sum ```bash sha512sum /usr/local/bin/skale ``` Expected checksum ```bash 15b2aade24223da4f84ec79bd820d57f852fd7a5d78f10652823629da28aab5db49a5815a2be0c894bb00b99324b00b7d9da2ab1518ddc11f304378af54b427c ``` 11. Make node-cli executable ```bash chmod +x /usr/local/bin/skale ``` 12. Update the following parameters to the new values ```bash CONTAINER_CONFIGS_STREAM=3.1.1 SGX_WALLET_URL=https://[NEW SGX WALLET SERVER IP]:1026 ``` 13. Execute update ```bash skale node update .env --yes ``` 14. Restart nftables and docker services Caution Proceed with the execution in close collaboration with the core team, ensuring that the chains are fully stable beforehand. ```bash systemctl restart nftables && systemctl restart docker ```
# SKALE 3.1.1 upgrade
> SKALE node upgrade steps from 3.1.0 to 3.1.1
Caution The firewall mechanism was updated in version 3.1.1. As a result, please proceed with the following steps with extra caution. Ensure that you perform these actions on each node individually. ## Upgrade steps for the node server [Section titled “Upgrade steps for the node server”](#upgrade-steps-for-the-node-server) 1. Turn off sgxwallet ```bash cd sgxwallet/run_sgx/ && docker-compose down && cd ../../ ``` 2. Turn off the node ```bash skale node turn-off --unsafe --yes ``` 3. Backup the node ```bash skale node backup . ``` Save the data on another machine 4. Backup `sgx_data` folder and SGX backup key. Save the data on another machine 5. Upgrade packages ```bash sudo apt update && sudo apt upgrade sudo reboot ``` 6. Upgrade to Ubuntu 22.04 ```bash do-release-upgrade reboot ``` 7. Turn off docker-lvmpy ```bash systemctl stop docker-lvmpy && systemctl disable docker-lvmpy ``` 8. Make sure nftables is installed ```bash sudo apt update && sudo apt install nftables docker-compose-plugin ``` 9. Disable ufw ipv6 configuration ```bash sed -i 's/IPV6=yes/IPV6=no/' /etc/default/ufw. ``` 10. Reload ufw ```bash ufw reload ``` 11. Pull latest changes from sgxwallet ```bash cd sgxwallet/run_sgx && git checkout stable && git pull ``` 12. Add `-b` option in the `command` section of `run_sgx/docker-compose.yml` 13. Run sgxwallet ```bash cd run_sgx && docker-compose up -d ``` 14. Download new node-cli binary ```bash curl -L https://github.com/skalenetwork/node-cli/releases/download/2.6.0/skale-2.6.0-Linux-x86_64 > /usr/local/bin/skale ``` 15. Verify node-cli binary hash sum ```bash sha512sum /usr/local/bin/skale ``` Expected checksum ```bash 15b2aade24223da4f84ec79bd820d57f852fd7a5d78f10652823629da28aab5db49a5815a2be0c894bb00b99324b00b7d9da2ab1518ddc11f304378af54b427c ``` 16. Make node-cli executable ```bash chmod +x /usr/local/bin/skale ``` 17. Update the following parameters to the new values ```bash CONTAINER_CONFIGS_STREAM=3.1.1 ``` 18. Execute update ```bash skale node update .env --yes ``` 19. Restart nftables and docker services Caution Proceed with the execution in close collaboration with the core team, ensuring that the chains are fully stable beforehand. ```bash systemctl restart nftables && systemctl restart docker nft add rule inet firewall skale tcp dport 1026-1031 drop ```
# SKALE 3.1.2 upgrade
> SKALE node upgrade steps from 3.1.1 to 3.1.2
## Upgrade steps for the SGX server [Section titled “Upgrade steps for the SGX server”](#upgrade-steps-for-the-sgx-server) 1. Go to run\_sgx folder ```bash cd sgxwallet/run_sgx ``` 2. Backup `sgx_data` folder and SGX backup key 3. Pull recent changes ```bash git checkout stable && git pull ``` If there any conflicts, please, contact the SKALE team 4. Restart the container ```bash docker compose down && docker compose up -d ``` ## Upgrade steps for the node server [Section titled “Upgrade steps for the node server”](#upgrade-steps-for-the-node-server) 1. Disable docker-lvmpy ```bash systemctl stop docker-lvmpy && systemctl disable docker-lvmpy ``` 2. Download new node-cli binary ```bash curl -L https://github.com/skalenetwork/node-cli/releases/download/2.6.1/skale-2.6.1-Linux-x86_64 > /usr/local/bin/skale ``` 3. Verify node-cli binary hash sum ```bash sha512sum /usr/local/bin/skale ``` Expected checksum ```bash 5faf3eb1bffe00a4172f7f34570b84bed2ff051b40b3bc97b249ee74e07ea2dee5991297bbe8071c50ad01fa718d9ebbe9fc4d397324b4fa05950d11e891a179 ``` 4. Make node-cli executable ```bash chmod +x /usr/local/bin/skale ``` 5. Run update procedure ```bash skale node update .env --yes ```
# SKALE 4.0.0 upgrade
> SKALE node upgrade steps from 3.1.2 to 4.0.0
## Upgrade steps for the node server [Section titled “Upgrade steps for the node server”](#upgrade-steps-for-the-node-server) 1. Disable docker-lvmpy ```bash systemctl stop docker-lvmpy && systemctl disable docker-lvmpy ``` 2. Download new node-cli binary ```bash curl -L https://github.com/skalenetwork/node-cli/releases/download/2.6.2/skale-2.6.2-Linux-x86_64 > /usr/local/bin/skale ``` 3. Verify node-cli binary hash sum ```bash sha512sum /usr/local/bin/skale ``` Expected checksum ```bash e012e18b062015c234e364bc0cd49ee40e65243d725f2261a4a5a2d516ac2fd86d59f3b9104f15f4fbe4045ec3ead018cc7ec159d079001fe9293617602741e4 ``` 4. Make node-cli executable ```bash chmod +x /usr/local/bin/skale ``` 5. Update the following parameters to the new values ```bash CONTAINER_CONFIGS_STREAM=4.0.0 ``` 6. Run update procedure ```bash skale node update .env --yes ```
# SKALE 4.0.1 upgrade
> SKALE node upgrade steps from 4.0.0 to 4.0.1
#### Upgrade steps for the node server [Section titled “Upgrade steps for the node server”](#upgrade-steps-for-the-node-server) 1. Update the following parameters to the new values ```bash CONTAINER_CONFIGS_STREAM=4.0.1 ``` 2. Run update procedure ```bash skale node update .env --yes ```
# Run Archive Node
> Run a SKALE Network Archive Node
Within the realm of nodes, there are distinct types tailored for specific purposes. For instance, archive nodes specialize in storing comprehensive historical data of the blockchain and providing it upon request. This sets them apart from full nodes, which focus on recent blockchain states, and light nodes, primarily reliant on data from full nodes. Archive nodes build archival blockchain data quickly and efficiently, and they’re useful for querying arbitrary historical data, like a user’s balances on a specific block. ## General Steps [Section titled “General Steps”](#general-steps) 1. Provision a machine. 2. Notify core team of IP/IPs range (`x.x.x.x:x.x.x.x`) and SKALE Chain for archive. 3. Complete archive node setup. ## Recommended Machine Requirements [Section titled “Recommended Machine Requirements”](#recommended-machine-requirements) * A Linux x86\_64 machine * Ubuntu 20.04 * 4 physical cores * 16GB RAM * 100GB root storage * 2TB attached storage ## Node Network Requirements [Section titled “Node Network Requirements”](#node-network-requirements) * Ports 80, 443, 3009, and 10000–18192, and ICMP IPv4 should not be closed by any firewall software. ## Node Software Prerequisites [Section titled “Node Software Prerequisites”](#node-software-prerequisites) * 8GB Swap * docker * docker-compose → 1.29.2 * iptables-persistent, btrfs-progs, lsof, lvm2, psmisc, and apt packages ## From Fresh Machine [Section titled “From Fresh Machine”](#from-fresh-machine) ```shell sudo apt-get update # Install Docker and Docker-compose sudo apt-get install docker.io sudo curl -L "https://github.com/docker/compose/releases/download/1.29.2/docker-compose-$(uname -s)-$(uname -m)" -o /usr/local/bin/docker-compose # Install other dependencies sudo apt install iptables-persistent btrfs-progs lsof lvm2 psmisc # Setup Swapfile sudo fallocate -l 8G /swapfile sudo chmod 600 /swapfile sudo mkswap /swapfile sudo swapon /swapfile sudo cp /etc/fstab /etc/fstab.bak echo '/swapfile none swap sw 0 0' | sudo tee -a /etc/fstab ``` ## SKALE Archive Node Implementation [Section titled “SKALE Archive Node Implementation”](#skale-archive-node-implementation) 1. ##### Download sync-node-cli tool [Section titled “Download sync-node-cli tool”](#download-sync-node-cli-tool) ```shell VERSION_NUM=2.3.0-sync-node.1 && sudo -E bash -c "curl -L https://github.com/skalenetwork/node-cli/releases/download/$VERSION_NUM/skale-$VERSION_NUM-`uname -s`-`uname -m`-sync > /usr/local/bin/skale" ``` 2. ##### Verify checksum [Section titled “Verify checksum”](#verify-checksum) ```shell # sha512sum /usr/local/bin/skale b35d88fba1269f859a996a1fefd9520e30f965c092d3ba716f8d7dd88694b821dc225641f75a60cef2364d0fbeb986d314f592fe4b4238c716acf0834d2d6146 /home/ubuntu/dist/skale-2.3.0-sync-node.1-Linux-x86_64-sync ``` 3. ##### Apply executable permissions to the downloaded binary: [Section titled “Apply executable permissions to the downloaded binary:”](#apply-executable-permissions-to-the-downloaded-binary) ```shell chmod +x /usr/local/bin/skale ``` 4. ##### Test the installation [Section titled “Test the installation”](#test-the-installation) ```shell sudo skale --help ``` 5. ##### Prepare `.env` file: [Section titled “Prepare .env file:”](#prepare-env-file) ```shell CONTAINER_CONFIGS_STREAM="2.2.1-sync" ENDPOINT=[YOUR GETH/INFURA ENDPOINT] IMA_CONTRACTS_ABI_URL=https://raw.githubusercontent.com/skalenetwork/skale-network/master/releases/mainnet/IMA/1.5.0/mainnet/abi.json MANAGER_CONTRACTS_ABI_URL=https://raw.githubusercontent.com/skalenetwork/skale-network/master/releases/mainnet/skale-manager/1.9.3/skale-manager-1.9.3-mainnet-abi.json DISK_MOUNTPOINT=[The second disk /dev/sdb or /dev/xvdb (this is an example. You just need to use your 2TB block device)] DOCKER_LVMPY_STREAM="1.0.2-stable.0" ENFORCE_BTRFS=True/False ENV_TYPE="mainnet" SCHAIN_NAME=[SCHAIN NAME FOR YOUR ARCHIVE NODE] ``` 6. ##### Init archive node: [Section titled “Init archive node:”](#init-archive-node) ```shell sudo skale sync-node init --archive --catchup --historic-state [ENV_FILE_PATH] ``` . Wait until your archive node will be inited. . After the node is successfully inited, wait until chain container will download the snapshot and starts catchup blocks (usually 15–30 minutes). ## Setup SSL certs [Section titled “Setup SSL certs”](#setup-ssl-certs) Node SSL certificates support secure communication with chain endpoints. By default, each node of a SKALE Chain listens on HTTP and WS ports. If SSL certs exist on the node, then HTTPS and WSS ports are also turned on. To upload SSL certs to the node run: ```shell sudo skale ssl upload -c $PATH_TO_CERT_FILE -k $PATH_TO_KEY_FILE ``` To check the status of your certs run: ```shell sudo skale ssl status ``` Once certs are uploaded, HTTPS/WSS endpoints should become available for your chain. ## Update archive node [Section titled “Update archive node”](#update-archive-node) Update archive SKALE node on current machine ```shell sudo skale sync-node update [ENV_FILEPATH] ``` Options: * `--yes` - update without additional confirmation Arguments: * `ENV_FILEPATH` - path to env file where parameters are defined
# Validator Setup
> Setup Process for new SKALE Validator
1. ## Setup Validator [Section titled “Setup Validator”](#setup-validator) ### 1.1 Prepare [Section titled “1.1 Prepare”](#11-prepare) #### 1.1.1 Obtain Ethereum Software Wallet or Hardware wallet [Section titled “1.1.1 Obtain Ethereum Software Wallet or Hardware wallet”](#111-obtain-ethereum-software-wallet-or-hardware-wallet) Get a Ledger, Hardware or Software wallet ready like Metamask/Portis/Bitski/Torus/myetherwallet. Specific setup instructions will follow. This wallet will be used for receiving delegation, bounties, and self delegating. #### 1.1.2 Fund Validator Wallet with ETH [Section titled “1.1.2 Fund Validator Wallet with ETH”](#112-fund-validator-wallet-with-eth) Be ready to have some ETH to accept delegations and link your validator supernode. Remember these are transactions with SKALE Manager on Ethereum, and therefore require ETH. *Minimum ETH: 1.0* #### 1.1.3 Get SKALE Manager contract ABIs from SKALE [Section titled “1.1.3 Get SKALE Manager contract ABIs from SKALE”](#113-get-skale-manager-contract-abis-from-skale) #### 1.1.4 Fund SRW Wallet with ETH [Section titled “1.1.4 Fund SRW Wallet with ETH”](#114-fund-srw-wallet-with-eth) Be ready to fund ETH in your self-recharging wallet (SRW). See [Self-recharging wallet documentation](/run-a-skale-node/validator-cli/self-recharging-wallets). *Minimum ETH*: #### 1.1.5 Decide your commission fee [Section titled “1.1.5 Decide your commission fee”](#115-decide-your-commission-fee) Decide on your commission fee. This cannot be changed once it is set. To set a new commission fee, you’ll have to register a new validator. This new validator would have to link supernodes and accept delegations for it (old validator supernodes and delegations cannot be rolled into a new validator commission fee). *Reference Documents* * [Validator & Token Economics](https://skale.network/blog/validator-economics) * [Tokenomics](https://skale.network/tokenomics) ### 1.2 Register Validator [Section titled “1.2 Register Validator”](#12-register-validator) SKALE Validator CLI is the validator client interface for registering a new validator into network or handling additional delegation services where validators can self delegate or token holders can delegate to a validator. These are the type of operations that can be done with the Validator CLI: * Register Validator (Set Commission Rate or Minimum delegation amount) * Accept pending delegations * Link all validator supernode addresses to a validator wallet address * Request or cancel a delegation [See the SKALE Validator CLI documentation](/run-a-skale-node/validator-cli/overview) This document contains instructions on how to get started with the SKALE Validator CLI. #### 1.2.1 Install SKALE Validator CLI [Section titled “1.2.1 Install SKALE Validator CLI”](#121-install-skale-validator-cli) ##### Download the SKALE Validator CLI binary [Section titled “Download the SKALE Validator CLI binary”](#download-the-skale-validator-cli-binary) `VERSION_NUM` is a version identifier ```shell VERSION_NUM=[VERSION_NUM] && sudo -E bash -c "curl -L https://github.com/skalenetwork/validator-cli/releases/download/$VERSION_NUM/sk-val-$VERSION_NUM-`uname -s`-`uname -m` > /usr/local/bin/sk-val" ``` ##### Apply executable permissions to the binary [Section titled “Apply executable permissions to the binary”](#apply-executable-permissions-to-the-binary) ```shell chmod +x /usr/local/bin/sk-val ``` ##### Set SKALE Manager contracts info and set the endpoint [Section titled “Set SKALE Manager contracts info and set the endpoint”](#set-skale-manager-contracts-info-and-set-the-endpoint) ```shell sk-val init -e [ENDPOINT] -c [ABI] --wallet [software/ledger] ``` Required arguments: * `--endpoint/-e` - RPC endpoint of the supernode in the network where SKALE manager is deployed (http or https). Example is network_mode: host devices: - "/dev/isgx" - "/dev/sg0" volumes: - ./sgx_data:/usr/src/sdk/sgx_data - /dev/urandom:/dev/random logging: driver: json-file options: max-size: "10m" max-file: "4" restart: unless-stopped command: -y -V healthcheck: test: ["CMD", "ls", "/dev/isgx", "/dev/"] ``` ### 2.7 Spin up SGXWallet Container [Section titled “2.7 Spin up SGXWallet Container”](#27-spin-up-sgxwallet-container) **Start SGX Wallet Containers** To run the server as a daemon: ```shell sudo docker compose up -d ``` ### 2.8 Securely save generated backup key [Section titled “2.8 Securely save generated backup key”](#28-securely-save-generated-backup-key) The backup key is automatically stored in *sgx\_data* directory. The filename of the key is sgx\_wallet\_backup\_key.txt, and is generated the first time the SGX wallet is started. Important **This key must be securely recorded and stored.** Be sure to store this key in a safe place, then go into a docker container and securely remove it with the following command: ```shell docker exec -it bash && apt-get install secure-delete && srm -vz backup_key.txt ``` ### 2.9 Backup sgx data [Section titled “2.9 Backup sgx data”](#29-backup-sgx-data) It’s strongly recommended to backup sgx data regularly. The guide can be found [here](https://github.com/skalenetwork/sgxwallet/blob/stable/docs/backup-procedure.md). 3. ## Supernode Setup [Section titled “Supernode Setup”](#supernode-setup) After Setting up SGX Wallet and create certifications, validators can download the SKALE Node CLI executables register and maintain your SKALE supernode. This process downloads docker container images from docker hub and spins up SKALE supernode functionalities. Some base containers such as SKALE Admin, Bounty, TransactionManager will be created during installation for each supernode. This document contains instructions on how to setup supernode using SKALE Node CLI. ### 3.1 Prepare Server [Section titled “3.1 Prepare Server”](#31-prepare-server) Supernode server should follow compliance requirements which will be checked during installing SKALE supernode software. Please make sure: **General requirements** * A Linux x86\_64 machine * Ubuntu 22.04 LTS (Jammy Jellyfish) * Separate not mounted block device - 2 Tb * 8 physical cores * 32GB RAM * 16GB Swap More information can be found here: [Compliance requirements](/run-a-skale-node/compliance-requirements) ### 3.2 Install Packages [Section titled “3.2 Install Packages”](#32-install-packages) Before setting up supernode you should make sure that the following software is installed: * docker * docker-compose * nftables * lvm2 ```shell echo iptables-persistent iptables-persistent/autosave_v4 boolean true | sudo debconf-set-selections echo iptables-persistent iptables-persistent/autosave_v6 boolean true | sudo debconf-set-selections sudo apt install iptables-persistent -y ``` If you have any concerns or questions, please don’t hesitate to reach out to SKALE Team leads on [Discord](http://discord.gg/skale). ### 3.3 Download Node CLI binary [Section titled “3.3 Download Node CLI binary”](#33-download-node-cli-binary) ### 3.4 Download the Executable [Section titled “3.4 Download the Executable”](#34-download-the-executable) ```shell sudo -E bash -c "curl -L {node-cli} > /usr/local/bin/skale" ``` ### 3.5 Apply executable permissions to the downloaded binary: [Section titled “3.5 Apply executable permissions to the downloaded binary:”](#35-apply-executable-permissions-to-the-downloaded-binary) ```shell chmod +x /usr/local/bin/skale ``` ### 3.6 Test the Installation [Section titled “3.6 Test the Installation”](#36-test-the-installation) ```shell sudo skale --help ``` More information can be found [here](/run-a-skale-node/node-cli/overview). ### 3.7 Configure .env [Section titled “3.7 Configure .env”](#37-configure-env) Configuration parameters are passed to Node CLI through .env file. It should contain the following variables: * `CONTAINERS_CONFIG_STREAM` - git branch with containers versions config * `DISK_MOUNTPOINT` - Attached storage block device * `DOCKER_LVMPY_STREAM` - git branch of docker lvmpy volume driver for schains * `ENDPOINT` - RPC endpoint of the supernode in the network where SKALE manager is deployed (`http` or `https`) * `FILEBEAT_HOST` - URL to the Filebeat log server * `IMA_CONTRACTS_ABI_URL` - URL to IMA contracts ABI and addresses * `IMA_ENDPOINT` - IMA endpoint to connect (should be the same as `ENDPOINT`). * `MANAGER_CONTRACTS_ABI_URL` - URL to SKALE Manager contracts ABI and addresses * `SGX_SERVER_URL` - URL to SGX server in the network (i.e. http(s)://host:port, do not add a trailing ”/” after the port number ) * `ENV_TYPE` - network type (mainnet/testnet) `ENDPOINT`, `IMA_ENDPOINT`, `SGX_SERVER_URL`, `DISK_MOUNTPOINT` are server dependent. Other options depend on the network type. For the `{ENV_TYPE}` network .env will look like: ```txt CONTAINER_CONFIGS_STREAM=3.0.1 DOCKER_LVMPY_STREAM=1.0.2-stable.0 FILEBEAT_HOST=filebeat.mainnet.skalenodes.com:5000 MANAGER_CONTRACTS_ABI_URL=https://raw.githubusercontent.com/skalenetwork/skale-network/master/releases/mainnet/skale-manager/1.11.0/skale-manager-1.11.0-mainnet-abi.json IMA_CONTRACTS_ABI_URL=https://raw.githubusercontent.com/skalenetwork/skale-network/master/releases/mainnet/IMA/1.5.0/mainnet/abi.json ENV_TYPE=mainnet DISK_MOUNTPOINT=[DISK_MOUNTPOINT] IMA_ENDPOINT=[IMA_ENDPOINT] ENDPOINT=[ENDPOINT] SGX_SERVER_URL=[SGX_SERVER_URL] # Do not add a trailing "/" after the port number. ``` It’s possible to configure Telegram based alert system by providing the following options: * `TG_API_KEY` - Telegram API key * `TG_CHAT_ID` - Telegram chat ID ### 3.8 Enable SGX wallet autosign [Section titled “3.8 Enable SGX wallet autosign”](#38-enable-sgx-wallet-autosign) Switch back to sgx server and go to `sgxwallet/run_sgx` folder ```shell cd sgxwallet/run_sgx ``` Set `-s` option in docker-compose.yml ```shell sed -i -E 's/(command: .*) *$/\1 -s/g' docker-compose.yml ``` Restart the container ```shell docker compose down && docker compose up -d ``` ### 3.9 Initialize Supernode [Section titled “3.9 Initialize Supernode”](#39-initialize-supernode) To install supernode on your server you should run `skale node init`. It will create necessary configuration files and run base services and containers. ```shell sudo skale node init .env ``` **Example Output:** ```shell 48914619bcd3: Pull complete db7a07cce60c: Pull complete d285532a5ada: Pull complete 8646278c4014: Pull complete 3a12d6e582e7: Pull complete 0a3d98d81a07: Pull complete 43b3a182ba00: Pull complete Creating monitor_filebeat ... done Creating skale_transaction-manager ... done Creating skale_watchdog ... done Creating skale_admin ... done Creating skale_bounty ... done Creating skale_api ... done ``` You can verify installation procedure by running: ```shell sudo skale wallet info ``` **Output:** ```shell Address: ETH balance: 1.0 ETH SKALE balance: 0 SKALE ``` The common problem is network misconfiguration between the supernode and SGXWallet. You can recheck connection status using `skale health sgx`: ```shell sudo skale health sgx ``` **Output:** ```shell SGX server status: ┌────────────────┬──────────────────────────┐ │ SGX server URL │ │ ├────────────────┼──────────────────────────┤ │ Status │ CONNECTED │ └────────────────┴──────────────────────────┘ ``` ### 3.10 Disable SGX wallet autosign [Section titled “3.10 Disable SGX wallet autosign”](#310-disable-sgx-wallet-autosign) Switch back to sgx server and go to `sgxwallet/run_sgx` folder ```shell cd sgxwallet/run_sgx ``` Remove `-s` option in docker-compose.yml ```shell sed -i -E 's/(command: .*) -s( .*)?$/\1\2/g' docker-compose.yml ``` Restart the container ```shell docker compose down && docker compose up -d ``` ### 3.11 Setup SSL Certificates [Section titled “3.11 Setup SSL Certificates”](#311-setup-ssl-certificates) #### 3.11.1 Setup IP Redirects [Section titled “3.11.1 Setup IP Redirects”](#3111-setup-ip-redirects) You will need to setup redirects from each supernode IP to the supernode domain. #### 3.11.2 Issue SSL Certificates [Section titled “3.11.2 Issue SSL Certificates”](#3112-issue-ssl-certificates) You will need SSL certs issued by one of the Trusted CAs. Once you’ve decided on the certificate issuer you have several options - issue a separate certificate for each subdomain (node-0.awesome-validator.com, node-1.awesome-validator.com) or issue a single Wildcard SSL for all supernodes (\*.awesome-validator.com). As a result, you should have 2 main files saved and copied to the respective supernodes: * Certificate file (for example, fullchain.pem or cert.pem) * Private key file (for example, privkey.pem, pk.pem) #### 3.11.3 Upload certificates to the SKALE Node [Section titled “3.11.3 Upload certificates to the SKALE Node”](#3113-upload-certificates-to-the-skale-node) Once you copied the certificate and private key file, all you have to do is to run the following command: ```shell sudo skale ssl upload -c $PATH_TO_CERT_FILE -k $PATH_TO_KEY_FILE ``` #### 3.11.4 SSL Status [Section titled “3.11.4 SSL Status”](#3114-ssl-status) Status of the SSL certificates on the supernode ```shell sudo skale ssl status ``` For more details, please see [Node SSL docs](/run-a-skale-node/node-cli/node-ssl-setup). ### 3.12 Fund Node wallet with ETH [Section titled “3.12 Fund Node wallet with ETH”](#312-fund-node-wallet-with-eth) Some of the supernode operations send ETH mainnet transaction (e.g. chain creation). So the supernode wallet should have at least 1 ETH To get the address you should run `skale wallet info` command. ### 3.13 Sign Validator ID using SGXWallet [Section titled “3.13 Sign Validator ID using SGXWallet”](#313-sign-validator-id-using-sgxwallet) Using *validator-cli* check your validator ID: ```shell sk-val validator ls ``` Get your SKALE supernode signature by running Node CLI command. ```shell sudo skale node signature [VALIDATOR_ID] ``` **Output:** ```shell Signature: ``` ### 3.14 Link SKALE wallet address to your validator account using Validator CLI [Section titled “3.14 Link SKALE wallet address to your validator account using Validator CLI”](#314-link-skale-wallet-address-to-your-validator-account-using-validator-cli) To successfully register new supernode you should bind supernode address and validator entity using *validator-cli* `link-address`: ```shell sk-val validator link-address [NODE_ADDRESS] [SIGNATURE] ``` Optional arguments: * `--pk-file` - Path to file with private key (only for `software` wallet type) * `--gas-price` - Gas price value in Gwei for transaction (if not specified doubled average network value will be used) * `--yes` - Confirmation flag ### 3.15 Backup Node [Section titled “3.15 Backup Node”](#315-backup-node) We strongly recommend to regularly backup supernode data. The critical information stored `~/.skale` directory. The `skale node backup` command archives the data which you can download and store somewhere else. To restore the supernode you should use `skale node restore` More information can be found [here](/run-a-skale-node/node-cli/releases/v2-0#node-backup). ### 3.16 Accept Delegations [Section titled “3.16 Accept Delegations”](#316-accept-delegations) Every delegation need to be accepted. You can do it using `sk-val validator accept-delegation` command: ```shell sk-val validator accept-delegation --delegation-id [DELEGATION-ID] ``` Required arguments: * `--delegation-id` - Delegation id to accept Optional arguments: * `--pk-file` - Path to file with private key (only for software wallet type) * `--gas-price` - Gas price value in Gwei for transaction (if not specified doubled average network value will be used) * `--yes` - Confirmation flag You can get \[DELEGATION-ID] by running `sk-val validator delegations`: ```shell sk-val validator delegations [VALIDATOR_ID] ``` You will see your pending delegation (`PENDING` status) as well as already accepted ones (`DELEGATED` status). 4. ## Register Node in SKALE Network [Section titled “Register Node in SKALE Network”](#register-node-in-skale-network) ### 4.1 Register Node with Node CLI [Section titled “4.1 Register Node with Node CLI”](#41-register-node-with-node-cli) To register with the network, you will need to provide the following: * Node name * Machine public IP * Domain name ```shell sudo skale node register --name [NODE_NAME] --ip [NODE_IP] --domain [DOMAIN_NAME] ``` Optional arguments: * `--port` - beginning of the port range that will be used for skale schains (`10000` by default) **Output:** ```shell Node registered in SKALE manager. For more info run: skale node info ``` ### 4.2 Check Node Status [Section titled “4.2 Check Node Status”](#42-check-node-status) You can check the status of your supernode, and ensure that it’s properly registered with the SKALE Network. ```shell sudo skale node info ``` **Output:** ```shell # Node info Name: ID: IP: Public IP: Port: Domain name: Status: Active ``` 5. ## Post Registration Checks [Section titled “Post Registration Checks”](#post-registration-checks) * [ ] Private and backup keys are secured in a safe place. * [ ] VPN is configured on all SGXWallet servers. * [ ] Ensure node wallets have sufficient ETH. * [ ] Accept delegations for the next month. * [ ] Check telegram notifications (if you enabled them). * [ ] Use [watchdog](/run-a-skale-node/watchdog/overview) to monitor node status. * [ ] Get support from the SKALE validator community.
# Run Sync Node
> Guide to running a SKALE Network Sync Node
The Full-Sync Node is an available software implementation of a read-only SKALE Node that can help decrease the load on the core nodes of your chain. Applications are commonly read-heavy compared to writes, meaning they pull data from the chain more often than push them. For applications that contain many reads, a full-sync node can help increase chain stability and speed by reducing the number of actions the core nodes on the chain must do, leaving them with a more extraordinary ability to handle transactions. ## General Steps [Section titled “General Steps”](#general-steps) * Provision a machine * Notify core team of IP/IPs range (`x.x.x.x:x.x.x.x`) and SKALE Chain for full-sync. * Complete Full Sync setup ## Node Machine Requirements [Section titled “Node Machine Requirements”](#node-machine-requirements) * A Linux x86\_64 machine * Ubuntu 22.04 * 8 vCPUs * 16GB RAM * 100GB root storage * 256GB attached storage for MEDIUM chain * 2TB attached storage for LARGE chain ## Node Network Requirements [Section titled “Node Network Requirements”](#node-network-requirements) * Ports 80, 443, 3009, and 10000–18192, and ICMP IPv4 shouldn’t be closed by external firewall ## Node Software Prerequisites [Section titled “Node Software Prerequisites”](#node-software-prerequisites) * 16GB Swap * docker * docker-compose → 1.27.4 * iptables-persistent, btrfs-progs, lsof, lvm2, psmisc, and apt packages ## From Fresh Machine [Section titled “From Fresh Machine”](#from-fresh-machine) ```shell sudo apt-get update # Install Docker and Docker-compose sudo apt-get install docker.io sudo curl -L "https://github.com/docker/compose/releases/download/1.27.4/docker-compose-$(uname -s)-$(uname -m)" -o /usr/local/bin/docker-compose # Install other dependencies sudo apt install iptables-persistent btrfs-progs lsof lvm2 psmisc # Setup Swapfile sudo fallocate -l 16G /swapfile sudo chmod 600 /swapfile sudo mkswap /swapfile sudo swapon /swapfile sudo cp /etc/fstab /etc/fstab.bak echo '/swapfile none swap sw 0 0' | sudo tee -a /etc/fstab ``` ## Installation [Section titled “Installation”](#installation) 1. ##### Download sync-node-cli tool [Section titled “Download sync-node-cli tool”](#download-sync-node-cli-tool) ```shell VERSION_NUM=2.6.2 && sudo -E bash -c "curl -L https://github.com/skalenetwork/node-cli/releases/download/$VERSION_NUM/skale-$VERSION_NUM-`uname -s`-`uname -m`-sync > /usr/local/bin/skale" ``` 2. ##### Apply executable permissions to the downloaded binary: [Section titled “Apply executable permissions to the downloaded binary:”](#apply-executable-permissions-to-the-downloaded-binary) ```shell chmod +x /usr/local/bin/skale ``` 3. ##### Test the installation [Section titled “Test the installation”](#test-the-installation) ```shell skale --help ``` 4. ##### Prepare `.env` file: [Section titled “Prepare .env file:”](#prepare-env-file) ```plaintext CONTAINER_CONFIGS_STREAM="4.0.1" ENFORCE_BTRFS=True/False ENDPOINT=[[By Validator], YOUR GETH/INFURA ENDPOINT] MANAGER_CONTRACTS_ABI_URL="https://raw.githubusercontent.com/skalenetwork/skale-network/refs/heads/master/releases/mainnet/skale-manager/1.12.0/skale-manager-1.12.0-mainnet-abi.json" IMA_CONTRACTS_ABI_URL="https://raw.githubusercontent.com/skalenetwork/skale-network/refs/heads/master/releases/mainnet/IMA/2.2.0/mainnet/abi.json" DISK_MOUNTPOINT=[[By Validator], your attached storage /dev/sda or /dev/xvdd (this is an example. You just need to use your 2TB block device)] DOCKER_LVMPY_STREAM="1.0.2-stable.0" ENV_TYPE="mainnet" SCHAIN_NAME=[[By Validator], SCHAIN NAME FOR YOUR SYNC NODE] ``` 5. ##### Init sync node: [Section titled “Init sync node:”](#init-sync-node) ```shell skale sync-node init [ENV_FILE_PATH] ``` 6. ##### Wait until your sync node will be inited [Section titled “Wait until your sync node will be inited”](#wait-until-your-sync-node-will-be-inited) 7. ##### After the node is successfully inited, wait until `skaled` will download the snapshot and starts catchup blocks (usually 15–30 minutes) [Section titled “After the node is successfully inited, wait until skaled will download the snapshot and starts catchup blocks (usually 15–30 minutes)”](#after-the-node-is-successfully-inited-wait-until-skaled-will-download-the-snapshot-and-starts-catchup-blocks-usually-1530-minutes) ### Setup SSL certs [Section titled “Setup SSL certs”](#setup-ssl-certs) Node SSL certificates support secure communication with sChain endpoints. By default, each node of a SKALE Chain listens on HTTP and WS ports. If SSL certs exist on the node, then HTTPS and WSS ports are also turned on. To upload SSL certs to the node run: ```shell skale ssl upload -c $PATH_TO_CERT_FILE -k $PATH_TO_KEY_FILE ``` To check the status of your certs run: ```shell skale ssl status ``` Once certs are uploaded, HTTPS/WSS endpoints should become available for your chain. ### Full sync node update [Section titled “Full sync node update”](#full-sync-node-update) Update full sync SKALE node on current machine ```shell skale sync-node update [ENV_FILEPATH] ``` Options: * `--yes` - update without additional confirmation Arguments: * `ENV_FILEPATH` - path to env file where parameters are defined \[NOTE] You can just update a file with environment variables used during `skale sync-node init`. ### Maintenance [Section titled “Maintenance”](#maintenance) Maintenance commands are not available for a sync node.
# SKALE Supernode Swap Limit Fix
> SKALE Supernode Swap Limit Fix for validators
## Introduction [Section titled “Introduction”](#introduction) This guide provides instructions for SKALE validators to fix swap limit issues on their supernodes. We need to enable swap limiting capability so sChain containers can use swap properly. ## Background [Section titled “Background”](#background) Swap memory is limited by default if memory for the container is limited. For each sChain container, 2.6GB of RAM is allocated on the machine, which means an additional 2.6GB will be allocated for swap. For more details, refer to the [Docker documentation on resource constraints](https://docs.docker.com/config/containers/resource_constraints/#--memory-swap-details). ## Checking Current Setup (Optional) [Section titled “Checking Current Setup (Optional)”](#checking-current-setup-optional) You can check the current memory allocation for your sChain containers (if your supernode has sChains) using the following command: ```bash docker inspect skale_schain_[SCHAIN-NAME] | grep Memory ``` A correct setup should look similar to this: ```plaintext "Memory": 2678032302, "MemoryReservation": 0, "MemorySwap": 5356064604, "MemorySwappiness": null, ``` `MemorySwap` should be x2 of `Memory` value. ## Identifying the Issue [Section titled “Identifying the Issue”](#identifying-the-issue) The issue occurs when the swap limit capability is disabled in the kernel. To check if this is the case, run: ```bash docker info ``` If you see the following line at the end of the output, it means the swap limiting capability is disabled: ```plaintext WARNING: No swap limit support ``` ## Fixing the Swap Limit Issue [Section titled “Fixing the Swap Limit Issue”](#fixing-the-swap-limit-issue) Warning If your supernode is running on Google Cloud, commands may differ. Please check discussions on [Stack Exchange](https://unix.stackexchange.com/a/495058) or contact SKALE team. Follow these steps to enable swap limiting capability: 1. Log into the supernode as a user that you used to setup the supernode (user should have sudo privileges). 2. Make a backup of your supernode and move backup archive to another machine: ```bash skale node backup [BACKUP_FOLDER_PATH] [ENV_FILE] ``` Check out [node-cli backup docs](https://github.com/skalenetwork/node-cli?tab=readme-ov-file#node-backup) for more details. 3. Turn off your SKALE Supernode: ```bash skale node turn-off ``` Wait for the supernode to turn off gracefully. 4. Edit the `/etc/default/grub` file. Add or edit the `GRUB_CMDLINE_LINUX` line to include the following key-value pairs: ```plaintext GRUB_CMDLINE_LINUX="cgroup_enable=memory swapaccount=1" ``` 5. Update GRUB: ```bash sudo update-grub ``` 6. Reboot the machine: ```bash sudo reboot ``` 7. After the machine has rebooted, turn your SKALE Supernode back on: ```bash skale node turn-on [ENV_FILEPATH] ``` Replace `[ENV_FILEPATH]` with the path to your environment file (the same you used for supernode updates). For more details on this process, you can refer to this [Unix Stack Exchange thread](https://unix.stackexchange.com/questions/342735/docker-warning-no-swap-limit-support). 8. After the Supernode is turned on, check if the swap limit is enabled: ```bash docker info ``` No warning should be displayed.
# Validator Troubleshooting
> Asynchronous Support for Validators
Need help solving an issue? Check to see if this has already been answered below. If you can’t find an answer to your issue, reach out to the SKALE Network developer community on [Discord](https://discord.com/invite/gM5XBy6). SKALE Network has many resources designed to help you get your questions answered. You can reach out to the SKALE Network developer community on [discord](https://discord.com/invite/gM5XBy6), or submit a support request below. [Contact Support](https://skalelabs.typeform.com/to/pSu895)
# Validator CLI
> The Validator CLI offers key tools for SKALE Network validators
On the **SKALE Network**, the **validator CLI** (Command Line Interface) is a tool used by validators to interact with the network and manage their validator supernodes. Validators play a crucial role in validating transactions, producing blocks, and maintaining the security of the network. Below are some of the main functions of the validator CLI: ## Node Management [Section titled “Node Management”](#node-management) Validators can use the CLI to: * Start, stop, and monitor their supernodes on the SKALE Network. ## Staking Operations [Section titled “Staking Operations”](#staking-operations) Validators can: * Stake SKALE tokens (SKL) or manage their delegations through the CLI. This is essential for securing the network and earning rewards. ## Upgrades and Updates [Section titled “Upgrades and Updates”](#upgrades-and-updates) The CLI is useful for: * Applying software upgrades to validator supernodes. * Managing updates to keep supernodes compliant with the latest network features. ## Validator Registration [Section titled “Validator Registration”](#validator-registration) Validators can: * Register their supernodes on the SKALE Network, enabling them to participate in the consensus process. ## Monitoring and Debugging [Section titled “Monitoring and Debugging”](#monitoring-and-debugging) The CLI allows validators to: * Monitor the performance of their supernodes. * Troubleshoot and access logs for debugging purposes. Validators rely on the **validator CLI** to ensure smooth operations and proper participation in SKALE’s decentralized and elastic blockchain infrastructure.
# Validator CLI - v1.2.0
> Validator CLI v1.2.0 is the latest release
## Installation [Section titled “Installation”](#installation) 1. Download the executable ```shell VERSION_NUM={put the version number here} && sudo -E bash -c "curl -L https://github.com/skalenetwork/validator-cli/releases/download/$VERSION_NUM/sk-val-$VERSION_NUM-`uname -s`-`uname -m` > /usr/local/bin/sk-val" ``` 2. Apply executable permissions to the binary ```shell sudo chmod +x /usr/local/bin/sk-val ``` ## CLI Usage [Section titled “CLI Usage”](#cli-usage) ## Initialize Validator CLI [Section titled “Initialize Validator CLI”](#initialize-validator-cli) Download SKALE Manager contracts info and set the supernode of the network ```shell sk-val init ``` **Required Arguments** * `--endpoint/-e` is the RPC endpoint of the supernode in the network where SKALE Manager is deployed \[http or https] * `--contracts-url/-c` is the URL to SKALE Manager contracts ABI and addresses * `-w/--wallet` is the type of the wallet that will be used to sign transactions. Must be of type software, sgx, or hardware. **Usage Example** ```shell sk-val init -e ws://geth.test.com:8546 -c https://test.com/manager.json --wallet software ``` ## SGX Commands [Section titled “SGX Commands”](#sgx-commands) ### Init [Section titled “Init”](#init) This command creates an SGX Wallet. ```shell sk-val sgx init [SGX_SERVER_URL] ``` **Optional Arguments** * `--force/-f` rewrites the current sgx wallet data * `--ssl-port` specifies the port that is used by the sgx server to establish a TLS connection ### Info [Section titled “Info”](#info) This command prints information about the SGX Wallet. ```shell sk-val sgx info ``` **Optional Arguments** * `--raw` prints info in plain JSON ## Validator Commands [Section titled “Validator Commands”](#validator-commands) ### Register [Section titled “Register”](#register) Registers as a new SKALE validator. ```shell sk-val validator register ``` **Required Arguments** * `--name/-n` is the validator name * `--description/-d` is the validator description * `--commission-rate/-c` is the commission rate in percentage form * `--min-delegation` is the minimum delegation amount that the validator will accept **Optional Arguments** * `--pk-file` is a path to a file with private key (only supported for *software* wallet type) * `--gas-price` allows the executor to specify the gas price value in gwei for a transaction. If not specified, the average gas price of the network will be double and set. * `--yes` the confirmation flag may be set in advance #### Usage Example [Section titled “Usage Example”](#usage-example) ```shell sk-val validator register -n test -d "test description" -c 20 --min-delegation 1000 --pk-file ./pk.txt ``` ### List [Section titled “List”](#list) Lists all available validators. ```shell sk-val validator ls ``` **Optional Arguments** * `--wei/-w` can be used to show the amount of tokens in wei ### Delegations [Section titled “Delegations”](#delegations) Returns a list of delegations for a given validator id. ```shell sk-val validator delegations [VALIDATOR_ID] ``` **Required Parameters** 1. `VALIDATOR_ID` is the id of the validator. This is a numeric value. ### Accept Pending Delegations [Section titled “Accept Pending Delegations”](#accept-pending-delegations) This command will accept pending delegations by delegation Id. ```shell sk-val validator accept-delegation --pk-file ./pk.txt ``` **Requirement Arguments** * `--delegation-id` is the id of he delegation request to accept **Optional Arguments** * `--pk-file` is a path to a file with private key (only supported for *software* wallet type) * `--gas-price` allows the executor to specify the gas price value in gwei for a transaction. If not specified, the average gas price of the network will be double and set. * `--yes` the confirmation flag may be set in advance ### Accept All Pending Delegations [Section titled “Accept All Pending Delegations”](#accept-all-pending-delegations) Caution This will accept ALL pending delegations associated with this validator address. A list with all pending delegations will be shown first. The executor will need to confirm the operation. ```shell sk-val validator accept-all-delegations ./pk.txt ``` **Optional Arguments** * `--pk-file` is a path to a file with private key (only supported for *software* wallet type) * `--gas-price` allows the executor to specify the gas price value in gwei for a transaction. If not specified, the average gas price of the network will be double and set. ### Validator Linked Addresses [Section titled “Validator Linked Addresses”](#validator-linked-addresses) Lists the linked addresses for the validator address. ```shell sk-val validator linked-addresses [ADDRESS] ``` **Required Parameters** 1. `ADDRESS` is the Ethereum address of the validator ### Link Address [Section titled “Link Address”](#link-address) Links a supernode address to the validator account. ```shell sk-val validator link-address [ADDRESS] [NODE_SIGNATURE] --pk-file ./pk.txt ``` **Required Parameters** 1. `ADDRESS` is the Ethereum address that will be linked 2. `NODE_SIGNATURE` is the signature of the supernode that you can get using the `skale node signature` command from the SKALE Node CLI **Optional Arguments** * `--pk-file` is a path to a file with private key (only supported for *software* wallet type) * `--gas-price` allows the executor to specify the gas price value in gwei for a transaction. If not specified, the average gas price of the network will be double and set. * `--yes` the confirmation flag may be set in advance ### Unlink Address [Section titled “Unlink Address”](#unlink-address) Unlinks a supernode address from the validator account. ```shell sk-val validator unlink-address [ADDRESS] --pk-file ./pk.txt ``` **Required Parameters** 1. `ADDRESS` is the Ethereum address that will be unlinked **Optional Arguments** * `--pk-file` is a path to a file with private key (only supported for *software* wallet type) * `--gas-price` allows the executor to specify the gas price value in gwei for a transaction. If not specified, the average gas price of the network will be double and set. * `--yes` the confirmation flag may be set in advance ### Validator Info [Section titled “Validator Info”](#validator-info) Shows info about a given validator. ```shell sk-val validator info [VALIDATOR_ID] ``` **Required Parameters** 1. `VALIDATOR_ID` is the validator id to lookup **Output Includes:** 1. Validator Id 2. Validator Name 3. Validator Address 4. Validator Fee Rate (in percentage form) 5. Minimum Delegation Amount (SKL) 6. If the validator is accepting new delegation requests ### Withdraw Fee [Section titled “Withdraw Fee”](#withdraw-fee) Withdraws earned fees to a specified address. ```shell sk-val validator withdraw-fee [RECIPIENT_ADDRESS] --pk-file ./pk.txt ``` **Required Parameters** 1. `RECIPIENT_ADDRESS` is the address to transfer the bounties too **Optional Arguments** * `--pk-file` is a path to a file with private key (only supported for *software* wallet type) * `--gas-price` allows the executor to specify the gas price value in gwei for a transaction. If not specified, the average gas price of the network will be double and set. * `--yes` the confirmation flag may be set in advance ### Set Minimum Delegation Amount (MDA) [Section titled “Set Minimum Delegation Amount (MDA)”](#set-minimum-delegation-amount-mda) Sets new minimum delegation amount for the validator. ```shell sk-val validator set-mda [NEW_MDA] --pk-file ./pk.txt ``` **Required Parameters** 1. `NEW_MDA` is the new mda value **Optional Arguments** * `--pk-file` is a path to a file with private key (only supported for *software* wallet type) * `--gas-price` allows the executor to specify the gas price value in gwei for a transaction. If not specified, the average gas price of the network will be double and set. * `--yes` the confirmation flag may be set in advance ### Request Address Change [Section titled “Request Address Change”](#request-address-change) Requests a change of Ethereum Address for the validator. ```shell sk-val validator change-address [ADDRESS] --pk-file ./pk.txt ``` **Required Parameters** 1. `ADDRESS` is the validator Ethereum address **Optional Arguments** * `--pk-file` is a path to a file with private key (only supported for *software* wallet type) * `--gas-price` allows the executor to specify the gas price value in gwei for a transaction. If not specified, the average gas price of the network will be double and set. * `--yes` the confirmation flag may be set in advance ### Confirm Address Change [Section titled “Confirm Address Change”](#confirm-address-change) Confirms a requested address change for the validator. ```shell sk-val validator confirm-address [VALIDATOR_ID] --pk-file ./pk.txt ``` **Required Parameters** 1. `VALIDATOR_ID` is the ID of the associated validator **Optional Arguments** * `--pk-file` is a path to a file with private key (only supported for *software* wallet type) * `--gas-price` allows the executor to specify the gas price value in gwei for a transaction. If not specified, the average gas price of the network will be double and set. * `--yes` the confirmation flag may be set in advance ### Earned Fees [Section titled “Earned Fees”](#earned-fees) Retrieves the earned fee amount for the validator address. ```shell sk-val validator earned-fees [ADDRESS] ``` \**Required Parameters* 1. `ADDRESS` is the validator address to check **Optional Arguments** * `--wei` can be used to show the amount in wei ## Holder Commands [Section titled “Holder Commands”](#holder-commands) ### Delegate [Section titled “Delegate”](#delegate) Delegate tokens to a validator ```shell sk-val holder delegate ``` **Required Arguments** * `--validator-id` is the id of the validator to delegate to * `--amount` is the amount of SKL tokens to delegate * `--delegation-period` is the delegation period in months \[Set to 2] * `--info` to request info on the delegation **Optional Arguments** * `--pk-file` is a path to a file with private key (only supported for *software* wallet type) * `--gas-price` allows the executor to specify the gas price value in gwei for a transaction. If not specified, the average gas price of the network will be double and set. ### Delegations [Section titled “Delegations”](#delegations-1) Use to list out all delegations for an address. ```shell sk-val holder delegations [ADDRESS] ``` **Required Parameters** 1. `ADDRESS` is the Ethereum address of the SKL token holder **Optional Arguments** * `--wei/-w` to show amounts in wei ### Cancel Pending Delegation [Section titled “Cancel Pending Delegation”](#cancel-pending-delegation) Use to cancel a pending delegation request. ```shell sk-val holder cancel-delegation [DELEGATION_ID] ``` **Required Parameters** 1. `DELEGATION_ID` is the id of the delegation to cancel **Optional Arguments** * `--pk-file` is a path to a file with private key (only supported for *software* wallet type) * `--gas-price` allows the executor to specify the gas price value in gwei for a transaction. If not specified, the average gas price of the network will be double and set. ### Request Undelegation [Section titled “Request Undelegation”](#request-undelegation) Request undelegation which goes into affect at the end of the undelegation period. ```shell sk-val holder undelegate [DELEGATION_ID] ``` **Required Parameters** 1. `DELEGATION_ID` is the id of the delegation to cancel **Optional Arguments** * `--pk-file` is a path to a file with private key (only supported for *software* wallet type) * `--gas-price` allows the executor to specify the gas price value in gwei for a transaction. If not specified, the average gas price of the network will be double and set. ### Withdraw Bounty [Section titled “Withdraw Bounty”](#withdraw-bounty) Withdraws a bounty to the specified address ```shell sk-val holder withdraw-bounty [VALIDATOR_ID] [RECIPIENT_ADDRESS] --pk-file ./pk.txt ``` **Required Parameters** 1. `VALIDATOR_ID` is the id of the validator 2. `RECIPIENT_ADDRESS` is the Ethereum address to have the bounty sent too **Optional Arguments** * `--pk-file` is a path to a file with private key (only supported for *software* wallet type) * `--gas-price` allows the executor to specify the gas price value in gwei for a transaction. If not specified, the average gas price of the network will be double and set. * `--yes` confirmation flag can be used to auto execute ### Locked [Section titled “Locked”](#locked) Shows the amount of locked tokens for an address. ```shell sk-val holder locked [ADDRESS] ``` **Required Parameters** 1. `ADDRESS` is the Ethereum address of the SKL token holder **Optional Arguments** * `--wei/-w` to show amounts in wei ### Earned Bounties [Section titled “Earned Bounties”](#earned-bounties) Reads the amount of earned bounties by a token holder for a single validator. ```shell sk-val holder earned-bounties [VALIDATOR_ID] [ADDRESS] ``` **Required Parameters** 1. `VALIDATOR_ID` is the id of the validator 2. `ADDRESS` is the Ethereum address of the SKL token holder **Optional Arguments** * `--wei/-w` to show amounts in wei ## Wallet Commands [Section titled “Wallet Commands”](#wallet-commands) ### Setup Ledger [Section titled “Setup Ledger”](#setup-ledger) ```shell sk-val wallet setup-ledger ``` **Required Arguments** * `--address-index` is the index of the wallet to use (starts at 0) * `--keys-type` is the type of Ledger keys whether live or legacy ### Send ETH Tokens [Section titled “Send ETH Tokens”](#send-eth-tokens) Executes a transfer of ETH tokens to a specific address. ```shell sk-val wallet send-eth [ADDRESS] [AMOUNT] ``` **Required Parameters** 1. `ADDRESS` is the Ethereum receiver address (e.g to) 2. `AMOUNT` is the amount of ETH tokens to send **Optional Arguments** * `--pk-file` is a path to a file with private key (only supported for *software* wallet type) * `--yes` confirmation flag can be used to auto execute #### Usage Example [Section titled “Usage Example”](#usage-example-1) ```shell sk-val wallet send-eth 0x01C19c5d3Ad1C3014145fC82263Fbae09e23924A 0.01 --pk-file ./pk.txt --yes ``` ### Send SKL Tokens [Section titled “Send SKL Tokens”](#send-skl-tokens) Executes a transfer of SKL tokens to a specific address. ```shell sk-val wallet send-skl [ADDRESS] [AMOUNT] ``` **Required Parameters** 1. `ADDRESS` is the Ethereum receiver address (e.g to) 2. `AMOUNT` is the amount of ETH tokens to send **Optional Arguments** * `--pk-file` is a path to a file with private key (only supported for *software* wallet type) * `--yes` confirmation flag can be used to auto execute #### Usage Example [Section titled “Usage Example”](#usage-example-2) ```shell sk-val wallet send-skl 0x01C19c5d3Ad1C3014145fC82263Fbae09e23924A 0.01 --pk-file ./pk.txt --yes ``` ## Self-Recharging Wallet Commands [Section titled “Self-Recharging Wallet Commands”](#self-recharging-wallet-commands) ### Balance [Section titled “Balance”](#balance) Shows the balance of the validator self-recharging wallet. ```shell sk-val srw balance [VALIDATOR_ID] ``` **Required Parameters** 1. `VALIDATOR_ID` is the ID of the validator **Optional Arguments** * `--wei/-w` shows the amount in wei #### Usage Example [Section titled “Usage Example”](#usage-example-3) ```shell sk-val srw balance 1 --wei ``` ### Recharge Wallet [Section titled “Recharge Wallet”](#recharge-wallet) Recharges the validator SRW wallet (amount in ETH). ```shell sk-val srw recharge [AMOUNT] ``` **Required Parameters** 1. `AMOUNT` is the amount of ETH tokens to send **Optional Arguments** * `--pk-file` is a path to a file with private key (only supported for *software* wallet type) * `--yes` confirmation flag can be used to auto execute #### Usage Example [Section titled “Usage Example”](#usage-example-4) ```shell sk-val srw recharge 0.1 --pk-file ./tests/test-pk.txt ``` ### Withdraw [Section titled “Withdraw”](#withdraw) Withdraw ETH from validator SRW (amount in ETH). ```shell sk-val srw withdraw [AMOUNT] ``` **Required Parameters** 1. `AMOUNT` is the amount of ETH tokens to send **Optional Arguments** * `--pk-file` is a path to a file with private key (only supported for *software* wallet type) * `--yes` confirmation flag can be used to auto execute #### Usage Example [Section titled “Usage Example”](#usage-example-5) ```shell sk-val srw withdraw 0.1 --pk-file ./tests/test-pk.txt ``` ## Exit Codes [Section titled “Exit Codes”](#exit-codes) | Code | Explanation | | ---- | ----------------------- | | 0 | Everything is OK | | 1 | General error exit code | | 3 | Bad API response | | 4 | Script execution error | | 5 | Transaction error | | 6 | Revert error |
# Self Recharging Wallets
> Deep dive into self-recharging capabilities of supernode wallets
## Types of Wallets [Section titled “Types of Wallets”](#types-of-wallets) There are several types of wallets in the SKALE Network. These include: 1. Wallets Controlled by the validator, supernode operator, and SKALE Chain owner. These wallets may be software or hardware wallets. 2. Self-Recharging wallets can be for validators and for the SKALE Chain owner. ## Node Transactions & Reimbursement [Section titled “Node Transactions & Reimbursement”](#node-transactions--reimbursement) The following table explores what supernode transactions are reimbursed and by who. | Transaction | Reimbursed By | Description of Transaction | | ------------------ | ----------------- | ------------------------------------------------------------------------------------------------------------------------------------------------------------------ | | getBounty() | Validator | Called every month by each supernode to request bounty. | | nodeExit() | Validator | To remove a supernode from the network due to hardware failure or unmet MSR. | | complaint() | Validator | Performed in DKG failure mode when a supernode lodges a general DKG complaint against a malicious supernode who may have failed to send data. | | complaintBadData() | Validator | Performed in DKG failure mode when a supernode discovers that malicious data has been sent and requires verification data to validate. | | preResponse() | Validator | Performed in DKG failure mode, when a supernode sends a verification vector and secret key shares ahead of the final `response()` result. | | response() | Validator | Performed in DKG failure mode when a supernode sends a response to a `complaint()` to prove it’s not malicious based on the data it sends in `preResponse()`. | | broadcast() | SKALE Chain Owner | Performed during SKALE Chain creation when distributed key generation process begins. Supernodes broadcast their secret key contributions to all other supernodes. | | alright() | SKALE Chain Owner | Performed during SKALE Chain creation when distributed key generation is in-process. Supernodes send receipts of secret key contributions. | ## Replenishment [Section titled “Replenishment”](#replenishment) Self-recharging validator wallets can be replenished in ETH by anyone with the wallet’s contract address and the `ValidatorId` or `sChainId`. This functionality allows anyone to ensure the continued ETH funding and operation of validator supernodes and SKALE Chains. If the *self-recharging*… * *validator balance* runs out of ETH, then the supernodes’ wallets are first spent until transactions revert. * *SKALE Chain Owner balance* runs out of ETH, then transactions will revert. Node wallets connected to the self-recharging validator wallet are replenished automatically at the end of each transaction based on the best estimate of the gas consumed in the transaction. Caution If the validator self-recharging wallet is out of ETH, then supernode wallets start using their own ETH until the supernode balance is 0. Suppose the validator self-recharging wallet has 0 balance at the same time that the supernode wallet balance is 0. In that case, validators are then responsible for recharging both the validator self-recharging wallet and the supernode wallets with 0 balance. Danger If a supernode’s `getBounty` transaction reverts and can’t complete the transaction before the end of the month, the validator-delegators will receive less bounty. Validators must ensure sufficient balance and a working endpoint to connect with Ethereum mainnet. ## Using a Self-Recharging Wallet [Section titled “Using a Self-Recharging Wallet”](#using-a-self-recharging-wallet) When a new validator is registered, a self-recharging wallet is automatically deployed. The validator’s private key has withdraw access to this wallet. Validators can use this private key to close the self-recharging wallet should the validator leave the network. As a validator links supernodes to their validator ID, these linked supernodes will automatically request reimbursement from the validator’s self-recharging wallet for those transactions. If a supernode is unlinked from the validator, this supernode will no longer request reimbursement from the validator’s self-recharging wallet. Existing validators will automatically be added to the Wallet contract and will start using them once this feature is deployed to mainnet. ## Interacting with the Self-Recharging Wallet (SRW) [Section titled “Interacting with the Self-Recharging Wallet (SRW)”](#interacting-with-the-self-recharging-wallet-srw) Validators can use the CLI to recharge, withdraw funds from, or check the self-recharging wallet’s balance. Anyone can recharge or check the balance by interacting with the Wallet contract on Ethereum. *For the CLI* ```shell # Validator recharges the self-recharging wallet from their wallet (sk-val wallet info) sk-val srw recharge AMOUNT_IN_ETH [--validator-id VALIDATOR_ID] [--gas-price PRICE_IN_GWEI] [--pk-file PATH_TO_PK] > sk-val srw recharge 0.1 # Recharge using a hardware wallet > sk-val srw recharge 0.1 --validator-id 1 # Recharge validator ID 1 using a hardware wallet > sk-val srw recharge 0.1 --pk-file ./tests/test-pk.txt # Recharge using a software wallet # Validator withdraws an amount from the self-recharging wallet sk-val srw withdraw AMOUNT_IN_ETH [--pk-file PATH_TO_PK] [--gas-price PRICE_IN_GWEI] > sk-val srw withdraw 0.1 # Withdraw using a hardware wallet > sk-val srw withdraw 0.1 --pk-file ./tests/test-pk.txt # Withdraw using a software wallet # Returns self-recharging wallet balance sk-val srw balance VALIDATOR_ID [--wei] > sk-val srw balance 1 # Show balance in ETH > sk-val srw balance 1 --wei # Show balance in Wei ``` *For Wallets Contract* See ```shell rechargeValidatorWallet(validatorId) withdrawFundsFromValidatorWallet(amount) getValidatorBalance(validatorId) ```
# Watchdog APIs
> SKALE Watchdog APIs
## REST JSON APIs [Section titled “REST JSON APIs”](#rest-json-apis) * [/status/core](#statuscore) * [/status/sgx](#statussgx) * [/status/schains](#statusschains) * [/status/hardware](#statushardware) * [/status/endpoint](#statusendpoint) * [/status/schain-containers-versions](#statusschain-containers-versions) * [/status/meta-info](#statusmeta-info) * [/status/btrfs](#statusbtrfs) * [/status/ssl](#statusssl) * [/status/ima](#statusima) * [/status/public-ip](#statuspublic-ip) * [/status/validator-nodes](#statusvalidator-nodes) # Watchdog [Section titled “Watchdog”](#watchdog) ## Introduction [Section titled “Introduction”](#introduction) SKALE Watchdog is microservice running on every SKALE supernode for providing SLA agents with supernode performance metrics. It also can be used for external monitoring goals (validators can use it in their monitoring tools). Watchdog is a Python script running in docker container with Flask web server that provides simple REST JSON API available on port 3009 (http\://YOUR\_SKALE\_NODE\_IP:3009). Currently, Watchdog can give data on all SKALE supernode docker containers, health checks of sChains and SGX server, ethereum supernode endpoint status, and hardware information. \[NOTE] Node CLI automatically opens port 3009 on the machine using iptables. Be sure that port 3009 is open for the supernode’s external network for Watchdog to work. ## REST JSON APIs [Section titled “REST JSON APIs”](#rest-json-apis-1) * [/status/core](#statuscore) * [/status/sgx](#statussgx) * [/status/schains](#statusschains) * [/status/hardware](#statushardware) * [/status/endpoint](#statusendpoint) * [/status/schain-containers-versions](#statusschain-containers-versions) * [/status/meta-info](#statusmeta-info) * [/status/btrfs](#statusbtrfs) * [/status/ssl](#statusssl) * [/status/ima](#statusima) * [/status/public-ip](#statuspublic-ip) * [/status/validator-nodes](#statusvalidator-nodes) ### /status/core [Section titled “/status/core”](#statuscore) #### Description [Section titled “Description”](#description) Returns data on all SKALE containers running on a given node. These are containers with prefix `skale_`, including base containers and pairs of sChain and IMA containers, where every pair corresponds to a certain sChain assigned to this node. Here is a list of the base containers: * skale\_transaction-manager * skale\_admin * skale\_api * skale\_mysql * skale\_sla * skale\_bounty * skale\_watchdog * skale\_nginx Docker container name patterns for sChain with name SCHAIN\_NAME are the following: * sChain: skale\_schain\_SCHAIN\_NAME * IMA: skale\_ima\_SCHAIN\_NAME #### Usage [Section titled “Usage”](#usage) ```shell $ curl http://YOUR_SKALE_NODE_IP:3009/status/core {"data": [{"image": "skalenetwork/ima:1.0.0-develop.103", "name": "skale_ima_clean-rigel-kentaurus", "state": {"Status": "running", "Running": true, "Paused": false, "Restarting": false, "OOMKilled": false, "Dead": false, "Pid": 32501, "ExitCode": 0, "Error": "", "StartedAt": "2021-01-08T18:03:23.165649145Z", "FinishedAt": "0001-01-01T00:00:00Z"}}, {"image": "skalenetwork/schain:3.2.2-develop.0", "name": "skale_schain_clean-rigel-kentaurus", "state": {"Status": "running", "Running": true, "Paused": false, "Restarting": false, "OOMKilled": false, "Dead": false, "Pid": 32315, "ExitCode": 0, "Error": "", "StartedAt": "2021-01-08T18:03:02.980981899Z", "FinishedAt": "0001-01-01T00:00:00Z"}}, {"image": "skalenetwork/bounty-agent:1.1.1-beta.0", "name": "skale_bounty", "state": {"Status": "running", "Running": true, "Paused": false, "Restarting": false, "OOMKilled": false, "Dead": false, "Pid": 2834, "ExitCode": 0, "Error": "", "StartedAt": "2021-01-05T18:59:01.745578956Z", "FinishedAt": "0001-01-01T00:00:00Z"}}, {"image": "skalenetwork/admin:1.1.0-beta.7", "name": "skale_api", "state": {"Status": "running", "Running": true, "Paused": false, "Restarting": false, "OOMKilled": false, "Dead": false, "Pid": 2810, "ExitCode": 0, "Error": "", "StartedAt": "2021-01-05T18:59:01.724467486Z", "FinishedAt": "0001-01-01T00:00:00Z"}}, {"image": "skalenetwork/sla-agent:1.0.2-beta.1", "name": "skale_sla", "state": {"Status": "running", "Running": true, "Paused": false, "Restarting": false, "OOMKilled": false, "Dead": false, "Pid": 2831, "ExitCode": 0, "Error": "", "StartedAt": "2021-01-05T18:59:01.75059756Z", "FinishedAt": "0001-01-01T00:00:00Z"}}, {"image": "nginx:1.19.6", "name": "skale_nginx", "state": {"Status": "running", "Running": true, "Paused": false, "Restarting": false, "OOMKilled": false, "Dead": false, "Pid": 2612, "ExitCode": 0, "Error": "", "StartedAt": "2021-01-05T18:59:01.592144127Z", "FinishedAt": "0001-01-01T00:00:00Z"}}, {"image": "mysql/mysql-server:5.7.30", "name": "skale_mysql", "state": {"Status": "running", "Running": true, "Paused": false, "Restarting": false, "OOMKilled": false, "Dead": false, "Pid": 2367, "ExitCode": 0, "Error": "", "StartedAt": "2021-01-05T18:59:01.363363602Z", "FinishedAt": "0001-01-01T00:00:00Z", "Health": {"Status": "healthy", "FailingStreak": 0, "Log": [{"Start": "2021-01-11T13:05:26.695580607Z", "End": "2021-01-11T13:05:26.7965889Z", "ExitCode": 0, "Output": "mysqld is alive\n"}, {"Start": "2021-01-11T13:05:56.8026356Z", "End": "2021-01-11T13:05:56.897819023Z", "ExitCode": 0, "Output": "mysqld is alive\n"}, {"Start": "2021-01-11T13:06:26.90380399Z", "End": "2021-01-11T13:06:27.00531651Z", "ExitCode": 0, "Output": "mysqld is alive\n"}, {"Start": "2021-01-11T13:06:57.011844463Z", "End": "2021-01-11T13:06:57.106312668Z", "ExitCode": 0, "Output": "mysqld is alive\n"}, {"Start": "2021-01-11T13:07:27.111509013Z", "End": "2021-01-11T13:07:27.218446754Z", "ExitCode": 0, "Output": "mysqld is alive\n"}]}}}, {"image": "skalenetwork/watchdog:1.1.2-beta.0", "name": "skale_watchdog", "state": {"Status": "running", "Running": true, "Paused": false, "Restarting": false, "OOMKilled": false, "Dead": false, "Pid": 2171, "ExitCode": 0, "Error": "", "StartedAt": "2021-01-05T18:59:01.231188713Z", "FinishedAt": "0001-01-01T00:00:00Z"}}, {"image": "skalenetwork/admin:1.1.0-beta.7", "name": "skale_admin", "state": {"Status": "running", "Running": true, "Paused": false, "Restarting": false, "OOMKilled": false, "Dead": false, "Pid": 15922, "ExitCode": 0, "Error": "", "StartedAt": "2021-01-08T15:30:06.84581235Z", "FinishedAt": "2021-01-08T15:30:06.61032202Z", "Health": {"Status": "healthy", "FailingStreak": 0, "Log": [{"Start": "2021-01-11T13:03:27.83704947Z", "End": "2021-01-11T13:03:27.943393521Z", "ExitCode": 0, "Output": "Modification time diff: 16.017173290252686, limit is 600\n"}, {"Start": "2021-01-11T13:04:27.948600024Z", "End": "2021-01-11T13:04:28.07052713Z", "ExitCode": 0, "Output": "Modification time diff: 30.681769371032715, limit is 600\n"}, {"Start": "2021-01-11T13:05:28.076286609Z", "End": "2021-01-11T13:05:28.18879886Z", "ExitCode": 0, "Output": "Modification time diff: 40.09002113342285, limit is 600\n"}, {"Start": "2021-01-11T13:06:28.194725277Z", "End": "2021-01-11T13:06:28.304819334Z", "ExitCode": 0, "Output": "Modification time diff: 4.169792890548706, limit is 600\n"}, {"Start": "2021-01-11T13:07:28.310191582Z", "End": "2021-01-11T13:07:28.432554349Z", "ExitCode": 0, "Output": "Modification time diff: 18.855625867843628, limit is 600\n"}]}}}, {"image": "skalenetwork/transaction-manager:1.1.0-beta.1", "name": "skale_transaction-manager", "state": {"Status": "running", "Running": true, "Paused": false, "Restarting": false, "OOMKilled": false, "Dead": false, "Pid": 2065, "ExitCode": 0, "Error": "", "StartedAt": "2021-01-05T18:59:01.201684713Z", "FinishedAt": "0001-01-01T00:00:00Z"}}], "error": null} ``` ### /status/sgx [Section titled “/status/sgx”](#statussgx) #### Description [Section titled “Description”](#description-1) Returns SGX server info - connection status and SGX wallet version #### Usage [Section titled “Usage”](#usage-1) ```shell $ curl http://YOUR_SKALE_NODE_IP:3009/status/sgx {"data": {"status": 0, "status_name": "CONNECTED", "sgx_wallet_version": "1.64.2"}, "error": null} ``` ### /status/schains [Section titled “/status/schains”](#statusschains) #### Description [Section titled “Description”](#description-2) Returns list of health checks for every sChain running on a given node: * data\_dir - checks that sChain data dir exists * dkg - checks that DKG procedure is completed for current sChain * config - checks that sChain config file exists * volume - checks that sChain volume exists * firewall\_rules - checks that firewall rules are set correctly * container - checks that skaled container is running * ima\_container - checks that IMA container is running * RPC - checks that local skaled RPC is accessible * blocks - checks that local skaled is mining blocks #### Usage [Section titled “Usage”](#usage-2) ```shell $ curl http://YOUR_SKALE_NODE_IP:3009/status/schains {"data": [{"name": "clean-rigel-kentaurus", "healthchecks": {"data_dir": true, "dkg": true, "config": true, "volume": true, "firewall_rules": true, "container": true, "exit_code_ok": true, "ima_container": true, "rpc": true, "blocks": true}}], "error": null} ``` ### /status/endpoint [Section titled “/status/endpoint”](#statusendpoint) #### Description [Section titled “Description”](#description-3) Returns info on ethereum node endpoint, used by a given SKALE node - current block number and syncing status (web3.eth.syncing result) #### Usage [Section titled “Usage”](#usage-3) ```shell $ curl http://YOUR_SKALE_NODE_IP:3009/status/endpoint {"data": {"block_number": 7917221, "syncing": false}, "error": null} ``` ### /status/hardware [Section titled “/status/hardware”](#statushardware) #### Description [Section titled “Description”](#description-4) Returns node hardware information: * cpu\_total\_cores - return the number of logical CPUs in the system ( the number of physical cores multiplied by the number of threads that can run on each core) * cpu\_physical\_cores - return the number of physical CPUs in the system * memory - total physical memory in bytes (exclusive swap) * swap - total swap memory in bytes * system\_release - system/OS name and system’s release * uname\_version - system’s release version * attached\_storage\_size - attached storage size in bytes #### Usage [Section titled “Usage”](#usage-4) ```shell curl http://YOUR_SKALE_NODE_IP:3009/status/hardware {"data": {"cpu_total_cores": 8, "cpu_physical_cores": 8, "memory": 33675845632, "swap": 67 ``` #### Example of Response [Section titled “Example of Response”](#example-of-response) ```json {"data": [{"image": "nginx:1.13.7", "name": "skale_nginx", "state": {"Status": "running", "Running": true, "Paused": false, "Restarting": false, "OOMKilled": false, "Dead": false, "Pid": 18579, "ExitCode": 0, "Error": "", "StartedAt": "2020-12-15T13:48:28.545487937Z", "FinishedAt": "0001-01-01T00:00:00Z"}}, {"image": "skalenetwork/admin:1.1.0-beta.1", "name": "skale_api", "state": {"Status": "running", "Running": true, "Paused": false, "Restarting": false, "OOMKilled": false, "Dead": false, "Pid": 18284, "ExitCode": 0, "Error": "", "StartedAt": "2020-12-15T13:48:27.651007072Z", "FinishedAt": "0001-01-01T00:00:00Z"}}, {"image": "skalenetwork/sla-agent:1.0.2-beta.1", "name": "skale_sla", "state": {"Status": "running", "Running": true, "Paused": false, "Restarting": false, "OOMKilled": false, "Dead": false, "Pid": 18365, "ExitCode": 0, "Error": "", "StartedAt": "2020-12-15T13:48:27.730205071Z", "FinishedAt": "0001-01-01T00:00:00Z"}}, {"image": "skalenetwork/bounty-agent:1.1.1-beta.0", "name": "skale_bounty", "state": {"Status": "running", "Running": true, "Paused": false, "Restarting": false, "OOMKilled": false, "Dead": false, "Pid": 18340, "ExitCode": 0, "Error": "", "StartedAt": "2020-12-15T13:48:27.694385403Z", "FinishedAt": "0001-01-01T00:00:00Z"}}, {"image": "skalenetwork/transaction-manager:1.1.0-beta.0", "name": "skale_transaction-manager", "state": {"Status": "running", "Running": true, "Paused": false, "Restarting": false, "OOMKilled": false, "Dead": false, "Pid": 17872, "ExitCode": 0, "Error": "", "StartedAt": "2020-12-15T13:48:27.25649668Z", "FinishedAt": "0001-01-01T00:00:00Z"}}, {"image": "skalenetwork/watchdog:1.0.0-stable.0", "name": "skale_watchdog", "state": {"Status": "running", "Running": true, "Paused": false, "Restarting": false, "OOMKilled": false, "Dead": false, "Pid": 18118, "ExitCode": 0, "Error": "", "StartedAt": "2020-12-15T13:48:27.907066673Z", "FinishedAt": "0001-01-01T00:00:00Z"}}, {"image": "skalenetwork/admin:1.1.0-beta.1", "name": "skale_admin", "state": {"Status": "running", "Running": true, "Paused": false, "Restarting": false, "OOMKilled": false, "Dead": false, "Pid": 17936, "ExitCode": 0, "Error": "", "StartedAt": "2020-12-15T13:48:27.265352128Z", "FinishedAt": "0001-01-01T00:00:00Z", "Health": {"Status": "healthy", "FailingStreak": 0, "Log": [{"Start": "2020-12-15T14:04:29.314460489Z", "End": "2020-12-15T14:04:29.441963475Z", "ExitCode": 0, "Output": "Modification time diff: 21.14485740661621, limit is 600\n"}, {"Start": "2020-12-15T14:05:29.447580804Z", "End": "2020-12-15T14:05:29.580104983Z", "ExitCode": 0, "Output": "Modification time diff: 33.23975086212158, limit is 600\n"}, {"Start": "2020-12-15T14:06:29.586114183Z", "End": "2020-12-15T14:06:29.719576685Z", "ExitCode": 0, "Output": "Modification time diff: 0.5591189861297607, limit is 600\n"}, {"Start": "2020-12-15T14:07:29.727615313Z", "End": "2020-12-15T14:07:29.860632612Z", "ExitCode": 0, "Output": "Modification time diff: 13.140380859375, limit is 600\n"}, {"Start": "2020-12-15T14:08:29.866030839Z", "End": "2020-12-15T14:08:29.991292415Z", "ExitCode": 0, "Output": "Modification time diff: 25.21944308280945, limit is 600\n"}]}}}, {"image": "mysql/mysql-server:5.7.30", "name": "skale_mysql", "state": {"Status": "running", "Running": true, "Paused": false, "Restarting": false, "OOMKilled": false, "Dead": false, "Pid": 17880, "ExitCode": 0, "Error": "", "StartedAt": "2020-12-15T13:48:27.270664629Z", "FinishedAt": "0001-01-01T00:00:00Z", "Health": {"Status": "healthy", "FailingStreak": 0, "Log": [{"Start": "2020-12-15T14:06:31.513600128Z", "End": "2020-12-15T14:06:31.628416403Z", "ExitCode": 0, "Output": "mysqld is alive\n"}, {"Start": "2020-12-15T14:07:01.635502928Z", "End": "2020-12-15T14:07:01.75593047Z", "ExitCode": 0, "Output": "mysqld is alive\n"}, {"Start": "2020-12-15T14:07:31.766279603Z", "End": "2020-12-15T14:07:31.88026375Z", "ExitCode": 0, "Output": "mysqld is alive\n"}, {"Start": "2020-12-15T14:08:01.885733506Z", "End": "2020-12-15T14:08:01.999542219Z", "ExitCode": 0, "Output": "mysqld is alive\n"}, {"Start": "2020-12-15T14:08:32.005145263Z", "End": "2020-12-15T14:08:32.115797294Z", "ExitCode": 0, "Output": "mysqld is alive\n"}]}}}], "error": null} ``` ### /status/containers [Section titled “/status/containers”](#statuscontainers) Documentation unavailable. ### /status/meta-info [Section titled “/status/meta-info”](#statusmeta-info) #### Description [Section titled “Description”](#description-5) Returns steam versions. #### Usage [Section titled “Usage”](#usage-5) ```shell $ curl http://YOUR_SKALE_NODE_IP:3009/status/meta-info {"data": {"version": "1.1.0", "config_stream": "1.2.1", "docker_lvmpy_stream": "1.0.1-stable.1"}, "error": null} ``` ### /status/schain-containers-versions [Section titled “/status/schain-containers-versions”](#statusschain-containers-versions) #### Description [Section titled “Description”](#description-6) Returns SKALE Chain and IMA container versions. #### Usage [Section titled “Usage”](#usage-6) ```shell $ curl http://YOUR_SKALE_NODE_IP:3009/status/schain-containers-versions {"data": {"skaled_version": "3.5.12-stable.1", "ima_version": "1.0.0-develop.148"}, "error": null} ``` ### /status/btrfs [Section titled “/status/btrfs”](#statusbtrfs) #### Description [Section titled “Description”](#description-7) Returns btrfs kernel information. #### Usage [Section titled “Usage”](#usage-7) ```shell $ curl http://YOUR_SKALE_NODE_IP:3009/status/btrfs ``` ### /status/ssl [Section titled “/status/ssl”](#statusssl) #### Description [Section titled “Description”](#description-8) Returns key-cert pair validity. #### Usage [Section titled “Usage”](#usage-8) ```shell $ curl http://YOUR_SKALE_NODE_IP:3009/status/ssl ``` #### Example Response [Section titled “Example Response”](#example-response) ```json {"data": {"issued_to": "skale.network.cloud", "expiration_date": "2021-11-08T17:45:04"}, "error": null} ``` ### /status/ima [Section titled “/status/ima”](#statusima) #### Description [Section titled “Description”](#description-9) Returns the status of the IMA container. ### Usage [Section titled “Usage”](#usage-9) ```shell $ curl http://YOUR_SKALE_NODE_IP:3009/status/ima ``` #### Example Response [Section titled “Example Response”](#example-response-1) ```json {"data": [{"skale-chain-name": {"error": "IMA docker container is not running", "last_ima_errors": []}}], "error": null} ``` ### /status/public-ip [Section titled “/status/public-ip”](#statuspublic-ip) #### Description [Section titled “Description”](#description-10) #### Usage [Section titled “Usage”](#usage-10) ```shell $ curl http://YOUR_SKALE_NODE_IP:3009/status/public-ip ``` #### Example Response [Section titled “Example Response”](#example-response-2) ```json {"data": {"public_ip": "1.2.3.4"}, "error": null} ``` ### /status/validator-nodes [Section titled “/status/validator-nodes”](#statusvalidator-nodes) #### Description [Section titled “Description”](#description-11) #### Usage [Section titled “Usage”](#usage-11) ```shell $ curl http://YOUR_SKALE_NODE_IP:3009/status/validator-nodes ``` #### Example Response [Section titled “Example Response”](#example-response-3) ```json {"data": [[1, "1.2.3.4", true], [2, "1.2.3.5", false]], "error": null} ```
# SKALE Watchdog
> Overview of SKALE Watchdog
SKALE Watchdog is microservice running on every SKALE supernode for providing SLA agents with supernode performance metrics. It also can be used for external monitoring goals (validators can use it in their monitoring tools). ## How It Works [Section titled “How It Works”](#how-it-works) Watchdog is a Python script running in docker container with Flask web server that provides simple REST JSON API available on port 3009 (http\://YOUR\_SKALE\_NODE\_IP:3009). Currently, Watchdog can give data on all SKALE supernode docker containers, health checks of sChains and SGX server, Ethereum node endpoint status, and hardware information. [Checkout the APIs ](/run-a-skale-node/watchdog/apis)
# Bridge ERC-1155 Tokens
> Guide on bridging ERC-1155 tokens on SKALE
SKALE’s Interchain Messaging Agent includes a native bridging layer for ERC-1155 tokens, the most popular semi-fungible token standard that exists in blockchain today. The following introduces key information on setting up the bridgeable assets as well as how to programatically bridge the tokens. ## Important Information [Section titled “Important Information”](#important-information) * When a SKALE Chain is created, there are NO ERC-1155 tokens mapped by default * In order to bridge an ERC-1155 token to a SKALE Chain from Ethereum, it must be **added** by the SKALE Chain owner or operator via the standard mapping process * All ERC-1155 tokens bridged into SKALE have a set of basic requirements to make them compatible with SKALE’s bridging layer ## Bridge Setup [Section titled “Bridge Setup”](#bridge-setup) ### 1. Prepare the ERC-1155 on SKALE [Section titled “1. Prepare the ERC-1155 on SKALE”](#1-prepare-the-erc-1155-on-skale) ERC-1155 tokens that are being bridged to SKALE should follow two basic requirements in order to be compatible with the SKALE IMA bridging layer: 1. Have a **mint** function that is locked down to the IMA Bridge 2. Have a **burn** function that is locked down to the IMA Bridge Caution on Minting If the mint function is not locked down to just the IMA Bridge, specifically TokenManagerERC1155; there is a chance that the existing tokens on the SKALE Chain may not match what is secured in the bridge. Caution on Burning If the burn function is not locked down to just the IMA Bridge, specifically TokenManagerERC1155; there is a chance that the supply on the SKALE Chain side could be “burned”, while the tokens still exist on Ethereum which could later be withdrawn under certain circumstances. It is recommended that explicit burns on a SKALE Chain should be avoided for bridged tokens. The following is the base interchain token code that meets the above bridging requirements for IMA. It is not recommended to use this directly, but to use a wrapper. See InGameTokens for an example of InterchainERC1155 in use! InterchainERC1155.sol ```solidity // SPDX-License-Identifier: MIT pragma solidity 0.8.9; import { ERC1155 } from "@openzeppelin/contracts/token/ERC1155/extensions/ERC1155.sol"; import { AccessControl } from "@openzeppelin/contracts/access/AccessControl.sol"; import { Strings } from "@openzeppelin/contracts/utils/Strings.sol"; contract InterchainERC1155 is AccessControl, ERC1155 { using Strings for uint256; bytes32 public constant MINTER_ROLE = keccak256("MINTER_ROLE"); string private _baseUri; constructor(string memory baseUri) ERC1155("") { _grantRole(MINTER_ROLE, 0xD2aaA00900000000000000000000000000000000); _baseUri = baseUri; // e.g. "ipfs://QmSomeCID/" } function uri(uint256 tokenId) public view override returns (string memory) { return string(abi.encodePacked(_baseUri, tokenId.toString(), ".json")); } function mint( address account, uint256 id, uint256 amount, bytes memory data ) external { require(hasRole(MINTER_ROLE, _msgSender()), "Sender is not a Minter"); _mint(account, id, amount, data); } function mintBatch( address account, uint256[] memory ids, uint256[] memory amounts, bytes memory data ) external { require(hasRole(MINTER_ROLE, _msgSender()), "Sender is not a Minter"); _mintBatch(account, ids, amounts, data); } function setBaseUri(string memory newBaseUri) external onlyRole(DEFAULT_ADMIN_ROLE) { _baseUri = newBaseUri; } } ``` ### 2. Deploy the ERC-1155 on SKALE [Section titled “2. Deploy the ERC-1155 on SKALE”](#2-deploy-the-erc-1155-on-skale) Utilize your preferred tooling i.e [Foundry](https://getfoundry.sh), [Hardhat](https://hardhat.org), [Remix](https://remix.ethereum.org/#lang=en\&optimize=false\&runs=200\&evmVersion=paris\&version=soljson-v0.8.19+commit.7dd6d404.js), etc. to deploy your IMA compatible ERC-1155 token to the SKALE Chain you want to be able to bridge assets too. InGameTokens.sol ```solidity // SPDX-License-Identifier: MIT pragma solidity 0.8.19; import { InterchainERC1155 } from "./InterchainERC1155.sol"; contract InGameTokens is InterchainERC1155("ipfs://") {} ``` > *InterchainERC1155.sol is inherited from the code above* ### 3. Map the SKALE and Ethereum tokens together [Section titled “3. Map the SKALE and Ethereum tokens together”](#3-map-the-skale-and-ethereum-tokens-together) #### Add the token on Ethereum via SAFE [Section titled “Add the token on Ethereum via SAFE”](#add-the-token-on-ethereum-via-safe) Start by visiting your SAFE via the official SAFE website or your preferred tool. If you are unsure, you can follow the steps [here](/run-a-skale-chain/using-safe). Once on your SAFE, start by preparing a transaction via the **Transaction Builder**. Follow these steps: 1. Input the DepositBoxERC1155 address into the address field. 2. Select **Use Implementation ABI** 3. Select `addERC1155TokenByOwner` for the method 4. Input your *SKALE Chain Name* and your ERC-1155 contract address on Ethereum in the fields 5. Send by itself or via batch Caution Make sure to replace the values with your SKALE Chain name and the correct token addresses. #### Add the token on SKALE Chain TokenManagerERC1155 [Section titled “Add the token on SKALE Chain TokenManagerERC1155”](#add-the-token-on-skale-chain-tokenmanagererc1155) * Multisigwallet CLI ```shell npx msig encodeData [SKALE_CHAIN_NAME] TokenManagerERC1155 addERC1155TokenByOwner Mainnet 0x[TOKEN_ON_ETHEREUM] 0x[TOKEN_ON_SKALE_CHAIN] ``` After this, execute by following the steps on [Using SAFE](/run-a-skale-chain/using-safe#submit-transaction-to-safe) #### Verify the Mapping [Section titled “Verify the Mapping”](#verify-the-mapping) To verify the mapping, you should have an event emitted from the following: 1. DepositBoxERC1155 on Ethereum - `event ERC1155TokenAdded(string schainName, address indexed contractOnMainnet);` 2. TokenManagerERC1155 on SKALE Chain - `event ERC1155TokenAdded(SchainHash indexed chainHash, address indexed erc1155OnMainChain, address indexed erc1155nSchain);` ## Bridging ERC-1155 [Section titled “Bridging ERC-1155”](#bridging-erc-1155) The following does not require you to setup your own token. This works with **ANY** ERC-1155 token that is mapped from Ethereum to any SKALE Chain as long as the actual ERC-1155 token on each side does not have additional restrictions around who can transfer. The flow for bridging an ERC-1155 from Ethereum to SKALE follows a very similar flow to a standard ERC-1155 transfer: 1. Approve the bridge contract on the ERC-1155 token to allow it to move your NFTs 2. Call the bridge directly to transfer the specific ERC-1155 from Ethereum -> SKALE Chain, if the mapping exists 3. Wait for the message to be posted by the validator set on the SKALE Chain, which is the net-new minted NFT corresponding to the NFT (by id(s) and amount(s)) locked on Ethereum during the bridge ### Bridge to SKALE (from Ethereum) [Section titled “Bridge to SKALE (from Ethereum)”](#bridge-to-skale-from-ethereum) The following will help you bridge an NFT from Ethereum to SKALE. * bridge.js ```js import { Contract, JsonRpcProvider, Wallet, parseEther } from "ethers"; // npm add ethers const PRIVATE_KEY = "[YOUR_PRIVATE_KEY]"; const ETHEREUM_RPC_URL = "[YOUR_ETHEREUM_RPC_URL]"; const ERC1155_ADDRESS = "[YOUR_TOKEN_ADDRESS]"; const ERC1155_ABI = [ "function setApprovalForAll(address operator, bool approved) external" ]; const DEPOSIT_BOX_ERC1155_ADDRESS = "[DEPOSIT_BOX_ERC1155_ADDRESS]"; const DEPOSIT_BOX_ERC1155_ABI = [ "function depositERC1155(string calldata schainName, address erc1155OnMainnet, uint256 id, uint256 amount) external" ]; const SKALE_CHAIN_NAME = "[SKALE_CHAIN_NAME]"; // e.g elated-tan-skat (europa mainnnet); const ONE_TOKEN = parseEther("1"); // 100 tokens in wei format const TOKEN_ID = BigInt(1); // Setup the RPC Provider to connect to Ethereum const provider = new JsonRpcProvider(ETHEREUM_RPC_URL); // Setup the wallet with your private key and default to the Ethereum provider const wallet = new Wallet(PRIVATE_KEY, provider); // Setup the smart contracts which default to being signed by your wallet and connected on Ethereum const depositBoxContract = new Contract(DEPOSIT_BOX_ERC1155_ADDRESS, DEPOSIT_BOX_ERC1155_ABI, wallet); const erc1155TokenContract = new Contract(ERC1155_ADDRESS, ERC1155_ABI, wallet); // 1. Approve the bridge to move ALL ERC-1155 tokens (this is required by the standard) const approvalTx = await erc1155TokenContract.setApprovalForAll(DEPOSIT_BOX_ERC1155_ADDRESS, true); await approvalTx.wait(1); // Wait 1 blocks for confirmation, ~15 seconds // 2. Deposit ERC-20 into bridge, will receive on same address on SKALE const depositTx = await depositBoxContract.depositERC1155(SKALE_CHAIN_NAME, ERC1155_ADDRESS, TOKEN_ID, ONE_TOKEN); await depositTx.wait(1); // Success! Now watch for delivery on SKALE Chain console.log("Success!"); ``` * bridgeDirect.js ```js import { Contract, JsonRpcProvider, Wallet, parseEther } from "ethers"; // npm add ethers const PRIVATE_KEY = "[YOUR_PRIVATE_KEY]"; const ETHEREUM_RPC_URL = "[YOUR_ETHEREUM_RPC_URL]"; const ERC1155_ADDRESS = "[YOUR_TOKEN_ADDRESS]"; const ERC1155_ABI = [ "function setApprovalForAll(address operator, bool approved) external" ]; const DEPOSIT_BOX_ERC1155_ADDRESS = "[DEPOSIT_BOX_ERC1155_ADDRESS]"; const DEPOSIT_BOX_ERC1155_ABI = [ "function depositERC1155Direct(string calldata schainName, address erc1155OnMainnet, uint256 id, uint256 amount, address receiver) external" ]; const SKALE_CHAIN_NAME = "[SKALE_CHAIN_NAME]"; // e.g elated-tan-skat (europa mainnnet); const ONE_TOKEN = parseEther("1"); // 100 tokens in wei format const TOKEN_ID = BigInt(1); const CUSTOM_RECEIVER = "[CUSTOM_RECEIVER_ADDRESS]"; // Setup the RPC Provider to connect to Ethereum const provider = new JsonRpcProvider(ETHEREUM_RPC_URL); // Setup the wallet with your private key and default to the Ethereum provider const wallet = new Wallet(PRIVATE_KEY, provider); // Setup the smart contracts which default to being signed by your wallet and connected on Ethereum const depositBoxContract = new Contract(DEPOSIT_BOX_ERC1155_ADDRESS, DEPOSIT_BOX_ERC1155_ABI, wallet); const erc1155TokenContract = new Contract(ERC1155_ADDRESS, ERC1155_ABI, wallet); // 1. Approve the bridge to move ALL ERC-1155 tokens (this is required by the standard) const approvalTx = await erc1155TokenContract.setApprovalForAll(DEPOSIT_BOX_ERC1155_ADDRESS, true); await approvalTx.wait(1); // Wait 1 blocks for confirmation, ~15 seconds // 2. Deposit ERC-20 into bridge, will receive on custom receiver address on SKALE const depositTx = await depositBoxContract.depositERC1155Direct(SKALE_CHAIN_NAME, ERC1155_ADDRESS, TOKEN_ID, ONE_TOKEN, CUSTOM_RECEIVER); await depositTx.wait(1); // Success! Now watch for delivery on SKALE Chain console.log("Success!"); ``` * bridgeBatch.js ```js import { Contract, JsonRpcProvider, Wallet, parseEther } from "ethers"; // npm add ethers const PRIVATE_KEY = "[YOUR_PRIVATE_KEY]"; const ETHEREUM_RPC_URL = "[YOUR_ETHEREUM_RPC_URL]"; const ERC1155_ADDRESS = "[YOUR_TOKEN_ADDRESS]"; const ERC1155_ABI = [ "function setApprovalForAll(address operator, bool approved) external" ]; const DEPOSIT_BOX_ERC1155_ADDRESS = "[DEPOSIT_BOX_ERC1155_ADDRESS]"; const DEPOSIT_BOX_ERC1155_ABI = [ "function depositERC1155Batch(string calldata schainName, address erc1155OnMainnet, uint256[] calldata ids, uint256[] calldata amounts) external" ]; const SKALE_CHAIN_NAME = "[SKALE_CHAIN_NAME]"; // e.g elated-tan-skat (europa mainnnet); const TOKEN_AMOUNTS = [parseEther("1"), parseEther("2")] // 1 and 2 tokens in wei format const TOKEN_IDS = [BigInt(1), BigInt(2)] // Setup the RPC Provider to connect to Ethereum const provider = new JsonRpcProvider(ETHEREUM_RPC_URL); // Setup the wallet with your private key and default to the Ethereum provider const wallet = new Wallet(PRIVATE_KEY, provider); // Setup the smart contracts which default to being signed by your wallet and connected on Ethereum const depositBoxContract = new Contract(DEPOSIT_BOX_ERC1155_ADDRESS, DEPOSIT_BOX_ERC1155_ABI, wallet); const erc1155TokenContract = new Contract(ERC1155_ADDRESS, ERC1155_ABI, wallet); // 1. Approve the bridge to move ALL ERC-1155 tokens (this is required by the standard) const approvalTx = await erc1155TokenContract.setApprovalForAll(DEPOSIT_BOX_ERC1155_ADDRESS, true); await approvalTx.wait(1); // Wait 1 blocks for confirmation, ~15 seconds // 2. Deposit ERC-20 into bridge, will receive on same address on SKALE const depositTx = await depositBoxContract.depositERC1155Batch(SKALE_CHAIN_NAME, ERC1155_ADDRESS, TOKEN_IDS, TOKEN_AMOUNTS); await depositTx.wait(1); // Success! Now watch for delivery on SKALE Chain console.log("Success!"); ``` * bridgeBatchDirect.js ```js import { Contract, JsonRpcProvider, Wallet, parseEther } from "ethers"; // npm add ethers const PRIVATE_KEY = "[YOUR_PRIVATE_KEY]"; const ETHEREUM_RPC_URL = "[YOUR_ETHEREUM_RPC_URL]"; const ERC1155_ADDRESS = "[YOUR_TOKEN_ADDRESS]"; const ERC1155_ABI = [ "function setApprovalForAll(address operator, bool approved) external" ]; const DEPOSIT_BOX_ERC1155_ADDRESS = "[DEPOSIT_BOX_ERC1155_ADDRESS]"; const DEPOSIT_BOX_ERC1155_ABI = [ "function depositERC1155BatchDirect(string calldata schainName, address erc1155OnMainnet, uint256[] calldata ids, uint256[] calldata amounts, address receiver) external" ]; const SKALE_CHAIN_NAME = "[SKALE_CHAIN_NAME]"; // e.g elated-tan-skat (europa mainnnet); const TOKEN_AMOUNTS = [parseEther("1"), parseEther("2")] // 1 and 2 tokens in wei format const TOKEN_IDS = [BigInt(1), BigInt(2)] const CUSTOM_RECEIVER = "[CUSTOM_RECEIVER_ADDRESS]"; // Setup the RPC Provider to connect to Ethereum const provider = new JsonRpcProvider(ETHEREUM_RPC_URL); // Setup the wallet with your private key and default to the Ethereum provider const wallet = new Wallet(PRIVATE_KEY, provider); // Setup the smart contracts which default to being signed by your wallet and connected on Ethereum const depositBoxContract = new Contract(DEPOSIT_BOX_ERC1155_ADDRESS, DEPOSIT_BOX_ERC1155_ABI, wallet); const erc1155TokenContract = new Contract(ERC1155_ADDRESS, ERC1155_ABI, wallet); // 1. Approve the bridge to move ALL ERC-1155 tokens (this is required by the standard) const approvalTx = await erc1155TokenContract.setApprovalForAll(DEPOSIT_BOX_ERC1155_ADDRESS, true); await approvalTx.wait(1); // Wait 1 blocks for confirmation, ~15 seconds // 2. Deposit ERC-20 into bridge, will receive on custom receiver address on SKALE const depositTx = await depositBoxContract.depositERC1155BatchDirect(SKALE_CHAIN_NAME, ERC1155_ADDRESS, TOKEN_IDS, TOKEN_AMOUNTS, CUSTOM_RECEIVER); await depositTx.wait(1); // Success! Now watch for delivery on SKALE Chain console.log("Success!"); ``` ### Bridge to Ethereum (from SKALE) [Section titled “Bridge to Ethereum (from SKALE)”](#bridge-to-ethereum-from-skale) SKALE’s decentralized bridge offers a simple two-step process to bridge from any SKALE Chain to Ethereum Mainnet. 1. The first step, which only has to be done if you don’t have a sufficient balance to exit, is to fill up your gas wallet on Ethereum 2. The second step is to initiate the bridge (technically known as an exit) on the SKALE Chain #### Pre-pay for your Exit [Section titled “Pre-pay for your Exit”](#pre-pay-for-your-exit) This step is optional IF the user has already filled up their gas wallet and has sufficient balance left. You can check if the wallet is an `activeUser` on the CommunityLocker 0xD2aaa00300000000000000000000000000000000 smart contract on the SKALE Chain. If active, no need to fill the pool again. fillCommunityPool.js ```js import { Contract, JsonRpcProvider, Wallet, parseEther } from "ethers"; // npm add ethers const PRIVATE_KEY = "[YOUR_PRIVATE_KEY]"; const ETHEREUM_RPC_URL = "[YOUR_ETHEREUM_RPC_URL]"; const COMMUNITY_POOL_ADDRESS = "[COMMUNIY_POOL_ADDRESS]"; const COMMUNITY_POOL_ABI = [ "function rechargeUserWallet(string calldata schainName, address user) external" ]; const SKALE_CHAIN_NAME = "[SKALE_CHAIN_NAME]"; // e.g elated-tan-skat (europa mainnnet); // Setup the RPC Provider to connect to Ethereum const provider = new JsonRpcProvider(ETHEREUM_RPC_URL); // Setup the wallet with your private key and default to the Ethereum provider const wallet = new Wallet(PRIVATE_KEY, provider); // Setup the smart contracts which default to being signed by your wallet and connected on Ethereum const communityPoolContract = new Contract(COMMUNITY_POOL_ADDRESS, COMMUNITY_POOL_ABI, wallet); const rechargeTx = await communityPoolContract.rechargeUserWallet( SKALE_CHAIN_NAME, wallet.address, { value: parseEther("0.02") // Recharge by 0.02 ETH } ); await rechargeTx.wait(5); // wait 5 blocks for full finality // Success! You can now bridge from SKALE to Ethereum! console.log("Success!"); ``` #### Bridge to Ethereum [Section titled “Bridge to Ethereum”](#bridge-to-ethereum) Once the above prepayment steps are completed, you can proceed with the bridging. Bridging from SKALE simply requires the `exitToMainERC1155` function to be called with the corresponding token and amount to initiate the transfer back to Ethereum. * exit.js ```js import { Contract, JsonRpcProvider, Wallet, parseEther } from "ethers"; // npm add ethers const PRIVATE_KEY = "[YOUR_PRIVATE_KEY]"; const SKALE_RPC_URL = "[YOUR_SKALE_RPC_URL]"; const ERC1155_ADDRESS = "[YOUR_TOKEN_ADDRESS]"; const ERC1155_ABI = [ "function setApprovalForAll(address operator, bool approved) external" ]; const TOKEN_MANAGER_ERC1155_ADDRESS = "0xD2aaA00900000000000000000000000000000000"; // DO NOT CHANGE THIS const TOKEN_MANAGER_ERC1155_ABI = [ "function exitToMainERC1155(address contractOnMainnet, uint256 id, uint256 amount) external" ]; const TOKEN_ID = BigInt(1); // Token Id #1 const AMOUNT = parseEther("2"); // 2 in wei form // Setup the RPC Provider to connect to Ethereum const provider = new JsonRpcProvider(SKALE_RPC_URL); // Setup the wallet with your private key and default to the Ethereum provider const wallet = new Wallet(PRIVATE_KEY, provider); // Setup the smart contracts which default to being signed by your wallet and connected on Ethereum const tokenManagerERC1155Contract = new Contract(TOKEN_MANAGER_ERC1155_ADDRESS, TOKEN_MANAGER_ERC1155_ABI, wallet); const erc1155TokenContract = new Contract(ERC1155_ADDRESS, ERC1155_ABI, wallet); // 1. Approve the bridge to move ERC-1155 on your behalf const approvalTx = await erc1155TokenContract.setApprovalForAll(TOKEN_MANAGER_ERC1155_ADDRESS, true); await approvalTx.wait(1); // Wait 1 blocks for confirmation, ~1 seconds // 2. Transfer ERC-1155 Token into bridge, will recieve on the same address on Ethereum const exitTx = await tokenManagerERC1155Contract.exitToMainERC1155(ERC1155_ADDRESS, TOKEN_ID, AMOUNT); await exitTx.wait(1); // Success! Now watch for delivery on Ethereum console.log("Success!"); ``` * exitBatch.js ```js import { Contract, JsonRpcProvider, Wallet, parseEther } from "ethers"; // npm add ethers const PRIVATE_KEY = "[YOUR_PRIVATE_KEY]"; const SKALE_RPC_URL = "[YOUR_SKALE_RPC_URL]"; const ERC1155_ADDRESS = "[YOUR_TOKEN_ADDRESS]"; const ERC1155_ABI = [ "function setApprovalForAll(address operator, bool approved) external" ]; const TOKEN_MANAGER_ERC1155_ADDRESS = "0xD2aaA00900000000000000000000000000000000"; // DO NOT CHANGE THIS const TOKEN_MANAGER_ERC1155_ABI = [ "function exitToMainERC1155Batch(address contractOnMainnet, uint256[] calldata ids, uint256[] calldata amounts) external" ]; const TOKEN_IDS = [BigInt(1), BigInt(2)]; // Token Id #1, #2 const AMOUNTS = [parseEther("5"), parseEther("1")]; // 5 and 1 in wei // Setup the RPC Provider to connect to Ethereum const provider = new JsonRpcProvider(SKALE_RPC_URL); // Setup the wallet with your private key and default to the Ethereum provider const wallet = new Wallet(PRIVATE_KEY, provider); // Setup the smart contracts which default to being signed by your wallet and connected on Ethereum const tokenManagerERC1155Contract = new Contract(TOKEN_MANAGER_ERC1155_ADDRESS, TOKEN_MANAGER_ERC1155_ABI, wallet); const erc1155TokenContract = new Contract(ERC1155_ADDRESS, ERC1155_ABI, wallet); // 1. Approve the bridge to move ERC-1155 on your behalf const approvalTx = await erc1155TokenContract.setApprovalForAll(TOKEN_MANAGER_ERC1155_ADDRESS, true); await approvalTx.wait(1); // Wait 1 blocks for confirmation, ~1 seconds // 2. Transfer ERC-1155 Tokens into bridge, will recieve on the same address on Ethereum const exitTx = await tokenManagerERC1155Contract.exitToMainERC1155Batch(ERC1155_ADDRESS, TOKEN_IDS, AMOUNTS); await exitTx.wait(1); // Success! Now watch for delivery on Ethereum console.log("Success!"); ```
# Bridge ERC-20 Tokens
> Guide on bridging ERC-20 tokens on SKALE
SKALE’s Interchain Messaging Agent includes a native bridging layer for ERC-20 tokens, the most popular fungible token standard that exists in blockchain today. The following introduces key information on setting up the bridgeable token as well as how to actually programatically bridge the token. ## Important Information [Section titled “Important Information”](#important-information) * When a SKALE Chain is created, there are NO ERC-20 tokens mapped by default * In order to bridge an ERC-20 token to a SKALE Chain from Ethereum, it must be **added** by the SKALE Chain owner or operator via the standard mapping process * All ERC-20 tokens bridged into SKALE have a set of basic requirements to make them compatible with SKALE’s bridging layer ## Bridge Setup [Section titled “Bridge Setup”](#bridge-setup) ### 1. Prepare the ERC-20 on SKALE [Section titled “1. Prepare the ERC-20 on SKALE”](#1-prepare-the-erc-20-on-skale) ERC-20 tokens that are being bridged to SKALE should follow two basic requirements in order to be compatible with the SKALE IMA bridging layer: 1. Have a **mint** function that is locked down to the IMA Bridge 2. Have a **burn** function that is locked down to the IMA Bridge Caution on Minting If the mint function is not locked down to just the IMA Bridge, specifically TokenManagerERC20; there is a chance that the supply on the SKALE Chain side could be larger than what is actually deposited in the bridge. Caution on Burning If the burn function is not locked down to just the IMA Bridge, specifically TokenManagerERC20; there is a chance that the supply on the SKALE Chain side could be “burned”, while the tokens still exist on Ethereum which could later be withdrawn under certain circumstances. It is recommended that explicit burns on a SKALE Chain should be avoided for bridged tokens. The following is the base interchain token code that meets the above bridging requirements for IMA. It is not recommended to use this directly, but to use a wrapper. See InterchainSKL for an 18 decimal example and InterchainUSDT for a 6 decimal example. InterchainERC20.sol ```solidity // SPDX-License-Identifier: MIT pragma solidity 0.8.19; // Importing the ERC20 standard contract and AccessControl for role-based access management. import {ERC20} from "@openzeppelin/contracts/token/ERC20/ERC20.sol"; import {AccessControl} from "@openzeppelin/contracts/access/AccessControl.sol"; /** * @title InterchainERC20 * @dev This contract is an ERC20 token implementation with role-based access control for minting and burning. * It utilizes OpenZeppelin's ERC20 and AccessControl for functionality. */ contract InterchainERC20 is ERC20, AccessControl { // Define roles using hashed constants for efficient comparison. bytes32 public constant MINTER_ROLE = keccak256("MINTER_ROLE"); bytes32 public constant BURNER_ROLE = keccak256("BURNER_ROLE"); constructor(string memory name, string memory symbol) ERC20(name, symbol) { // Assign the minter role to a predefined address. _grantRole(MINTER_ROLE, 0xD2aAA00500000000000000000000000000000000); // Assign the burner role to a predefined address. _grantRole(BURNER_ROLE, 0xD2aAA00500000000000000000000000000000000); } function mint(address to, uint256 amount) public virtual { // Ensure that the caller has the MINTER_ROLE. require(hasRole(MINTER_ROLE, msg.sender), "Caller is not a minter"); // Mint the specified amount of tokens to the target address. _mint(to, amount); } function burn(uint256 amount) public virtual { // Ensure that the caller has the BURNER_ROLE. require(hasRole(BURNER_ROLE, msg.sender), "Caller is not a burner"); // Burn the specified amount of tokens from the caller's account. _burn(msg.sender, amount); } } ``` ### 2. Deploy the ERC-20 on SKALE [Section titled “2. Deploy the ERC-20 on SKALE”](#2-deploy-the-erc-20-on-skale) Utilize your preferred tooling i.e [Foundry](https://getfoundry.sh), [Hardhat](https://hardhat.org), [Remix](https://remix.ethereum.org/#lang=en\&optimize=false\&runs=200\&evmVersion=paris\&version=soljson-v0.8.19+commit.7dd6d404.js), etc. to deploy your IMA compatible ERC-20 token to the SKALE Chain you want to be able to bridge assets too. * InterchainSKL.sol *This is an example of an 18 decimal ERC-20 token that would be deployed on SKALE* ```solidity // SPDX-License-Identifier: MIT pragma solidity 0.8.19; import { InterchainERC20 } from "./InterchainERC20.sol"; contract InterchainSKL is InterchainERC20("Skale Token", "SKL") {} ``` * InterchainUSDT.sol *This is an example of an 6 decimal ERC-20 token that would be deployed on SKALE* ```solidity // SPDX-License-Identifier: MIT pragma solidity 0.8.19; import { InterchainERC20 } from "./InterchainERC20.sol"; contract InterchainUSDT is InterchainERC20("Tether USD", "USDT") { function decimals() public view override returns (uint8) { return 6; } } ``` > *InterchainERC20.sol is inherited from the code above* ### 3. Map the SKALE and Ethereum tokens together [Section titled “3. Map the SKALE and Ethereum tokens together”](#3-map-the-skale-and-ethereum-tokens-together) #### Add the token on Ethereum via SAFE [Section titled “Add the token on Ethereum via SAFE”](#add-the-token-on-ethereum-via-safe) Start by visiting your SAFE via the official SAFE website or your preferred tool. If you are unsure, you can follow the steps [here](/run-a-skale-chain/using-safe). Once on your SAFE, start by preparing a transaction via the **Transaction Builder** and follow the screenshots below, which will use Europa Testnet and the SKL token as en example for the mapping. Caution Make sure to replace the values with your SKALE Chain name and the correct token addresses. #### Add the token on SKALE Chain TokenManagerERC20 [Section titled “Add the token on SKALE Chain TokenManagerERC20”](#add-the-token-on-skale-chain-tokenmanagererc20) * Multisigwallet CLI ```shell npx msig encodeData [SKALE_CHAIN_NAME] TokenManagerERC20 addERC20TokenByOwner Mainnet 0x[TOKEN_ON_ETHEREUM] 0x[TOKEN_ON_SKALE_CHAIN] ``` After this, execute by following the steps on [Using SAFE](/run-a-skale-chain/using-safe#submit-transaction-to-safe) #### Verify the Mapping [Section titled “Verify the Mapping”](#verify-the-mapping) To verify the mapping, you should have an event emitted from the following: 1. DepositBoxERC20 on Ethereum - `event ERC20TokenAdded(string schainName, address indexed contractOnMainnet);` 2. TokenManagerERC20 on SKALE Chain - `event ERC20TokenAdded(SchainHash indexed chainHash, address indexed erc20OnMainChain, address indexed erc20OnSchain);` ## Bridging ERC-20 [Section titled “Bridging ERC-20”](#bridging-erc-20) The following does not require you to setup your own token. This works with **ANY** ERC-20 token that is mapped from Ethereum to any SKALE Chain as long as the actual ERC-20 token on each side does not have additional restrictions around who can transfer. The flow for bridging an ERC-20 from Ethereum to SKALE follows a very similar flow to a standard ERC-20 transfer: 1. Approve the bridge contract on the ERC-20 token to allow it to control some amount of funds 2. Call the bridge directly to transfer the asset from Ethereum -> SKALE Chain, if the mapping exists 3. Wait for the message to be posted by the validator set on the SKALE Chain, which is the net-new minted tokens corresponding to the value locked on Ethereum during the bridge ### Bridge to SKALE (from Ethereum) [Section titled “Bridge to SKALE (from Ethereum)”](#bridge-to-skale-from-ethereum) * bridge.js ```js import { Contract, JsonRpcProvider, Wallet, parseEther } from "ethers"; // npm add ethers const PRIVATE_KEY = "[YOUR_PRIVATE_KEY]"; const ETHEREUM_RPC_URL = "[YOUR_ETHEREUM_RPC_URL]"; const ERC20_ADDRESS = "[YOUR_TOKEN_ADDRESS]"; const ERC20_ABI = [ "function approve(address spender, uint256 amount) external" ]; const DEPOSIT_BOX_ERC20_ADDRESS = "[DEPOSIT_BOX_ERC20_ADDRESS]"; const DEPOSIT_BOX_ERC20_ABI = [ "function depositERC20(string calldata schainName, address erc20OnMainnet, uint256 amount) external" ]; const SKALE_CHAIN_NAME = "[SKALE_CHAIN_NAME]"; // e.g elated-tan-skat (europa mainnnet); const ONE_HUNDRED_TOKENS = parseEther("100"); // 100 tokens in wei format // Setup the RPC Provider to connect to Ethereum const provider = new JsonRpcProvider(ETHEREUM_RPC_URL); // Setup the wallet with your private key and default to the Ethereum provider const wallet = new Wallet(PRIVATE_KEY, provider); // Setup the smart contracts which default to being signed by your wallet and connected on Ethereum const depositBoxContract = new Contract(DEPOSIT_BOX_ERC20_ADDRESS, DEPOSIT_BOX_ERC20_ABI, wallet); const erc20TokenContract = new Contract(ERC20_ADDRESS, ERC20_ABI, wallet); // 1. Approve the bridged to move ERC-20 const approvalTx = await erc20TokenContract.approve(DEPOSIT_BOX_ERC20_ADDRESS, ONE_HUNDRED_TOKENS); await approvalTx.wait(1); // Wait 1 blocks for confirmation, ~15 seconds // 2. Deposit ERC-20 into bridge, will receive on same address on SKALE const depositTx = await depositBoxContract.depositERC20(SKALE_CHAIN_NAME, ERC20_ADDRESS, ONE_HUNDRED_TOKENS); await depositTx.wait(1); // Success! Now watch for delivery on SKALE Chain console.log("Success!"); ``` * bridgeDirect.js ```js import { Contract, JsonRpcProvider, Wallet, parseEther } from "ethers"; // npm add ethers const PRIVATE_KEY = "[YOUR_PRIVATE_KEY]"; const ETHEREUM_RPC_URL = "[YOUR_ETHEREUM_RPC_URL]"; const ERC20_ADDRESS = "[YOUR_TOKEN_ADDRESS]"; const ERC20_ABI = [ "function approve(address spender, uint256 amount) external" ]; const DEPOSIT_BOX_ERC20_ADDRESS = "[DEPOSIT_BOX_ERC20_ADDRESS]"; const DEPOSIT_BOX_ERC20_ABI = [ "function depositERC20Direct(string calldata schainName, address erc20OnMainnet, uint256 amount, address receiver) external" ]; const SKALE_CHAIN_NAME = "[SKALE_CHAIN_NAME]"; // e.g elated-tan-skat (europa mainnnet); const ONE_HUNDRED_TOKENS = parseEther("100"); // 100 tokens in wei format const CUSTOM_RECEIVER = "[CUSTOM_RECEIVER_WALLET_ADDRESS]"; // Setup the RPC Provider to connect to Ethereum const provider = new JsonRpcProvider(ETHEREUM_RPC_URL); // Setup the wallet with your private key and default to the Ethereum provider const wallet = new Wallet(PRIVATE_KEY, provider); // Setup the smart contracts which default to being signed by your wallet and connected on Ethereum const depositBoxContract = new Contract(DEPOSIT_BOX_ERC20_ADDRESS, DEPOSIT_BOX_ERC20_ABI, wallet); const erc20TokenContract = new Contract(ERC20_ADDRESS, ERC20_ABI, wallet); // 1. Approve the bridged to move ERC-20 const approvalTx = await erc20TokenContract.approve(DEPOSIT_BOX_ERC20_ADDRESS, ONE_HUNDRED_TOKENS); await approvalTx.wait(1); // Wait 1 blocks for confirmation, ~15 seconds // 2. Deposit ERC-20 into bridge, will receive on the CUSTOM_RECEIVER address on SKALE const depositTx = await depositBoxContract.depositERC20Direct(SKALE_CHAIN_NAME, ERC20_ADDRESS, ONE_HUNDRED_TOKENS, CUSTOM_RECEIVER); await depositTx.wait(1); // Success! Now watch for delivery on SKALE Chain console.log("Success!"); ``` ### Bridge to Ethereum (from SKALE) [Section titled “Bridge to Ethereum (from SKALE)”](#bridge-to-ethereum-from-skale) SKALE’s decentralized bridge offers a simple two-step process to bridge from any SKALE Chain to Ethereum Mainnet. 1. The first step, which only has to be done if you don’t have a sufficient balance to exit, is to fill up your gas wallet on Ethereum 2. The second step is to initiate the bridge (technically known as an exit) on the SKALE Chain #### Pre-pay for your Exit [Section titled “Pre-pay for your Exit”](#pre-pay-for-your-exit) This step is optional IF the user has already filled up their gas wallet and has sufficient balance left. You can check if the wallet is an `activeUser` on the CommunityLocker 0xD2aaa00300000000000000000000000000000000 smart contract on the SKALE Chain. If active, no need to fill the pool again. fillCommunityPool.js ```js import { Contract, JsonRpcProvider, Wallet, parseEther } from "ethers"; // npm add ethers const PRIVATE_KEY = "[YOUR_PRIVATE_KEY]"; const ETHEREUM_RPC_URL = "[YOUR_ETHEREUM_RPC_URL]"; const COMMUNITY_POOL_ADDRESS = "[COMMUNIY_POOL_ADDRESS]"; const COMMUNITY_POOL_ABI = [ "function rechargeUserWallet(string calldata schainName, address user) external" ]; const SKALE_CHAIN_NAME = "[SKALE_CHAIN_NAME]"; // e.g elated-tan-skat (europa mainnnet); // Setup the RPC Provider to connect to Ethereum const provider = new JsonRpcProvider(ETHEREUM_RPC_URL); // Setup the wallet with your private key and default to the Ethereum provider const wallet = new Wallet(PRIVATE_KEY, provider); // Setup the smart contracts which default to being signed by your wallet and connected on Ethereum const communityPoolContract = new Contract(COMMUNITY_POOL_ADDRESS, COMMUNITY_POOL_ABI, wallet); const rechargeTx = await communityPoolContract.rechargeUserWallet( SKALE_CHAIN_NAME, wallet.address, { value: parseEther("0.02") // Recharge by 0.02 ETH } ); await rechargeTx.wait(5); // wait 5 blocks for full finality // Success! You can now bridge from SKALE to Ethereum! console.log("Success!"); ``` #### Bridge to Ethereum [Section titled “Bridge to Ethereum”](#bridge-to-ethereum) Once the above prepayment steps are completed, you can proceed with the bridging. Bridging from SKALE simply requires the `exitToMainERC20` function to be called with the corresponding token and amount to initiate the transfer back to Ethereum. exit.js ```js import { Contract, JsonRpcProvider, Wallet, parseEther } from "ethers"; // npm add ethers const PRIVATE_KEY = "[YOUR_PRIVATE_KEY]"; const SKALE_RPC_URL = "[YOUR_SKALE_RPC_URL]"; const ERC20_ADDRESS = "[YOUR_TOKEN_ADDRESS]"; const ERC20_ABI = [ "function approve(address spender, uint256 amount) external" ]; const TOKEN_MANAGER_ERC20_ADDRESS = "0xD2aAA00500000000000000000000000000000000"; // DO NOT CHANGE THIS const TOKEN_MANAGER_ERC20_ABI = [ "function exitToMainERC20(address contractOnMainnet, uint256 amount) external" ]; const ONE_HUNDRED_TOKENS = parseEther("100"); // 100 tokens in wei format // Setup the RPC Provider to connect to Ethereum const provider = new JsonRpcProvider(SKALE_RPC_URL); // Setup the wallet with your private key and default to the Ethereum provider const wallet = new Wallet(PRIVATE_KEY, provider); // Setup the smart contracts which default to being signed by your wallet and connected on Ethereum const tokenManagerERC20Contract = new Contract(TOKEN_MANAGER_ERC20_ADDRESS, TOKEN_MANAGER_ERC20_ABI, wallet); const erc20TokenContract = new Contract(ERC20_ADDRESS, ERC20_ABI, wallet); // 1. Approve the bridge to move ERC-20 on your behalf const approvalTx = await erc20TokenContract.approve(TOKEN_MANAGER_ERC20_ADDRESS, ONE_HUNDRED_TOKENS); await approvalTx.wait(1); // Wait 1 blocks for confirmation, ~1 seconds // 2. Transfer ERC-20 into bridge, will recieve on the same address on Ethereum const exitTx = await tokenManagerERC20Contract.exitToMainERC20(ERC20_ADDRESS, ONE_HUNDRED_TOKENS); await exitTx.wait(1); // Success! Now watch for delivery on Ethereum console.log("Success!"); ```
# Bridge ERC-721 Tokens
> Guide on bridging ERC-721 tokens on SKALE
SKALE’s Interchain Messaging Agent includes a native bridging layer for ERC-721 tokens, the most popular non-fungible token standard that exists in blockchain today. The following introduces key information on setting up the bridgeable collectibles as well as how to actually programatically bridge the tokens. ## Important Information [Section titled “Important Information”](#important-information) * When a SKALE Chain is created, there are NO ERC-721 tokens mapped by default * In order to bridge an ERC-721 token to a SKALE Chain from Ethereum, it must be **added** by the SKALE Chain owner or operator via the standard mapping process * All ERC-721 tokens bridged into SKALE have a set of basic requirements to make them compatible with SKALE’s bridging layer ## Bridge Setup [Section titled “Bridge Setup”](#bridge-setup) ### 1. Prepare the ERC-721 on SKALE [Section titled “1. Prepare the ERC-721 on SKALE”](#1-prepare-the-erc-721-on-skale) ERC-721 tokens that are being bridged to SKALE should follow two basic requirements in order to be compatible with the SKALE IMA bridging layer: 1. Have a **mint** function that is locked down to the IMA Bridge 2. Have a **burn** function that is locked down to the IMA Bridge Caution on Minting If the mint function is not locked down to just the IMA Bridge, specifically TokenManagerERC721; there is a chance that the existing tokens on the SKALE Chain may not match what is secured in the bridge. Caution on Burning If the burn function is not locked down to just the IMA Bridge, specifically TokenManagerERC721; there is a chance that the supply on the SKALE Chain side could be “burned”, while the tokens still exist on Ethereum which could later be withdrawn under certain circumstances. It is recommended that explicit burns on a SKALE Chain should be avoided for bridged tokens. The following is the base interchain token code that meets the above bridging requirements for IMA. It is not recommended to use this directly, but to use a wrapper. See InterchainSKL for an 18 decimal example and InterchainUSDT for a 6 decimal example. InterchainERC721.sol ```solidity // SPDX-License-Identifier: MIT pragma solidity 0.8.19; import {ERC721} from "@openzeppelin/contracts/token/ERC721/ERC721.sol"; import {AccessControl} from "@openzeppelin/contracts/access/AccessControl.sol"; import {Strings} from "@openzeppelin/contracts/utils/Strings.sol"; /** * @title InterchainERC721 * @dev ERC-721 with role-based minting and dynamic token URI. */ contract InterchainERC721 is AccessControl, ERC721 { using Strings for uint256; bytes32 public constant MINTER_ROLE = keccak256("MINTER_ROLE"); string private _baseTokenURI; constructor( string memory contractName, string memory contractSymbol, string memory baseTokenURI ) ERC721(contractName, contractSymbol) { _setRoleAdmin(MINTER_ROLE, 0xD2aaa00600000000000000000000000000000000); // example admin role _grantRole(MINTER_ROLE, _msgSender()); _baseTokenURI = baseTokenURI; } function mint(address to, uint256 tokenId) external returns (bool) { require(hasRole(MINTER_ROLE, _msgSender()), "Sender is not a Minter"); _safeMint(to, tokenId); return true; } /// @notice Override to return dynamic token URI function tokenURI(uint256 tokenId) public view override returns (string memory) { require(_exists(tokenId), "ERC721: URI query for nonexistent token"); return string(abi.encodePacked(_baseTokenURI, tokenId.toString(), ".json"); } /// @notice Allows admin to update base URI function setBaseURI(string calldata newBaseURI) external onlyRole(MINTER_ROLE) { _baseTokenURI = newBaseURI; } } ``` ### 2. Deploy the ERC-721 on SKALE [Section titled “2. Deploy the ERC-721 on SKALE”](#2-deploy-the-erc-721-on-skale) Utilize your preferred tooling i.e [Foundry](https://getfoundry.sh), [Hardhat](https://hardhat.org), [Remix](https://remix.ethereum.org/#lang=en\&optimize=false\&runs=200\&evmVersion=paris\&version=soljson-v0.8.19+commit.7dd6d404.js), etc. to deploy your IMA compatible ERC-721 token to the SKALE Chain you want to be able to bridge assets too. YourInterchainNFT.sol ```solidity // SPDX-License-Identifier: MIT pragma solidity 0.8.19; import { InterchainERC721 } from "./InterchainERC721.sol"; contract InterchainNFT is InterchainERC721("NFT Name", "NFT Symbol", "ipfs:///") {} ``` > *InterchainERC721.sol is inherited from the code above* ### 3. Map the SKALE and Ethereum tokens together [Section titled “3. Map the SKALE and Ethereum tokens together”](#3-map-the-skale-and-ethereum-tokens-together) #### Add the token on Ethereum via SAFE [Section titled “Add the token on Ethereum via SAFE”](#add-the-token-on-ethereum-via-safe) Start by visiting your SAFE via the official SAFE website or your preferred tool. If you are unsure, you can follow the steps [here](/run-a-skale-chain/using-safe). Once on your SAFE, start by preparing a transaction via the **Transaction Builder**. Follow these steps: 1. Input the DepositBoxERC721 address into the address field. 2. Select **Use Implementation ABI** 3. Select `addERC721TokenByOwner` for the method 4. Input your *SKALE Chain Name* and your ERC-721 contract address on Ethereum in the fields 5. Send by itslef or via batch Caution Make sure to replace the values with your SKALE Chain name and the correct token addresses. #### Add the token on SKALE Chain TokenManagerERC721 [Section titled “Add the token on SKALE Chain TokenManagerERC721”](#add-the-token-on-skale-chain-tokenmanagererc721) * Multisigwallet CLI ```shell npx msig encodeData [SKALE_CHAIN_NAME] TokenManagerERC721 addERC721TokenByOwner Mainnet 0x[TOKEN_ON_ETHEREUM] 0x[TOKEN_ON_SKALE_CHAIN] ``` After this, execute by following the steps on [Using SAFE](/run-a-skale-chain/using-safe#submit-transaction-to-safe) #### Verify the Mapping [Section titled “Verify the Mapping”](#verify-the-mapping) To verify the mapping, you should have an event emitted from the following: 1. DepositBoxERC721 on Ethereum - `event ERC721TokenAdded(string schainName, address indexed contractOnMainnet);` 2. TokenManagerERC721 on SKALE Chain - `event ERC721TokenAdded(SchainHash indexed chainHash, address indexed erc721OnMainChain, address indexed erc721OnSchain);` ## Bridging ERC-721 [Section titled “Bridging ERC-721”](#bridging-erc-721) The following does not require you to setup your own token. This works with **ANY** ERC-721 token that is mapped from Ethereum to any SKALE Chain as long as the actual ERC-721 token on each side does not have additional restrictions around who can transfer. The flow for bridging an ERC-721 from Ethereum to SKALE follows a very similar flow to a standard ERC-721 transfer: 1. Approve the bridge contract on the ERC-721 token to allow it to move your NFTs 2. Call the bridge directly to transfer the specific ERC-721 from Ethereum -> SKALE Chain, if the mapping exists 3. Wait for the message to be posted by the validator set on the SKALE Chain, which is the net-new minted NFT corresponding to the NFT (by id) locked on Ethereum during the bridge ### Bridge to SKALE (from Ethereum) [Section titled “Bridge to SKALE (from Ethereum)”](#bridge-to-skale-from-ethereum) The following will help you bridge an NFT from Ethereum to SKALE. * bridge.js ```js import { Contract, JsonRpcProvider, Wallet } from "ethers"; // npm add ethers const PRIVATE_KEY = "[YOUR_PRIVATE_KEY]"; const ETHEREUM_RPC_URL = "[YOUR_ETHEREUM_RPC_URL]"; const ERC721_ADDRESS = "[YOUR_TOKEN_ADDRESS]"; const ERC721_ABI = [ "function approve(address to, uint256 tokenId) external" ]; const DEPOSIT_BOX_ERC721_ADDRESS = "[DEPOSIT_BOX_ERC20_ADDRESS]"; const DEPOSIT_BOX_ERC721_ABI = [ "function depositERC721(string calldata schainName, address erc721OnMainnet, uint256 tokenId) external" ]; const SKALE_CHAIN_NAME = "[SKALE_CHAIN_NAME]"; // e.g elated-tan-skat (europa mainnnet); const TOKEN_ID = BigInt(1); // TokenId to bridge // Setup the RPC Provider to connect to Ethereum const provider = new JsonRpcProvider(ETHEREUM_RPC_URL); // Setup the wallet with your private key and default to the Ethereum provider const wallet = new Wallet(PRIVATE_KEY, provider); // Setup the smart contracts which default to being signed by your wallet and connected on Ethereum const depositBoxContract = new Contract(DEPOSIT_BOX_ERC721_ADDRESS, DEPOSIT_BOX_ERC721_ABI, wallet); const erc721TokenContract = new Contract(ERC721_ADDRESS, ERC721_ABI, wallet); // 1. Approve the bridge to move ERC-721 Token Id #1 const approvalTx = await erc721TokenContract.approve(DEPOSIT_BOX_ERC721_ADDRESS, TOKEN_ID); await approvalTx.wait(1); // Wait 1 blocks for confirmation, ~15 seconds // 2. Deposit ERC-721 Token Id #1 into bridge, will receive on same address on SKALE const depositTx = await depositBoxContract.depositERC721(SKALE_CHAIN_NAME, ERC721_ADDRESS, TOKEN_ID); await depositTx.wait(1); // Success! Now watch for delivery on SKALE Chain console.log("Success!"); ``` * bridgeDirect.js ```js import { Contract, JsonRpcProvider, Wallet } from "ethers"; // npm add ethers const PRIVATE_KEY = "[YOUR_PRIVATE_KEY]"; const ETHEREUM_RPC_URL = "[YOUR_ETHEREUM_RPC_URL]"; const ERC721_ADDRESS = "[YOUR_TOKEN_ADDRESS]"; const ERC721_ABI = [ "function approve(address to, uint256 tokenId) external" ]; const DEPOSIT_BOX_ERC721_ADDRESS = "[DEPOSIT_BOX_ERC20_ADDRESS]"; const DEPOSIT_BOX_ERC721_ABI = [ "function depositERC721Direct(string calldata schainName, address erc721OnMainnet, uint256 tokenId, address receiver) external" ]; const SKALE_CHAIN_NAME = "[SKALE_CHAIN_NAME]"; // e.g elated-tan-skat (europa mainnnet); const TOKEN_ID = BigInt(1); // TokenId to bridge const CUSTOM_RECEIVER = "[CUSTOM_RECEIVER_WALLET_ADDRESS]"; // Setup the RPC Provider to connect to Ethereum const provider = new JsonRpcProvider(ETHEREUM_RPC_URL); // Setup the wallet with your private key and default to the Ethereum provider const wallet = new Wallet(PRIVATE_KEY, provider); // Setup the smart contracts which default to being signed by your wallet and connected on Ethereum const depositBoxContract = new Contract(DEPOSIT_BOX_ERC721_ADDRESS, DEPOSIT_BOX_ERC721_ABI, wallet); const erc721TokenContract = new Contract(ERC721_ADDRESS, ERC721_ABI, wallet); // 1. Approve the bridge to move ERC-721 Token Id #1 const approvalTx = await erc721TokenContract.approve(DEPOSIT_BOX_ERC721_ADDRESS, TOKEN_ID); await approvalTx.wait(1); // Wait 1 blocks for confirmation, ~15 seconds // 2. Deposit ERC-721 Token Id #1 into bridge, will receive on custom address on SKALE const depositTx = await depositBoxContract.depositERC721Direct(SKALE_CHAIN_NAME, ERC721_ADDRESS, TOKEN_ID, CUSTOM_RECEIVER); await depositTx.wait(1); // Success! Now watch for delivery on SKALE Chain console.log("Success!"); ``` ### Bridge to Ethereum (from SKALE) [Section titled “Bridge to Ethereum (from SKALE)”](#bridge-to-ethereum-from-skale) SKALE’s decentralized bridge offers a simple two-step process to bridge from any SKALE Chain to Ethereum Mainnet. 1. The first step, which only has to be done if you don’t have a sufficient balance to exit, is to fill up your gas wallet on Ethereum 2. The second step is to initiate the bridge (technically known as an exit) on the SKALE Chain #### Pre-pay for your Exit [Section titled “Pre-pay for your Exit”](#pre-pay-for-your-exit) This step is optional IF the user has already filled up their gas wallet and has sufficient balance left. You can check if the wallet is an `activeUser` on the CommunityLocker 0xD2aaa00300000000000000000000000000000000 smart contract on the SKALE Chain. If active, no need to fill the pool again. fillCommunityPool.js ```js import { Contract, JsonRpcProvider, Wallet, parseEther } from "ethers"; // npm add ethers const PRIVATE_KEY = "[YOUR_PRIVATE_KEY]"; const ETHEREUM_RPC_URL = "[YOUR_ETHEREUM_RPC_URL]"; const COMMUNITY_POOL_ADDRESS = "[COMMUNIY_POOL_ADDRESS]"; const COMMUNITY_POOL_ABI = [ "function rechargeUserWallet(string calldata schainName, address user) external" ]; const SKALE_CHAIN_NAME = "[SKALE_CHAIN_NAME]"; // e.g elated-tan-skat (europa mainnnet); // Setup the RPC Provider to connect to Ethereum const provider = new JsonRpcProvider(ETHEREUM_RPC_URL); // Setup the wallet with your private key and default to the Ethereum provider const wallet = new Wallet(PRIVATE_KEY, provider); // Setup the smart contracts which default to being signed by your wallet and connected on Ethereum const communityPoolContract = new Contract(COMMUNITY_POOL_ADDRESS, COMMUNITY_POOL_ABI, wallet); const rechargeTx = await communityPoolContract.rechargeUserWallet( SKALE_CHAIN_NAME, wallet.address, { value: parseEther("0.02") // Recharge by 0.02 ETH } ); await rechargeTx.wait(5); // wait 5 blocks for full finality // Success! You can now bridge from SKALE to Ethereum! console.log("Success!"); ``` #### Bridge to Ethereum [Section titled “Bridge to Ethereum”](#bridge-to-ethereum) Once the above prepayment steps are completed, you can proceed with the bridging. Bridging from SKALE simply requires the `exitToMainERC721` function to be called with the corresponding token and amount to initiate the transfer back to Ethereum. exit.js ```js import { Contract, JsonRpcProvider, Wallet, parseEther } from "ethers"; // npm add ethers const PRIVATE_KEY = "[YOUR_PRIVATE_KEY]"; const SKALE_RPC_URL = "[YOUR_SKALE_RPC_URL]"; const ERC721_ADDRESS = "[YOUR_TOKEN_ADDRESS]"; const ERC721_ABI = [ "function approve(address spender, uint256 amount) external" ]; const TOKEN_MANAGER_ERC721_ADDRESS = "0xD2aaa00600000000000000000000000000000000"; // DO NOT CHANGE THIS const TOKEN_MANAGER_ERC721_ABI = [ "function exitToMainERC721(address contractOnMainnet, uint256 tokenId) external" ]; const TOKEN_ID = BigInt(1); // Token Id #1 // Setup the RPC Provider to connect to Ethereum const provider = new JsonRpcProvider(SKALE_RPC_URL); // Setup the wallet with your private key and default to the Ethereum provider const wallet = new Wallet(PRIVATE_KEY, provider); // Setup the smart contracts which default to being signed by your wallet and connected on Ethereum const tokenManagerERC721Contract = new Contract(TOKEN_MANAGER_ERC721_ADDRESS, TOKEN_MANAGER_ERC721_ABI, wallet); const erc721TokenContract = new Contract(ERC721_ADDRESS, ERC721_ABI, wallet); // 1. Approve the bridge to move ERC-721 on your behalf const approvalTx = await erc721TokenContract.approve(TOKEN_MANAGER_ERC721_ADDRESS, TOKEN_ID); await approvalTx.wait(1); // Wait 1 blocks for confirmation, ~1 seconds // 2. Transfer ERC-721 Token into bridge, will recieve on the same address on Ethereum const exitTx = await tokenManagerERC721Contract.exitToMainERC721(ERC721_ADDRESS, TOKEN_ID); await exitTx.wait(1); // Success! Now watch for delivery on Ethereum console.log("Success!"); ```
# Bridge ETH
> Guide on bridging ETH from Ethereum to a SKALE Chain
SKALE’s Interchain Messaging Agent includes a native bridging layer for industry standard assets including the native gas token of it’s base layer, ETH on Ethereum. You can use IMA to easily send ETH to any SKALE Chain. Here are a few important notes to simplify the flow for your application: ## Important Information [Section titled “Important Information”](#important-information) * Unlike ERC-20, ERC-721, and ERC-1155; ETH is nativley support between Ethereum and SKALE Chains. This means you do **NOT** need to map ETH to a token * ETH has its own special DepositBox on Ethereum called DepositBoxETH which holds ETH separately from the other assets bridged to the SKALE Network Really Important! When ETH is deposited on Ethereum, it is received as an ERC-20 token on all SKALE Chains. This token is **NOT** WETH. This token is predeployed on all SKALE Chains to the same token address and information as [ETHC](#eth-on-skale). ### ETH on SKALE [Section titled “ETH on SKALE”](#eth-on-skale) ETH when bridged to a SKALE Chain always “mints” to the same place. This is flagged as important to avoid confusion with you and your users. | Key | Value | Note | | ---------------- | ------------------------------------------ | -------------------------------------------------------- | | Name | ERC20 Ether Clone | Use ETH, Ether, or Ethereum on your frontend | | Symbol | ETHC | Use ETH on your frontend | | Contract Address | 0xD2Aaa00700000000000000000000000000000000 | This is the same on all SKALE Chains and will not change | An example of ETH on SKALE can be seen [here on Europa Mainnet block explorer](https://elated-tan-skat.explorer.mainnet.skalenodes.com/token/0xD2Aaa00700000000000000000000000000000000). ## Bridging ETH [Section titled “Bridging ETH”](#bridging-eth) To bridge ETH from Ethereum to SKALE, you should deposit ETH on Ethereum Mainnet to DepositBoxEth, a smart contract that ### Bridge to SKALE (from Ethereum) [Section titled “Bridge to SKALE (from Ethereum)”](#bridge-to-skale-from-ethereum) * normalDeposit.js ```js import { Contract, JsonRpcProvider, Wallet, parseEther } from "ethers"; // npm add ethers const PRIVATE_KEY = "[YOUR_PRIVATE_KEY]"; const ETHEREUM_RPC_URL = "[YOUR_ETHEREUM_RPC_URL]"; const DEPOSIT_BOX_ETH_ADDRESS = "[DEPOSIT_BOX_ETH_ADDRESS]"; const DEPOSIT_BOX_ETH_ABI = [ "function deposit(string memory schainName) external" ]; const SKALE_CHAIN_NAME = "[SKALE_CHAIN_NAME]"; // e.g elated-tan-skat (europa mainnnet); const provider = new JsonRpcProvider(ETHEREUM_RPC_URL); const wallet = new Wallet(PRIVATE_KEY, provider); const contract = new Contract(DEPOSIT_BOX_ETH_ADDRESS, DEPOSIT_BOX_ETH_ABI, wallet); const depositTransaction = await contract.deposit(SKALE_CHAIN_NAME, { value: parseEther("1") // set in wei -> 1000000000000000000 }); await depositTransaction.wait(2); // Wait 2 blocks for confirmation, you may choose anything >= 1 ``` * directDeposit.js ```js import { Contract, JsonRpcProvider, Wallet, parseEther } from "ethers"; // npm add ethers const PRIVATE_KEY = "[YOUR_PRIVATE_KEY]"; const ETHEREUM_RPC_URL = "[YOUR_ETHEREUM_RPC_URL]"; const DEPOSIT_BOX_ETH_ADDRESS = "[DEPOSIT_BOX_ETH_ADDRESS]"; const DEPOSIT_BOX_ETH_ABI = [ "function depositDirect(string memory schainName, address receiver) external" ]; const SKALE_CHAIN_NAME = "[SKALE_CHAIN_NAME]"; // e.g elated-tan-skat (europa mainnnet); const provider = new JsonRpcProvider(ETHEREUM_RPC_URL); const wallet = new Wallet(PRIVATE_KEY, provider); const contract = new Contract(DEPOSIT_BOX_ETH_ADDRESS, DEPOSIT_BOX_ETH_ABI, wallet); const depositTransactionToDiffWallet = await contract.deposit(SKALE_CHAIN_NAME, "0x...", { value: parseEther("1") // set in wei -> 1000000000000000000 }); await depositTransactionToDiffWallet.wait(2); // Wait 2 blocks for confirmation, you may choose anything >= 1 ``` ### Bridge to Etheruem (from SKALE) [Section titled “Bridge to Etheruem (from SKALE)”](#bridge-to-etheruem-from-skale) SKALE’s decentralized bridge offers a simple two-step process to bridge ETH from any SKALE Chain to Ethereum Mainnet. 1. The first step, which only has to be done if you don’t have a sufficient balance to exit, is to fill up your gas wallet on Ethereum 2. The second step is to initiate the bridge (technically known as an exit) on the SKALE Chain #### Pre-pay for your Exit [Section titled “Pre-pay for your Exit”](#pre-pay-for-your-exit) This step is optional IF the user has already filled up their gas wallet and has sufficient balance left. You can check if the wallet is an `activeUser` on the CommunityLocker 0xD2aaa00300000000000000000000000000000000 smart contract on the SKALE Chain. If active, no need to fill the pool again. fillCommunityPool.js ```js import { Contract, JsonRpcProvider, Wallet, parseEther } from "ethers"; // npm add ethers const PRIVATE_KEY = "[YOUR_PRIVATE_KEY]"; const ETHEREUM_RPC_URL = "[YOUR_ETHEREUM_RPC_URL]"; const COMMUNITY_POOL_ADDRESS = "[COMMUNIY_POOL_ADDRESS]"; const COMMUNITY_POOL_ABI = [ "function rechargeUserWallet(string calldata schainName, address user) external" ]; const SKALE_CHAIN_NAME = "[SKALE_CHAIN_NAME]"; // e.g elated-tan-skat (europa mainnnet); // Setup the RPC Provider to connect to Ethereum const provider = new JsonRpcProvider(ETHEREUM_RPC_URL); // Setup the wallet with your private key and default to the Ethereum provider const wallet = new Wallet(PRIVATE_KEY, provider); // Setup the smart contracts which default to being signed by your wallet and connected on Ethereum const communityPoolContract = new Contract(COMMUNITY_POOL_ADDRESS, COMMUNITY_POOL_ABI, wallet); const rechargeTx = await communityPoolContract.rechargeUserWallet( SKALE_CHAIN_NAME, wallet.address, { value: parseEther("0.02") // Recharge by 0.02 ETH } ); await rechargeTx.wait(5); // wait 5 blocks for full finality // Success! You can now bridge from SKALE to Ethereum! console.log("Success!"); ``` #### Bridge to Ethereum [Section titled “Bridge to Ethereum”](#bridge-to-ethereum) Once the above prepayment steps are completed, you can proceed with the bridging. Bridging from SKALE simply requires the `exitToMain` function to be called with the corresponding token and amount to initiate the transfer back to Ethereum. exit.js ```js import { Contract, JsonRpcProvider, Wallet, parseEther } from "ethers"; // npm add ethers const PRIVATE_KEY = "[YOUR_PRIVATE_KEY]"; const SKALE_RPC_URL = "[YOUR_SKALE_RPC_URL]"; const ETH_ERC20_ADDRESS = "0xD2Aaa00700000000000000000000000000000000"; // DO NOT CHANGE THIS const ERC20_ABI = [ "function approve(address spender, uint256 amount) external" ]; const TOKEN_MANAGER_ETH_ADDRESS = "0xd2AaA00400000000000000000000000000000000"; // DO NOT CHANGE THIS const TOKEN_MANAGER_ETH_ABI = [ "function exitToMain(uint256 amount) external" ]; const ONE_HUNDRED_TOKENS = parseEther("100"); // 100 tokens in wei format // Setup the RPC Provider to connect to Ethereum const provider = new JsonRpcProvider(SKALE_RPC_URL); // Setup the wallet with your private key and default to the Ethereum provider const wallet = new Wallet(PRIVATE_KEY, provider); // Setup the smart contracts which default to being signed by your wallet and connected on Ethereum const tokenManagerETH = new Contract(TOKEN_MANAGER_ETH_ADDRESS, TOKEN_MANAGER_ETH_ABI, wallet); const ethERC20Contract = new Contract(ETH_ERC20_ADDRESS, ERC20_ABI, wallet); // 1. Approve the bridge to move ERC-20 on your behalf const approvalTx = await ethERC20Contract.approve(TOKEN_MANAGER_ETH_ADDRESS, ONE_HUNDRED_TOKENS); await approvalTx.wait(1); // Wait 1 blocks for confirmation, ~1 seconds // 2. Transfer ERC-20 into bridge, will recieve on the same address on Ethereum const exitTx = await tokenManagerETH.exitToMain(ONE_HUNDRED_TOKENS); await exitTx.wait(1); // Success! Now watch for delivery on Ethereum console.log("Success!"); ```
# Connect Custom Contracts
> Learn how to connect your custom contracts via IMA
## Adding Extra Contract Registrar Role on sChain [Section titled “Adding Extra Contract Registrar Role on sChain”](#adding-extra-contract-registrar-role-on-schain) * via SAFE 1. Encode the function call via [multisigwallet-cli](/run-a-skale-chain/using-multisig-wallet-cli) ```shell npx msig encodeData [schain-name] MessageProxyForSchain grantRole 0x6155b5aac15ce9aa193c0527a6f43be0a36a7e2e7496c2b615c0e5f922842773 [0x_ACCOUNT_TO_GRANT_EXTRA_CONTRACT_REGISTRAR_ROLE_TO] ``` 2. Execute via SAFE by following the steps [here](/run-a-skale-chain/using-safe#submit-transaction-to-safe) * Ethers v6 ```ts /** * Run: * npm install ethers dotenv */ import { Contract, JsonRpcProvider, Wallet } from "ethers"; import dotenv from "dotenv"; dotenv.config(); const MSG_PROXY_SCHAIN_ADDR = "0xd2AAa00100000000000000000000000000000000"; const MSG_PROXY_SCHAIN_ABI = [ "function grantRole(bytes32 role, address account) external" ]; const provider = new JsonRpcProvider(process.env.RPC_URL); const wallet = new Wallet(process.env.PRIVATE_KEY, provider); const contract = new Contract(MSG_PROXY_SCHAIN_ADDR, MSG_PROXY_SCHAIN_ABI, wallet); const res = await contract.grantRole(id("EXTRA_CONTRACT_REGISTRAR_ROLE", "0x...")); ``` ## Registering Contracts on a SKALE Chain [Section titled “Registering Contracts on a SKALE Chain”](#registering-contracts-on-a-skale-chain) * **via SAFE** — would be if you give Marionette EXTRA\_CONTRACT\_REGISTRAR\_ROLE on MessageProxyForSchain * **via Ethers v6** — would be if you gave an EOA the role and use Ethers - via SAFE 1. Encode the function call via [multisigwallet-cli](/run-a-skale-chain/using-multisig-wallet-cli) ```shell npx msig encodeData juicy-low-small-testnet MessageProxyForSchain registerExtraContract destination-skale-chain-name local-contract-address ``` 2. Execute via SAFE by following the steps [here](/run-a-skale-chain/using-safe#submit-transaction-to-safe) - Ethers v6 ```ts /** * Run: * npm install ethers dotenv */ import { Contract, JsonRpcProvider, Wallet } from "ethers"; import dotenv from "dotenv"; dotenv.config(); const MSG_PROXY_SCHAIN_ADDR = "0xd2AAa00100000000000000000000000000000000"; const MSG_PROXY_SCHAIN_ABI = [ "function registerExtraContract(string memory chainName, address extraContract)" ]; const provider = new JsonRpcProvider(process.env.RPC_URL); const wallet = new Wallet(process.env.PRIVATE_KEY, provider); const contract = new Contract(MSG_PROXY_SCHAIN_ADDR, MSG_PROXY_SCHAIN_ABI, wallet); const res = await contract.registerExtraContract("elated-tan-skat", "0x...")); // elated-tan-skat is Europa Mainnet ``` ## Registering Contracts on Ethereum [Section titled “Registering Contracts on Ethereum”](#registering-contracts-on-ethereum) 1. Go to [SAFE App](https://safe.global) or your preferred frontend for SAFE. 2. Press **New Transaction** and then **Transaction Builder**  3. Input the MessageProxy address for your correct environment into the **Contract Address** field and select **Use Implementation ABI** **MessageProxy Contract Addresses** | Network | Contract Address | | ------------------------ | ------------------------------------------ | | Ethereum Mainnet | 0x8629703a9903515818C2FeB45a6f6fA5df8Da404 | | Ethereum Holesky Testnet | 0x682ef859e1cE314ceD13A6FA32cE77AaeCE98e28 | 4. Select `registerExtraContract` from the dropdown list in *Contract Method Selector*, set the *schainName (string)* field (e.g elated-tan-skat), and set the *extraContract (address)* field which is the smart contract on Ethereum 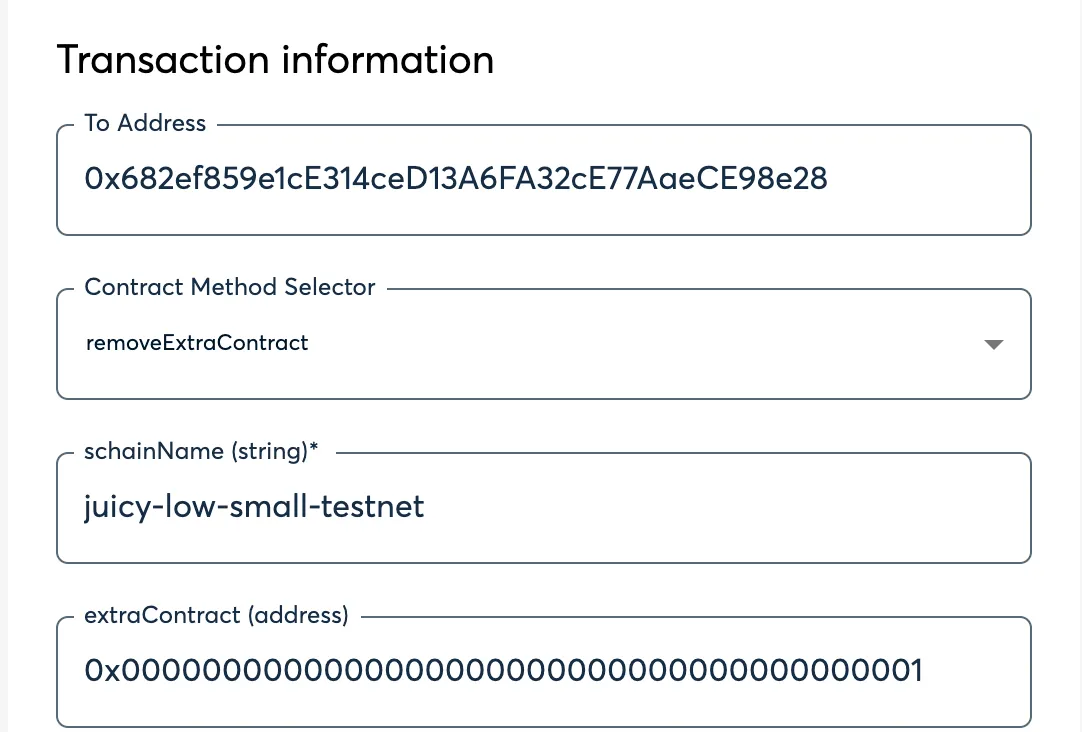 5. Click **Add transaction**, scroll down, and click **Create Batch**, then click **Send Batch**. [Tenderly](https://tenderly.co/) simulation is generally available, even on testnet, and is encouraged to be used to see all the changes occuring on the Ethereum side before they occur.
# Create Custom Contracts
> Learn how to create contracts that use SKALE's IMA Messaging Layer
The following will guide you through an example implementation of using SKALE’s Native Messaging Layer to send custom information back and forth between SKALE Chains. The following implements a bi-directional flow of data to showcase both sending and receiving clearly, however, contracts can easily implement a one-way flow. ## Custom Contract [Section titled “Custom Contract”](#custom-contract) SendNumber.sol ```solidity // SDPX-License-Identifier: MIT pragma solidity 0.8.9; import { IMessageProxyForSchain } from "./IMessageProxyForSchain.sol"; contract SendNumber { /// @notice lastNumber is the last value recieved via IMA. This is for testing purposes uint256 public lastNumber; /// @notice the dstChainHash is the keccak256 hash of the SKALE Chain name i.e keccak256(abi.encodePacked("elated-tan-skat")) bytes32 public dstChainHash; /// @notice the dstContractAddr is the address of the receiving contract on the other chain address public dstContractAddr; /// @notice messageProxy is a predeployed contract on all SKALE Chains IMessageProxyForSchain public messageProxy = IMessageProxyForSchain(0xd2AAa00100000000000000000000000000000000); event NumberReceived(uint256 indexed number, address indexed sender); constructor( bytes32 _dstChainHash, address _dstContractAddr ) { dstChainHash = _dstChainHash; dstContractAddr = _dstContractAddr; } function sendNumberToChain(uint256 number) external { /// this is how you post a message to IMA messageProxy.postOutgoingMessage( dstChainHash, dstContractAddr, abi.encode(number) ); } /// @notice this is how you recieve a message from IMA function postMessage( bytes32 schainHash, address sender, bytes calldata data ) external { if (schainHash != dstChainHash) revert("Invalid Chain Hash"); (uint256 number) = abi.decode(data, (uint256)); lastNumber = number; emit NumberReceived(number, sender); } } ``` ## Key Notes [Section titled “Key Notes”](#key-notes) * This contract is both a sender and receiver via IMA * This means it implements both postOutgoingMessage via MessageProxy interface AND postMessage which is the receiving part * This contract takes two constructor arguments to set the destination (dst) chain and contract which are later used to check and validate messages Caution Don’t forget to register your smart contracts on MessageProxyForSchain next! See [Connect Custom Contracts](/skale-bridge/messaging-layer/connect-custom-contracts) for next steps!
# Message Proxy
> Using SKALE MessageProxy to connect blockchains
A message proxy within the SKALE Ecosystem is a key “connection” point that works to send and receive messages between Ethereum and SKALE Chains. **MessageProxy** is an abstract smart contract that is extended into two key smart contracts used as cornerstones of the SKALE IMA Messaging Layer: 1. **MessageProxyForMainnet** — the MessageProxy deployed on the Ethereum Mainnet with an architecture designed for posting messages to SKALE Chains 2. **MessageProxyForSchain** — the MessageProxy that is pre-deployed on every SKALE Chain that enables communication with Ethereum Mainnet AND communication SKALE Chain to SKALE Chain > MessageProxy is used to send messages to any contracts. It is used within the bridging layer to actually prepare and execute messages for transportation between between chains. ## Architecture [Section titled “Architecture”](#architecture) * MessageProxy contracts are deployed on Mainnet, MessageProxyForMainnet, and each SKALE Chain, MessageProxyForSchain. * Contracts must be registered to a MessageProxy which allows them to interact with IMA Agent * Messages sent via MessageProxy are processed by the [IMA Agent](#ima-agent). * Messages received via MessageProxy are forwarded to the contract contract and executed ## Basic Implementation [Section titled “Basic Implementation”](#basic-implementation) Utilize the following base flow to send a message: ```solidity interface IMessageProxy { function postOutgoingMessage( bytes32 targetChainHash, address targetContract, bytes calldata data ) external; } contract ExampleSendContract { IMessageProxy private messageProxy = IMessageProxy(0xd2AAa00100000000000000000000000000000000); // Use this address for sChain, otherwise use the proper Mainnet Address function sendMessageToMainnet(address targetContracts, bytes calldata data) external { messageProxy.postOutgoingMessage(keccak256(abi.encodePacked("Mainnet")), targetContract, data); } } ``` Utilize the following base flow to receive a message: ```solidity contract ExampleReceiveContract { function postMessage( bytes32 schainHash, address sender, bytes calldata data ) external returns (address) { [add in your processing logic] } } ``` ## IMA Agent [Section titled “IMA Agent”](#ima-agent) The IMA Agent is a service that runs within each SKALE Supernode that handles watching for transactions that are executed via MessageProxy\* and processes them as messages accordingly. The agent automatically utilizes the nodes trusted execution environment (TEE) through Intel SGX© to handle the processing of messages. ## Managing IMA [Section titled “Managing IMA”](#managing-ima) IMA, similar to other predeployed contracts running on SKALE, is a highly customizable and managed by the SKALE Chain Owner/Operator or accounts delegated to them. The following are managed by the SKALE Chain Owner: ### Message Size Limit [Section titled “Message Size Limit”](#message-size-limit) The default message size limit is 1,000,000 gas units. This limit can be changed on each individual SKALE Chain with the following process: 1. Assign `CONSTANT_SETTER_ROLE`, an OpenZeppelin-based smart contract role, to one of your multisignature wallets or trusted delegated accounts. This call can be made by the [SKALE Chain Owner](/run-a-skale-chain/using-safe) or directly if another account is able to assign this role to your contract. * MultisigWallet CLI ```shell npx msig encodeData schain-name-here MessageProxyForSchain grantRole 0x96e3fc3be15159903e053027cff8a23f39a990e0194abcd8ac1cf1b355b8b93c [0x-wallet-address-of-executor] ``` * Ethers v6 ```ts /** * Run: * npm install ethers dotenv */ import { Contract, JsonRpcProvider, Wallet } from "ethers"; import dotenv from "dotenv"; dotenv.config(); const MSG_PROXY_SCHAIN_ADDR = "0xd2AAa00100000000000000000000000000000000"; const MSG_PROXY_SCHAIN_ABI = [ "function grantRole(bytes32 role, address account) external", "function setNewGasLimit(uint256 newGasLimit) external" ]; const provider = new JsonRpcProvider(process.env.RPC_URL); const wallet = new Wallet(process.env.PRIVATE_KEY); const contract = new Contract(MSG_PROXY_SCHAIN_ADDR, MSG_PROXY_SCHAIN_ABI, wallet); const res = await contract.grantRole("0x96e3fc3be15159903e053027cff8a23f39a990e0194abcd8ac1cf1b355b8b93c", "0x[ACCOUNT_TO_GRANT_ROLE]"); ``` 2. Once assigned, use your account to set the new gas limit. * MultisigWallet CLI ```shell npx msig encodeData schain-name-here MessageProxyForSchain setNewGasLimit 3000000 ``` * Ethers v6 ```ts /** * Run: * npm install ethers dotenv */ import { Contract, JsonRpcProvider, Wallet } from "ethers"; import dotenv from "dotenv"; dotenv.config(); const MSG_PROXY_SCHAIN_ADDR = "0xd2AAa00100000000000000000000000000000000"; const MSG_PROXY_SCHAIN_ABI = [ "function grantRole(bytes32 role, address account) external", "function setNewGasLimit(uint256 newGasLimit) external" ]; const provider = new JsonRpcProvider(process.env.RPC_URL); const wallet = new Wallet(process.env.PRIVATE_KEY); const contract = new Contract(MSG_PROXY_SCHAIN_ADDR, MSG_PROXY_SCHAIN_ABI, wallet); const res = await contract.setNewGasLimit(3000000); // Set to 3,0000,000 ```
# Using Custom Contracts
> Using Custom SKALE IMA Contracts
## Recap [Section titled “Recap”](#recap) 1. We have created a [custom contract](/skale-bridge/messaging-layer/create-custom-contracts) 2. We have [connected](/skale-bridge/messaging-layer/connect-custom-contracts) the custom Contracts 3. Now we are ready to test them! Follow the steps below. * Ethers v6 ```ts /** * Run: * npm install ethers dotenv */ import { Contract, JsonRpcProvider, Wallet } from "ethers"; import dotenv from "dotenv"; dotenv.config(); const SEND_NUMBER_ADDR = "0xd2AAa00100000000000000000000000000000000"; const SEND_NUMBER_ABI = [ "function sendNumber(uint256 number) external", "function lastNumber() external view returns (uint256)" ]; const sChainAProvider = new JsonRpcProvider(process.env.RPC_URL); const sChainBProvider = new JsonRpcProvider(process.env.PRC_URL); const wallet = new Wallet(process.env.PRIVATE_KEY, sChainAProvider); const contractA = new Contract(SEND_NUMBER_ADDR_A, SEND_NUMBER_ABI, wallet); const contractB = new Contract(SEND_NUMBER_ADDR_B, SEND_NUMBER_ABI, sChainBProvider); const txA = await contractA.sendNumber(BigInt(5)); await txA.ok(); // The following can be replaced with "listening for an event", however, // a while loop is more intuitive for a new developer while (true) { const lastNumber = await contractB.lastNumber(); if (lastNumber === BigInt(5)) { console.log("Posted!"); break; } await new Promise(res => setTimeout(res, 2000)); // Sleep 2 seconds } ```
# Introduction to SKALE Bridging
> Complete guide to seamless asset bridging on SKALE Network - Zero gas fees, instant finality, and enterprise-grade security
> **Transform your blockchain experience with SKALE’s revolutionary bridging and messaging technology** Welcome to the future of blockchain interoperability! SKALE’s Interchain Messaging Agent (IMA) provides the most advanced, secure, and cost-effective solution for moving assets between Ethereum and SKALE chains. ## Why Choose SKALE Bridge? [Section titled “Why Choose SKALE Bridge?”](#why-choose-skale-bridge) ### **Zero Gas Fees** [Section titled “Zero Gas Fees”](#zero-gas-fees) Say goodbye to expensive transaction costs. Bridge your assets and transact freely without worrying about gas fees eating into your profits when bridging SKALE Chain to SKALE Chain. ### **Instant Finality** [Section titled “Instant Finality”](#instant-finality) Experience lightning-fast transactions with thanks to SKALE’s incredibly fast block times averaging \~1 second. Most messages and bridging transactions deliver in less than 30 seconds! ### **Decentralized Security** [Section titled “Decentralized Security”](#decentralized-security) SKALE boasts one of the **ONLY** native bridges that is truly decentralized. IMA directly leverages the validators, threshold encryption design, and supermajority requirements that make SKALE Consensus so fast and secure. ### **Full EVM Compatibility** [Section titled “Full EVM Compatibility”](#full-evm-compatibility) Seamlessly migrate your existing Ethereum applications without code changes while gaining massive performance improvements PLUS bring your tokens and NFTs! ## What is IMA? [Section titled “What is IMA?”](#what-is-ima) SKALE’s Interchain Messaging Agent (IMA) is a decentralized, high-performance message transport layer and bridging protocol. The unique design and flexiblity of IMA allows every SKALE Chain to be joined together into an interconnected web of blockchains that make up the SKALE Network. ## 📚 Complete Bridging Guide [Section titled “📚 Complete Bridging Guide”](#-complete-bridging-guide) ### **Core Bridging to/from Ethereum** [Section titled “Core Bridging to/from Ethereum”](#core-bridging-tofrom-ethereum) * **[Bridge ETH](/skale-bridge/ethereum/bridge-eth)** - Transfer native Ethereum to a SKALE Chain * **[Bridge ERC-20 Tokens](/skale-bridge/ethereum/bridge-erc20)** - Move fungible tokens like USDC, WBTC, and more to a SKALE Chain * **[Bridge ERC-721 NFTs](/skale-bridge/ethereum/bridge-erc721)** - Seamlessly transfer unique digital assets to SKALE * **[Bridge ERC-1155 Tokens](/skale-bridge/ethereum/bridge-erc1155)** - Bring multi-token standard tokens to SKALE ### **Core Bridging SKALE Chain to SKALE Chain** [Section titled “Core Bridging SKALE Chain to SKALE Chain”](#core-bridging-skale-chain-to-skale-chain) * **[Bridge ERC-20 Tokens](/skale-bridge/skale/bridge-erc20)** - Move fungible tokens like USDC, WBTC, and more between SKALE Chains * **[Bridge ERC-721 NFTs](/skale-bridge/skale/bridge-erc721)** - Seamlessly transfer unique digital assets between SKALE Chains * **[Bridge ERC-1155 Tokens](/skale-bridge/skale/bridge-erc1155)** - Bring multi-token standard tokens between SKALE Chains ### **Advanced Features** [Section titled “Advanced Features”](#advanced-features) * **[Custom Contract Integration](/skale-bridge/messaging-layer/create-custom-contracts)** - Build multi-chain applications with ease * **[Connect Existing Contracts](/skale-bridge/messaging-layer/connect-custom-contracts)** - Connect multi-chain applications ### **Support & Troubleshooting** [Section titled “Support & Troubleshooting”](#support--troubleshooting) * **[Developer Support](https://discord.gg/skale)** - Get assistance from the SKALE Team
# Bridge ERC-1155 Tokens
> Guide on bridging ERC-1155 tokens on SKALE
SKALE’s Interchain Messaging Agent (IMA) Bridge allows for direct communication and bridging between SKALE Chains (without ever going to Mainnet). The following walks you through setting up an ERC-1155 token between two SKALE Chains and how to programatically bridge. ## Important Information [Section titled “Important Information”](#important-information) * When a SKALE Chain is created, there are no ERC-1155 tokens mapped by default * A token being bridged between two chains should have its supply **issued** (i.e minted) on one chain. The second SKALE Chain mints by design via IMA, however, the token should not be mintable any other way * Tokens being bridged from SKALE Chain to SKALE Chain are locked in TokenManagerERC1155 on the origin chain * Tokens being bridged from SKALE Chain to SKALE Chain are minted by IMA on the destination chain ## Bridge Setup [Section titled “Bridge Setup”](#bridge-setup) ### 1. Prepare the ERC-1155 [Section titled “1. Prepare the ERC-1155”](#1-prepare-the-erc-1155) ERC-1155 tokens that are being bridged between SKALE Chains should have the **mint** function that is locked down to TokenManagerERC1155. Caution on Minting If the mint function is not locked down to just the IMA Bridge, specifically TokenManagerERC1155; there is a chance that the existing tokens on the SKALE Chain may not match what is secured in the bridge. Caution on Burning If the burn function is not locked down to just the IMA Bridge, specifically TokenManagerERC1155; there is a chance that the supply on the SKALE Chain side could be “burned”, while the tokens still exist on the original SKALE Chain which could later be withdrawn under certain circumstances. It is recommended that explicit burns on a SKALE Chain should be avoided for bridged tokens. The following is the base interchain token code that meets the above bridging requirements for IMA. It is not recommended to use this directly, but to use a wrapper. See **YourInterchainNFT.sol** for an example. InterchainERC1155.sol ```solidity // SPDX-License-Identifier: MIT pragma solidity 0.8.9; import { ERC1155 } from "@openzeppelin/contracts/token/ERC1155/extensions/ERC1155.sol"; import { AccessControl } from "@openzeppelin/contracts/access/AccessControl.sol"; import { Strings } from "@openzeppelin/contracts/utils/Strings.sol"; contract InterchainERC1155 is AccessControl, ERC1155 { using Strings for uint256; bytes32 public constant MINTER_ROLE = keccak256("MINTER_ROLE"); string private _baseUri; constructor(string memory baseUri) ERC1155("") { _grantRole(MINTER_ROLE, 0xD2aaA00900000000000000000000000000000000); _baseUri = baseUri; // e.g. "ipfs://QmSomeCID/" } function uri(uint256 tokenId) public view override returns (string memory) { return string(abi.encodePacked(_baseUri, tokenId.toString(), ".json")); } function mint( address account, uint256 id, uint256 amount, bytes memory data ) external { require(hasRole(MINTER_ROLE, _msgSender()), "Sender is not a Minter"); _mint(account, id, amount, data); } function mintBatch( address account, uint256[] memory ids, uint256[] memory amounts, bytes memory data ) external { require(hasRole(MINTER_ROLE, _msgSender()), "Sender is not a Minter"); _mintBatch(account, ids, amounts, data); } function setBaseUri(string memory newBaseUri) external onlyRole(DEFAULT_ADMIN_ROLE) { _baseUri = newBaseUri; } } ``` ### 2. Deploy the ERC-1155 on SKALE [Section titled “2. Deploy the ERC-1155 on SKALE”](#2-deploy-the-erc-1155-on-skale) Utilize your preferred tooling i.e [Foundry](https://getfoundry.sh), [Hardhat](https://hardhat.org), [Remix](https://remix.ethereum.org/#lang=en\&optimize=false\&runs=200\&evmVersion=paris\&version=soljson-v0.8.19+commit.7dd6d404.js), etc. to deploy your IMA compatible ERC-1155 token to the SKALE Chain you want to be able to bridge assets too. InGameTokens.sol ```solidity // SPDX-License-Identifier: MIT pragma solidity 0.8.19; import { InterchainERC1155 } from "./InterchainERC1155.sol"; contract InGameTokens is InterchainERC1155("ipfs://") {} ``` > *InterchainERC1155.sol is inherited from the code above* ### 3. Map the SKALE Token [Section titled “3. Map the SKALE Token”](#3-map-the-skale-token) Caution Make sure to replace the values with your SKALE Chain name and the correct token addresses. #### Add the token on SKALE Chain TokenManagerERC1155 [Section titled “Add the token on SKALE Chain TokenManagerERC1155”](#add-the-token-on-skale-chain-tokenmanagererc1155) * **DST\_SCHAIN\_NAME** is the name of the sChain that the transaction should execute on * **ORIGIN\_SCHAIN\_NAME** is the name of the sChain that the token is being mapped from * **0x\_ORIGIN\_TOKEN** is the original token address on the ORIGIN\_SCHAIN\_NAME * **0x\_DST\_TOKEN** is the destination token address on the DST\_SCHAIN\_NAME - Multisigwallet CLI ```shell npx msig encodeData [DST_SCHAIN_NAME] TokenManagerERC1155 addERC20TokenByOwner [ORIGIN_SCHAIN_NAME] [0x_ORIGIN_TOKEN] [0x_DST_TOKEN] ``` After this, execute by following the steps on [Using SAFE](/run-a-skale-chain/using-safe#submit-transaction-to-safe) #### Verify the Mapping [Section titled “Verify the Mapping”](#verify-the-mapping) To verify the mapping, you should have an event emitted from TokenManagerERC1155 on SKALE Chain - `event ERC1155TokenAdded(SchainHash indexed chainHash, address indexed erc1155OnMainChain, address indexed erc1155OnSchain);` ## Bridging ERC-1155 [Section titled “Bridging ERC-1155”](#bridging-erc-1155) The following does not require you to setup your own token. This works with **ANY** ERC-1155 token that is mapped from a SKALE Chain to any other SKALE Chain as long as the actual ERC-1155 token on each side does not have additional restrictions around who can transfer. The flow for bridging an ERC-1155 from sChain to sChain follows a very similar flow to a standard ERC-1155 transfer: 1. Approve the bridge contract on the ERC-1155 token to allow it to move your NFTs 2. Call the bridge directly to transfer the specific ERC-1155 from SKALE Chain -> SKALE Chain, if the mapping exists 3. Wait for the message to be posted by the validator set on the SKALE Chain, which is the net-new minted NFT corresponding to the NFT (by id) locked on the origin SKALE Chain during the bridge ### Bridge Tokens [Section titled “Bridge Tokens”](#bridge-tokens) The following will help you bridge an ERC-1155 NFT from one SKALE Chain to another. * bridge.js ```js import { Contract, JsonRpcProvider, Wallet } from "ethers"; // npm add ethers const PRIVATE_KEY = "[YOUR_PRIVATE_KEY]"; const ORIGIN_SCHAIN_RPC_URL = "[YOUR_RPC_URL]"; const ERC1155_ADDRESS = "[ORIGIN_TOKEN_ADDRESS]"; const ERC1155_ABI = [ "function setApprovalForAll(address operator, bool approved) external" ]; const TOKEN_MANAGER_ERC1155_ADDRESS = "0xD2aaA00900000000000000000000000000000000"; // DO NOT CHANGE THIS const TOKEN_MANAGER_ERC1155_ABI = [ "function transferToSchainERC1155(string calldata targetSchainName, address contractOnMainnet, uint256 id, uint256 amount) external" ]; const DST_SKALE_CHAIN_NAME = "[DST_SKALE_CHAIN_NAME]"; // e.g green-giddy-denebola (nebula mainnnet); const NUMBER_TOKENS_TO_TRANSFER = parseEther("100"); // 100 tokens in wei format const TOKEN_ID = BigInt(1); // Setup the RPC Provider to connect to Ethereum const provider = new JsonRpcProvider(ORIGIN_SCHAIN_RPC_URL); // Setup the wallet with your private key and default to the Ethereum provider const wallet = new Wallet(PRIVATE_KEY, provider); // Setup the smart contracts which default to being signed by your wallet and connected on Ethereum const tokenManagerContract = new Contract(TOKEN_MANAGER_ERC1155_ADDRESS, TOKEN_MANAGER_ERC1155_ABI, wallet); const tokenContract = new Contract(ERC1155_ADDRESS, ERC1155_ABI, wallet); // 1. Approve the bridge to move ERC-1155 Tokens const approvalTx = await tokenContract.setApprovalForAll(TOKEN_MANAGER_ERC1155_ADDRESS, true); await approvalTx.wait(1); // Wait 1 blocks for confirmation, ~1 seconds // 2. Bridge 100 of ERC-1155 Token Id #1, will receive on same address on new skale chain const bridgeTx = await tokenManagerContract.transferToSchainERC1155(DST_SKALE_CHAIN_NAME, ERC1155_ADDRESS, TOKEN_ID, NUMBER_TOKENS_TO_TRANSFER); await bridgeTx.wait(1); // Wait 1 blocks for confirmation, ~1 seconds // Success! Now watch for delivery on Destination Chain console.log("Success!"); ``` * bridgeBatch.js ```js import { Contract, JsonRpcProvider, Wallet } from "ethers"; // npm add ethers const PRIVATE_KEY = "[YOUR_PRIVATE_KEY]"; const ORIGIN_SCHAIN_RPC_URL = "[YOUR_RPC_URL]"; const ERC1155_ADDRESS = "[ORIGIN_TOKEN_ADDRESS]"; const ERC1155_ABI = [ "function setApprovalForAll(address operator, bool approved) external" ]; const TOKEN_MANAGER_ERC1155_ADDRESS = "0xD2aaA00900000000000000000000000000000000"; // DO NOT CHANGE THIS const TOKEN_MANAGER_ERC1155_ABI = [ "function transferToSchainERC1155Batch(string calldata targetSchainName, address contractOnMainnet, uint256[] calldata ids, uint256[] calldata amounts) external" ]; const DST_SKALE_CHAIN_NAME = "[DST_SKALE_CHAIN_NAME]"; // e.g green-giddy-denebola (nebula mainnnet); const NUMBER_TOKENS_TO_TRANSFER = [parseEther("5"), parseEther("100")]; // 100 tokens in wei format const TOKEN_IDS = [BigInt(1), BigInt(5)]; // Setup the RPC Provider to connect to Ethereum const provider = new JsonRpcProvider(ORIGIN_SCHAIN_RPC_URL); // Setup the wallet with your private key and default to the Ethereum provider const wallet = new Wallet(PRIVATE_KEY, provider); // Setup the smart contracts which default to being signed by your wallet and connected on Ethereum const tokenManagerContract = new Contract(TOKEN_MANAGER_ERC1155_ADDRESS, TOKEN_MANAGER_ERC1155_ABI, wallet); const tokenContract = new Contract(ERC1155_ADDRESS, ERC1155_ABI, wallet); // 1. Approve the bridge to move ERC-1155 Tokens const approvalTx = await tokenContract.setApprovalForAll(TOKEN_MANAGER_ERC1155_ADDRESS, true); await approvalTx.wait(1); // Wait 1 blocks for confirmation, ~1 seconds // 2. Bridge 5 of ERC-1155 Token Id #1 and 100 of Token Id #5, will receive on same address on new skale chain const bridgeTx = await tokenManagerContract.transferToSchainERC1155Batch(DST_SKALE_CHAIN_NAME, ERC1155_ADDRESS, TOKEN_IDS, NUMBER_TOKENS_TO_TRANSFER); await bridgeTx.wait(1); // Wait 1 blocks for confirmation, ~1 seconds // Success! Now watch for delivery on Destination Chain console.log("Success!"); ```
# Bridge ERC-20 Tokens
> Guide on bridging ERC-20 tokens on SKALE
SKALE’s Interchain Messaging Agent (IMA) Bridge allows for direct communication and bridging between SKALE Chains (without ever going to Mainnet). The following walks you through setting up an ERC-20 token between two SKALE Chains and how to programatically bridge. ## Important Information [Section titled “Important Information”](#important-information) * When a SKALE Chain is created, there are no ERC-20 tokens mapped by default * A token being bridged between two chains should have its supply **issued** (i.e minted) on one chain. The second SKALE Chain mints by design via IMA, however, the token should not be mintable any other way * Tokens being bridged from SKALE Chain to SKALE Chain are locked in TokenManagerERC20 on the origin chain * Tokens being bridged from SKALE Chain to SKALE Chain are minted by IMA on the destination chain ## Bridge Setup [Section titled “Bridge Setup”](#bridge-setup) ### 1. Prepare the ERC-20 [Section titled “1. Prepare the ERC-20”](#1-prepare-the-erc-20) ERC-20 tokens that are being bridged between SKALE Chains should follow two basic requirements in order to be compatible with the SKALE IMA bridging layer: 1. Have a **mint** function that is locked down to TokenManagerERC20 2. Have a **burn** function that is locked down to TokenManagerERC20 Caution on Minting If the mint function is not locked down to just TokenManagerERC20 there is a chance that the supply on the desintation chain could be larger than what is actually locked in the bridge on the origin SKALE Chain. Caution on Burning If the burn function is not locked down to just TokenManagerERC20 there is a chance that the supply on the SKALE Chain side could be “burned”, while the tokens still exist on the origin SKALE Chain which could later be withdrawn under certain circumstances. It is recommended that explicit burns on a SKALE Chain should be avoided for the bridged tokens. The following is the base interchain token code that meets the above bridging requirements for IMA. It is not recommended to use this directly, but to use a wrapper. See InterchainSKL for an 18 decimal example and InterchainUSDT for a 6 decimal example. InterchainERC20.sol ```solidity // SPDX-License-Identifier: MIT pragma solidity 0.8.19; // Importing the ERC20 standard contract and AccessControl for role-based access management. import {ERC20} from "@openzeppelin/contracts/token/ERC20/ERC20.sol"; import {AccessControl} from "@openzeppelin/contracts/access/AccessControl.sol"; /** * @title InterchainERC20 * @dev This contract is an ERC20 token implementation with role-based access control for minting and burning. * It utilizes OpenZeppelin's ERC20 and AccessControl for functionality. */ contract InterchainERC20 is ERC20, AccessControl { // Define roles using hashed constants for efficient comparison. bytes32 public constant MINTER_ROLE = keccak256("MINTER_ROLE"); bytes32 public constant BURNER_ROLE = keccak256("BURNER_ROLE"); constructor(string memory name, string memory symbol) ERC20(name, symbol) { // Assign the minter role to a predefined address. _grantRole(MINTER_ROLE, 0xD2aAA00500000000000000000000000000000000); // Assign the burner role to a predefined address. _grantRole(BURNER_ROLE, 0xD2aAA00500000000000000000000000000000000); } function mint(address to, uint256 amount) public virtual { // Ensure that the caller has the MINTER_ROLE. require(hasRole(MINTER_ROLE, msg.sender), "Caller is not a minter"); // Mint the specified amount of tokens to the target address. _mint(to, amount); } function burn(uint256 amount) public virtual { // Ensure that the caller has the BURNER_ROLE. require(hasRole(BURNER_ROLE, msg.sender), "Caller is not a burner"); // Burn the specified amount of tokens from the caller's account. _burn(msg.sender, amount); } } ``` ### 2. Deploy the ERC-20 on SKALE Chain [Section titled “2. Deploy the ERC-20 on SKALE Chain”](#2-deploy-the-erc-20-on-skale-chain) Utilize your preferred tooling i.e [Foundry](https://getfoundry.sh), [Hardhat](https://hardhat.org), [Remix](https://remix.ethereum.org/#lang=en\&optimize=false\&runs=200\&evmVersion=paris\&version=soljson-v0.8.19+commit.7dd6d404.js), etc. to deploy your IMA compatible ERC-20 token to the SKALE Chain you want to be able to bridge assets too. * InterchainSKL.sol *This is an example of an 18 decimal ERC-20 token that would be deployed on SKALE* ```solidity // SPDX-License-Identifier: MIT pragma solidity 0.8.19; import { InterchainERC20 } from "./InterchainERC20.sol"; contract InterchainSKL is InterchainERC20("Skale Token", "SKL") {} ``` * InterchainUSDT.sol *This is an example of an 6 decimal ERC-20 token that would be deployed on SKALE* ```solidity // SPDX-License-Identifier: MIT pragma solidity 0.8.19; import { InterchainERC20 } from "./InterchainERC20.sol"; contract InterchainUSDT is InterchainERC20("Tether USD", "USDT") { function decimals() public view override returns (uint8) { return 6; } } ``` > *InterchainERC20.sol is inherited from the code above* ### 3. Map the SKALE Token [Section titled “3. Map the SKALE Token”](#3-map-the-skale-token) #### Add the token on SKALE Chain TokenManagerERC20 [Section titled “Add the token on SKALE Chain TokenManagerERC20”](#add-the-token-on-skale-chain-tokenmanagererc20) * **DST\_SCHAIN\_NAME** is the name of the sChain that the transaction should execute on * **ORIGIN\_SCHAIN\_NAME** is the name of the sChain that the token is being mapped from * **0x\_ORIGIN\_TOKEN** is the original token address on the ORIGIN\_SCHAIN\_NAME * **0x\_DST\_TOKEN** is the destination token address on the DST\_SCHAIN\_NAME - Multisigwallet CLI ```shell npx msig encodeData [DST_SCHAIN_NAME] TokenManagerERC20 addERC20TokenByOwner [ORIGIN_SCHAIN_NAME] [0x_ORIGIN_TOKEN] [0x_DST_TOKEN] ``` After this, execute by following the steps on [Using SAFE](/run-a-skale-chain/using-safe#submit-transaction-to-safe) #### Verify the mapping [Section titled “Verify the mapping”](#verify-the-mapping) To verify the mapping, TokenManagerERC20 on the SKALE Chain (DST\_CHAIN\_NAME from above) should emit an event - `event ERC20TokenAdded(SchainHash indexed chainHash, address indexed erc20OnMainChain, address indexed erc20OnSchain);` ## Bridging ERC-20 [Section titled “Bridging ERC-20”](#bridging-erc-20) The following does not require you to setup your own token. This works with **ANY** ERC-20 token that is mapped from a SKALE Chain to any other SKALE Chain as long as the actual ERC-20 token on each side does not have additional restrictions around who can transfer. The flow for bridging an ERC-20 from sChain to sChain follows a very similar flow to a standard ERC-20 transfer: 1. Approve the origin chain bridge contract on the ERC-20 token to allow it to control some amount of funds 2. Call the origin bridge directly to transfer the asset from SKALE Chain -> SKALE Chain 3. Wait for the message to be posted by the validator set on the destination SKALE Chain, which is where the net-new minted tokens corresponding to the value locked on the origin SKALE Chain during the bridge are created ### Bridge Tokens [Section titled “Bridge Tokens”](#bridge-tokens) If bridging a token nativley deployed on a SKALE Chain to another SKALE Chain, the process for bridging in either direction is identical. The action taken by the chain is slightly different (i.e lock and mint vs burn and unlock), however, for the end user the flow is identical i.e receive N new tokens in their wallet. * bridge.js ```js import { Contract, JsonRpcProvider, Wallet, parseEther } from "ethers"; // npm add ethers const PRIVATE_KEY = "[YOUR_PRIVATE_KEY]"; const ORIGIN_SCHAIN_RPC_URL = "[YOUR_RPC_URL]"; const ERC20_ADDRESS = "[ORIGIN_TOKEN_ADDRESS]"; const ERC20_ABI = [ "function approve(address spender, uint256 amount) external" ]; const TOKEN_MANAGER_ERC20_ADDRESS = "0xD2aAA00500000000000000000000000000000000"; // DO NOT CHANGE THIS const TOKEN_MANAGER_ERC20_ABI = [ "function transferToSchainERC20(string calldata targetSchainName, address contractOnMainnet, uint256 amount) external" ]; const DST_SKALE_CHAIN_NAME = "[DST_SKALE_CHAIN_NAME]"; // e.g green-giddy-denebola (nebula mainnnet); const NUMBER_TOKENS_TO_TRANSFER = parseEther("100"); // 100 tokens in wei format // Setup the RPC Provider to connect to Ethereum const provider = new JsonRpcProvider(ORIGIN_SCHAIN_RPC_URL); // Setup the wallet with your private key and default to the Ethereum provider const wallet = new Wallet(PRIVATE_KEY, provider); // Setup the smart contracts which default to being signed by your wallet and connected on Ethereum const tokenManagerContract = new Contract(TOKEN_MANAGER_ERC20_ADDRESS, TOKEN_MANAGER_ERC20_ABI, wallet); const tokenContract = new Contract(ERC20_ADDRESS, ERC20_ABI, wallet); // 1. Approve the bridge to move ERC-20 const approvalTx = await tokenContract.approve(TOKEN_MANAGER_ERC20_ADDRESS, NUMBER_TOKENS_TO_TRANSFER); await approvalTx.wait(1); // Wait 1 blocks for confirmation, ~1s seconds // 2. Deposit ERC-20 into bridge, will receive on same address on SKALE const bridgeTx = await tokenManagerContract.transferToSchainERC20(DST_SKALE_CHAIN_NAME, ERC20_ADDRESS, NUMBER_TOKENS_TO_TRANSFER); await bridgeTx.wait(1); // Wait 1 blocks for confirmation, ~1 seconds // Success! Now watch for delivery on Destination Chain console.log("Success!"); ``` * bridgeDirect.js ```js import { Contract, JsonRpcProvider, Wallet, parseEther } from "ethers"; // npm add ethers const PRIVATE_KEY = "[YOUR_PRIVATE_KEY]"; const ORIGIN_SCHAIN_RPC_URL = "[YOUR_RPC_URL]"; const ERC20_ADDRESS = "[ORIGIN_TOKEN_ADDRESS]"; const ERC20_ABI = [ "function approve(address spender, uint256 amount) external" ]; const TOKEN_MANAGER_ERC20_ADDRESS = "0xD2aAA00500000000000000000000000000000000"; // DO NOT CHANGE THIS const TOKEN_MANAGER_ERC20_ABI = [ "function transferToSchainERC20Direct(string calldata targetSchainName, address contractOnMainnet, uint256 amount, address receiver) external" ]; const DST_SKALE_CHAIN_NAME = "[DST_SKALE_CHAIN_NAME]"; // e.g green-giddy-denebola (nebula mainnnet); const NUMBER_TOKENS_TO_TRANSFER = parseEther("100"); // 100 tokens in wei format const CUSTOM_RECEIVER_ADDRESS = "[CUSTOM_RECEIVER_ADDRESS]"; // Setup the RPC Provider to connect to Ethereum const provider = new JsonRpcProvider(ORIGIN_SCHAIN_RPC_URL); // Setup the wallet with your private key and default to the Ethereum provider const wallet = new Wallet(PRIVATE_KEY, provider); // Setup the smart contracts which default to being signed by your wallet and connected on Ethereum const tokenManagerContract = new Contract(TOKEN_MANAGER_ERC20_ADDRESS, TOKEN_MANAGER_ERC20_ABI, wallet); const tokenContract = new Contract(ERC20_ADDRESS, ERC20_ABI, wallet); // 1. Approve the bridge to move ERC-20 const approvalTx = await tokenContract.approve(TOKEN_MANAGER_ERC20_ADDRESS, NUMBER_TOKENS_TO_TRANSFER); await approvalTx.wait(1); // Wait 1 blocks for confirmation, ~1 seconds // 2. Deposit ERC-20 into bridge, will receive on the custom receiver address on SKALE const bridgeTx = await tokenManagerContract.transferToSchainERC20Direct(DST_SKALE_CHAIN_NAME, ERC20_ADDRESS, NUMBER_TOKENS_TO_TRANSFER, CUSTOM_RECEIVER_ADDRESS); await bridgeTx.wait(1); // Wait 1 blocks for confirmation, ~1 seconds // Success! Now watch for delivery on Destination Chain console.log("Success!"); ```
# Bridge ERC-721 Tokens
> Guide on bridging ERC-721 tokens on SKALE
SKALE’s Interchain Messaging Agent (IMA) Bridge allows for direct communication and bridging between SKALE Chains (without ever going to Mainnet). The following walks you through setting up an ERC-721 token between two SKALE Chains and how to programatically bridge. ## Important Information [Section titled “Important Information”](#important-information) * When a SKALE Chain is created, there are no ERC-721 tokens mapped by default * A token being bridged between two chains should have its supply **issued** (i.e minted) on one chain. The second SKALE Chain mints by design via IMA, however, the token should not be mintable any other way * Tokens being bridged from SKALE Chain to SKALE Chain are locked in TokenManagerERC721 on the origin chain * Tokens being bridged from SKALE Chain to SKALE Chain are minted by IMA on the destination chain ## Bridge Setup [Section titled “Bridge Setup”](#bridge-setup) ### 1. Prepare the ERC-721 [Section titled “1. Prepare the ERC-721”](#1-prepare-the-erc-721) ERC-721 tokens that are being bridged between SKALE Chains should have the **mint** function that is locked down to TokenManagerERC721. Caution on Minting If the mint function is not locked down to just the IMA Bridge, specifically TokenManagerERC721; there is a chance that the existing tokens on the SKALE Chain may not match what is secured in the bridge. Caution on Burning If the burn function is not locked down to just the IMA Bridge, specifically TokenManagerERC721; there is a chance that the supply on the SKALE Chain side could be “burned”, while the tokens still exist on the original SKALE Chain which could later be withdrawn under certain circumstances. It is recommended that explicit burns on a SKALE Chain should be avoided for bridged tokens. The following is the base interchain token code that meets the above bridging requirements for IMA. It is not recommended to use this directly, but to use a wrapper. See **YourInterchainNFT.sol** for an example. InterchainERC721.sol ```solidity // SPDX-License-Identifier: MIT pragma solidity 0.8.19; import {ERC721} from "@openzeppelin/contracts/token/ERC721/ERC721.sol"; import {AccessControl} from "@openzeppelin/contracts/access/AccessControl.sol"; import {Strings} from "@openzeppelin/contracts/utils/Strings.sol"; /** * @title InterchainERC721 * @dev ERC-721 with role-based minting and dynamic token URI. */ contract InterchainERC721 is AccessControl, ERC721 { using Strings for uint256; bytes32 public constant MINTER_ROLE = keccak256("MINTER_ROLE"); string private _baseTokenURI; constructor( string memory contractName, string memory contractSymbol, string memory baseTokenURI ) ERC721(contractName, contractSymbol) { _setRoleAdmin(MINTER_ROLE, 0xD2aaa00600000000000000000000000000000000); // example admin role _grantRole(MINTER_ROLE, _msgSender()); _baseTokenURI = baseTokenURI; } function mint(address to, uint256 tokenId) external returns (bool) { require(hasRole(MINTER_ROLE, _msgSender()), "Sender is not a Minter"); _safeMint(to, tokenId); return true; } /// @notice Override to return dynamic token URI function tokenURI(uint256 tokenId) public view override returns (string memory) { require(_exists(tokenId), "ERC721: URI query for nonexistent token"); return string(abi.encodePacked(_baseTokenURI, tokenId.toString(), ".json"); } /// @notice Allows admin to update base URI function setBaseURI(string calldata newBaseURI) external onlyRole(MINTER_ROLE) { _baseTokenURI = newBaseURI; } } ``` ### 2. Deploy the ERC-721 on SKALE [Section titled “2. Deploy the ERC-721 on SKALE”](#2-deploy-the-erc-721-on-skale) Utilize your preferred tooling i.e [Foundry](https://getfoundry.sh), [Hardhat](https://hardhat.org), [Remix](https://remix.ethereum.org/#lang=en\&optimize=false\&runs=200\&evmVersion=paris\&version=soljson-v0.8.19+commit.7dd6d404.js), etc. to deploy your IMA compatible ERC-721 token to the SKALE Chain you want to be able to bridge assets too. YourInterchainNFT.sol ```solidity // SPDX-License-Identifier: MIT pragma solidity 0.8.19; import { InterchainERC721 } from "./InterchainERC721.sol"; contract InterchainNFT is InterchainERC721("NFT Name", "NFT Symbol", "ipfs:///") {} ``` > *InterchainERC721.sol is inherited from the code above* ### 3. Map the SKALE Token [Section titled “3. Map the SKALE Token”](#3-map-the-skale-token) #### Add the token on SKALE Chain TokenManagerERC721 [Section titled “Add the token on SKALE Chain TokenManagerERC721”](#add-the-token-on-skale-chain-tokenmanagererc721) * **DST\_SCHAIN\_NAME** is the name of the sChain that the transaction should execute on * **ORIGIN\_SCHAIN\_NAME** is the name of the sChain that the token is being mapped from * **0x\_ORIGIN\_TOKEN** is the original token address on the ORIGIN\_SCHAIN\_NAME * **0x\_DST\_TOKEN** is the destination token address on the DST\_SCHAIN\_NAME - Multisigwallet CLI ```shell npx msig encodeData [DST_SCHAIN_NAME] TokenManagerERC721 addERC20TokenByOwner [ORIGIN_SCHAIN_NAME] [0x_ORIGIN_TOKEN] [0x_DST_TOKEN] ``` After this, execute by following the steps on [Using SAFE](/run-a-skale-chain/using-safe#submit-transaction-to-safe) #### Verify the Mapping [Section titled “Verify the Mapping”](#verify-the-mapping) To verify the mapping, you should have an event emitted from TokenManagerERC721 on SKALE Chain - `event ERC721TokenAdded(SchainHash indexed chainHash, address indexed erc721OnMainChain, address indexed erc721OnSchain);` ## Bridging ERC-721 [Section titled “Bridging ERC-721”](#bridging-erc-721) The following does not require you to setup your own token. This works with **ANY** ERC-721 token that is mapped from a SKALE Chain to other any SKALE Chain as long as the actual ERC-721 token on each side does not have additional restrictions around who can transfer. The flow for bridging an ERC-721 from sChain to sChain follows a very similar flow to a standard ERC-721 transfer: 1. Approve the bridge contract on the ERC-721 token to allow it to move your NFTs 2. Call the bridge directly to transfer the specific ERC-721 from SKALE Chain -> SKALE Chain, if the mapping exists 3. Wait for the message to be posted by the validator set on the SKALE Chain, which is the net-new minted NFT corresponding to the NFT (by id) locked on the origin SKALE Chain during the bridge ### Bridge Tokens [Section titled “Bridge Tokens”](#bridge-tokens) The following will help you bridge an NFT from one SKALE Chain to another. bridge.js ```js import { Contract, JsonRpcProvider, Wallet } from "ethers"; // npm add ethers const PRIVATE_KEY = "[YOUR_PRIVATE_KEY]"; const ORIGIN_SCHAIN_RPC_URL = "[YOUR_RPC_URL]"; const ERC721_ADDRESS = "[ORIGIN_TOKEN_ADDRESS]"; const ERC721_ABI = [ "function approve(address spender, uint256 tokenId) external" ]; const TOKEN_MANAGER_ERC721_ADDRESS = "0xD2aaa00600000000000000000000000000000000"; // DO NOT CHANGE THIS const TOKEN_MANAGER_ERC721_ABI = [ "function transferToSchainERC721(string calldata targetSchainName, address contractOnMainnet, uint256 tokenId) external" ]; const DST_SKALE_CHAIN_NAME = "[DST_SKALE_CHAIN_NAME]"; // e.g green-giddy-denebola (nebula mainnnet); const TOKEN_ID = BigInt(1); // Setup the RPC Provider to connect to Ethereum const provider = new JsonRpcProvider(ORIGIN_SCHAIN_RPC_URL); // Setup the wallet with your private key and default to the Ethereum provider const wallet = new Wallet(PRIVATE_KEY, provider); // Setup the smart contracts which default to being signed by your wallet and connected on Ethereum const tokenManagerContract = new Contract(TOKEN_MANAGER_ERC721_ADDRESS, TOKEN_MANAGER_ERC721_ABI, wallet); const tokenContract = new Contract(ERC721_ADDRESS, ERC721_ABI, wallet); // 1. Approve the bridge to move ERC-721 Token Id #1 const approvalTx = await tokenContract.approve(TOKEN_MANAGER_ERC721_ADDRESS, TOKEN_ID); await approvalTx.wait(1); // Wait 1 blocks for confirmation, ~1 seconds // 2. Deposit ERC-721 Token Id #1 into bridge, will receive on same address on SKALE const bridgeTx = await tokenManagerContract.transferToSchainERC721(DST_SKALE_CHAIN_NAME, ERC721_ADDRESS, TOKEN_ID); await bridgeTx.wait(1); // Wait 1 blocks for confirmation, ~1 seconds // Success! Now watch for delivery on Destination Chain console.log("Success!"); ```
# Connect SKALE Chains
> Learn to connect SKALE Chains together for gas free bridging
Ready to start bridging ERC-20’s, ERC-721’s, and ERC-1155’s between SKALE Chains? Before you proceed to the setup guides for your target token, read through the following to ensure that the SKALE Chains you are moving assets between are able to communicate. ## Background on Connections [Section titled “Background on Connections”](#background-on-connections) All SKALE Chains utilize the same components and contracts to enable bridging. However, while SKALE Chains are all by default connected to Ethereum for operations and bridging; SKALE Chains do not come out of the box with connections to other SKALE Chains. This is both for security since the SKALE architecture does not define what chains can be used for externally, all chains adhere to an appchain first mentality i.e as siloed and secure as possible allowing the chain owner to setup and connect as they see fit. **Interested in setting up your own token on multiple SKALE Chains? Connect the chains now!** ## Connect a SKALE Chain [Section titled “Connect a SKALE Chain”](#connect-a-skale-chain) The following will create a connection from your chain to the target chain. If the other chain is already connected to your SKALE Chain, you can proceed with token setup and bridging. If the other chain has not yet connected then bridging will not work until completed. * via Multisigwallet CLI ```shell npx msig encodeData [SKALE_CHAIN_NAME] TokenManagerLinker connectSchain [TARGET_CHAIN_NAME] ``` After this, execute by following the steps on [Using SAFE](/run-a-skale-chain/using-safe#submit-transaction-to-safe) * connect.js ```js import { Contract, JsonRpcProvider, Wallet } from "ethers"; // npm add ethers const PRIVATE_KEY = "[YOUR_PRIVATE_KEY]"; const SCHAIN_RPC_URL = "[YOUR_RPC_URL]"; const TOKEN_MANAGER_LINKER_ADDRESS = "0xD2aAA00800000000000000000000000000000000"; // DO NOT CHANGE THIS const TOKEN_MANAGER_LINKER_ABI = [ "function connectSchain(string calldata schainName) external" ]; const SCHAIN_NAME = "[TARGET_SKALE_CHAIN_NAME]"; // e.g green-giddy-denebola (nebula mainnnet); // Setup the RPC Provider to connect to SKALE Chain const provider = new JsonRpcProvider(SCHAIN_RPC_URL); // Setup the wallet with your private key and default to the SKALE Chain provider const wallet = new Wallet(PRIVATE_KEY, provider); const tokenManagerLinkerContract = new Contract(TOKEN_MANAGER_LINKER_ADDRESS, TOKEN_MANAGER_LINKER_ABI, wallet); const connectTx = await tokenManagerLinkerContract.connectSchain(SCHAIN_NAME); await connectTx.wait(1); // Wait 1 blocks for confirmation, ~1 seconds // Success! Now watch for delivery on Destination Chain console.log("Success!"); ```
# SKALE Network Chains Information
> Access common chain information to start building and using SKALE
## SKALE Chains [Section titled “SKALE Chains”](#skale-chains) Unsure which chain to pick? Head over to the [pick a chain docs](/building-applications/pick-a-chain) for guidance. Interested in your own SKALE Chain? Head over to the [SKALE Discord](https://discord.gg/skale) to contact the team. * Testnet ### Testnet Chains [Section titled “Testnet Chains”](#testnet-chains) | Name | RPC Url(s) | Chain ID | Explorer | Chain Focus | Portal | | ------- | -------------------------------------------------------------------------------------------------------------- | ---------- | ---------------------------------------------------------------------------- | ---------------- | ----------------------------------------------------------- | | Calypso | [https://testnet.skalenodes.com/v1/giant-half-dual-testnet](https://testnet.skalenodes.com/v1/giant-half-dual) | 974399131 | [Explorer](https://giant-half-dual.explorer.testnet.skalenodes.com/) | Social, DePIN | [Portal](https://testnet.portal.skale.space/chains/calypso) | | Europa | [https://testnet.skalenodes.com/v1/elated-tan-skat](https://testnet.skalenodes.com/v1/juicy-low-small-testnet) | 1444673419 | [Explorer](https://juicy-low-small-testnet.explorer.testnet.skalenodes.com/) | DeFi & Liquidity | [Portal](https://testnet.portal.skale.space/chains/europa) | | Nebula | | 37084624 | [Explorer](https://lanky-ill-funny-testnet.explorer.testnet.skalenodes.com/) | Gaming | [Portal](https://testnet.portal.skale.space/chains/nebula) | | Titan | | 1020352220 | [Explorer](https://aware-fake-trim-testnet.explorer.testnet.skalenodes.com/) | AI | [Portal](https://testnet.portal.skale.space/chains/titan) | ## Testnet Smart Contracts [Section titled “Testnet Smart Contracts”](#testnet-smart-contracts) ### IMA Bridge Contracts [Section titled “IMA Bridge Contracts”](#ima-bridge-contracts) > The following contracts are deployed on Ethereum Holesky Testnet. | Name | Address | | ---------------------------- | ----------------------------------------------------------------------------------------------------------------------------- | | MessageProxyMainnet | [0x682ef859e1cE314ceD13A6FA32cE77AaeCE98e28](https://holesky.etherscan.io/address/0x682ef859e1cE314ceD13A6FA32cE77AaeCE98e28) | | Linker | [0x840A1BCa22c6D67Ed1076A1018b404EbcaA8a10c](https://holesky.etherscan.io/address/0x840A1BCa22c6D67Ed1076A1018b404EbcaA8a10c) | | CommunityPool | [0xF263049E4D7b331154077e30dD4de72F779E9554](https://holesky.etherscan.io/address/0xF263049E4D7b331154077e30dD4de72F779E9554) | | DepositBoxETH | [0xe1A65b7677866A80B6e4263469FAC22ddc26F4b8](https://holesky.etherscan.io/address/0xe1A65b7677866A80B6e4263469FAC22ddc26F4b8) | | DepositBoxERC20 | [0x4121c9218a65e12f027714AE956Aea7B9C220dAE](https://holesky.etherscan.io/address/0x4121c9218a65e12f027714AE956Aea7B9C220dAE) | | DepositBoxERC721 | [0x024cdFF8Cd5cF334243B2fC2fd3eA1Fc1C9ebec5](https://holesky.etherscan.io/address/0x024cdFF8Cd5cF334243B2fC2fd3eA1Fc1C9ebec5) | | DepositBoxERC1155 | [0xb990E0D1F115398D7E6A8E4269e68b9034366280](https://holesky.etherscan.io/address/0xb990E0D1F115398D7E6A8E4269e68b9034366280) | | DepositBoxERC721WithMetadata | [0x81caAfd5DF89d9DA44054c0a0a305E35DD7e958E](https://holesky.etherscan.io/address/0x81caAfd5DF89d9DA44054c0a0a305E35DD7e958E) | ### SKALE Manager [Section titled “SKALE Manager”](#skale-manager) > The following contracts are deployed on Ethereum Holesky Testnet. | Name | Address | | ----------------------- | ----------------------------------------------------------------------------------------------------------------------------- | | BountyV2 | [0x8264e2db182B10c4d833fb6eb8771739fC91a415](https://holesky.etherscan.io/address/0x8264e2db182B10c4d833fb6eb8771739fC91a415) | | ConstantsHolder | [0x9CA1455919813776E660a885C5b9381d521dd11f](https://holesky.etherscan.io/address/0x9CA1455919813776E660a885C5b9381d521dd11f) | | ContractManager | [0x7B8AEd1c748DD8CFa285f18Af071904469eF182B](https://holesky.etherscan.io/address/0x7B8AEd1c748DD8CFa285f18Af071904469eF182B) | | DelegationController | [0xdd2A2787c3ec037B86934e906ee54B00706dD743](https://holesky.etherscan.io/address/0xdd2A2787c3ec037B86934e906ee54B00706dD743) | | DelegationPeriodManager | [0x10061bd09F68b389E3feA854016e5304Fd3867F3](https://holesky.etherscan.io/address/0x10061bd09F68b389E3feA854016e5304Fd3867F3) | | Distributor | [0x26E159239b61D35cE233B7a05D6C54aBF90052d6](https://holesky.etherscan.io/address/0x26E159239b61D35cE233B7a05D6C54aBF90052d6) | | Nodes | [0xf3e63a1FBA9389ba5Fc3C6f6eC91D3420A4bA595](https://holesky.etherscan.io/address/0xf3e63a1FBA9389ba5Fc3C6f6eC91D3420A4bA595) | | NodeRotation | [0x3b2fC2De55091b38C7E1ce29e867d6c126cCB4Fa](https://holesky.etherscan.io/address/0x3b2fC2De55091b38C7E1ce29e867d6c126cCB4Fa) | | Punisher | [0xa296a51a5EE694aA8dff59d6ac388D589C0a63E6](https://holesky.etherscan.io/address/0xa296a51a5EE694aA8dff59d6ac388D589C0a63E6) | | Schains | [0x597756CE1e741c4E1a3Ae7E529D7db1531355B14](https://holesky.etherscan.io/address/0x597756CE1e741c4E1a3Ae7E529D7db1531355B14) | | SchainsInternal | [0x0071eeBE6fd1460942D88b55fE72551997A9ecAa](https://holesky.etherscan.io/address/0x0071eeBE6fd1460942D88b55fE72551997A9ecAa) | | SKALEDKGTester | [0x26464d81B6AbF2B01fBbbe40cccB4b947aea2936](https://holesky.etherscan.io/address/0x26464d81B6AbF2B01fBbbe40cccB4b947aea2936) | | SKALEManager | [0x2F4dD66BbA82A236d7a691F0e8D5C24A263b5457](https://holesky.etherscan.io/address/0x2F4dD66BbA82A236d7a691F0e8D5C24A263b5457) | | SKALEToken | [0x23595A46A9D68E75D4ea148Ac79415918570c3F3](https://holesky.etherscan.io/address/0x23595A46A9D68E75D4ea148Ac79415918570c3F3) | | SlashingTable | [0x84924b73a8F78dEA0FBD311e4DE371C8851b1180](https://holesky.etherscan.io/address/0x84924b73a8F78dEA0FBD311e4DE371C8851b1180) | | SyncManager | [0x9D5B2067b31D9d0B34F8f114D5d4A79a43ac0796](https://holesky.etherscan.io/address/0x9D5B2067b31D9d0B34F8f114D5d4A79a43ac0796) | | TimeHelpersWithDebug | [0x1F4d7D649821750480240c9b6f2DDD528dD74b99](https://holesky.etherscan.io/address/0x1F4d7D649821750480240c9b6f2DDD528dD74b99) | | ValidatorService | [0xC5BE0958642f36dE90a105D0133b6Eb218Fed14f](https://holesky.etherscan.io/address/0xC5BE0958642f36dE90a105D0133b6Eb218Fed14f) | | Wallets | [0x974ba85949B402bd7dc1a870845A6D8763cd61fd](https://holesky.etherscan.io/address/0x974ba85949B402bd7dc1a870845A6D8763cd61fd) | * Mainnet ### Mainnet Chains [Section titled “Mainnet Chains”](#mainnet-chains) | Name | RPC Url(s) | Chain ID | Explorer | Chain Focus | Portal | | ------- | -------------------------------------------------------------- | ---------- | ------------------------------------------------------------------------------- | ---------------- | --------------------------------------------------- | | Calypso | | 1564830818 | [Explorer](https://honorable-steel-rasalhague.explorer.mainnet.skalenodes.com/) | Social, DePIN | [Portal](https://portal.skale.space/chains/calypso) | | Europa | | 2046399126 | [Explorer](https://elated-tan-skat.explorer.mainnet.skalenodes.com/) | DeFi & Liquidity | [Portal](https://portal.skale.space/chains/europa) | | Nebula | | 1482601649 | [Explorer](https://green-giddy-denebola.explorer.mainnet.skalenodes.com/) | Gaming | [Portal](https://portal.skale.space/chains/nebula) | | Titan | | 1350216234 | [Explorer](https://parallel-stormy-spica.explorer.mainnet.skalenodes.com/) | AI | [Portal](https://portal.skale.space/chains/titan) | Caution * SKALE Mainnet chains have a deployer permission layer enabled by default. Request deployment permission in the [SKALE Discord](https://discord.gg/skale). * You can access the SKALE Mainnet Faucet at the [sFUEL Station](https://sfuelstation.com) ## Mainnet Smart Contracts [Section titled “Mainnet Smart Contracts”](#mainnet-smart-contracts) ### IMA Bridge Contracts [Section titled “IMA Bridge Contracts”](#ima-bridge-contracts-1) > The following contracts are deployed on Ethereum Mainnet. Learn more about the [SKALE Bridge here](/skale-bridge/overview). | Name | Address | | ---------------------------- | --------------------------------------------------------------------------------------------------------------------- | | MessageProxyMainnet | [0x8629703a9903515818C2FeB45a6f6fA5df8Da404](https://etherscan.io/address/0x8629703a9903515818C2FeB45a6f6fA5df8Da404) | | Linker | [0x6ef406953bac772C2146389ED37846BA3b6086D1](https://etherscan.io/address/0x6ef406953bac772C2146389ED37846BA3b6086D1) | | CommunityPool | [0x588801cA36558310D91234aFC2511502282b1621](https://etherscan.io/address/0x588801cA36558310D91234aFC2511502282b1621) | | DepositBoxETH | [0x49F583d263e4Ef938b9E09772D3394c71605Df94](https://etherscan.io/address/0x49F583d263e4Ef938b9E09772D3394c71605Df94) | | DepositBoxERC20 | [0x8fB1A35bB6fB9c47Fb5065BE5062cB8dC1687669](https://etherscan.io/address/0x8fB1A35bB6fB9c47Fb5065BE5062cB8dC1687669) | | DepositBoxERC721 | [0x7343d31eb99Fd31424bcca9f0a7EAFBc1F515f2d](https://etherscan.io/address/0x7343d31eb99Fd31424bcca9f0a7EAFBc1F515f2d) | | DepositBoxERC1155 | [0x3C02FdEe8E05B6dc4d44a6555b3ff5762D03871a](https://etherscan.io/address/0x3C02FdEe8E05B6dc4d44a6555b3ff5762D03871a) | | DepositBoxERC721withMetadata | [0x9f8196D864ee9476bF8DBE68aD07cc555d6B7986](https://etherscan.io/address/0x9f8196D864ee9476bF8DBE68aD07cc555d6B7986) | ### SKALE Manager [Section titled “SKALE Manager”](#skale-manager-1) > The following contracts are deployed on Ethereum Mainnet. | Name | Address | | ----------------------- | --------------------------------------------------------------------------------------------------------------------- | | BountyV2 | [0x801BA194f775a6CB0B5759FdDCe6A35e401787BF](https://etherscan.io/address/0x801BA194f775a6CB0B5759FdDCe6A35e401787BF) | | ConstantsHolder | [0x3d30A62AceEB6720312c3318D28620194e749e38](https://etherscan.io/address/0x3d30A62AceEB6720312c3318D28620194e749e38) | | ContractManager | [0xC04A10Fd5e6513242558f47331568aBD6185a310](https://etherscan.io/address/0xC04A10Fd5e6513242558f47331568aBD6185a310) | | Decryption | [0x9257B149889A76c7A86BFfA5820f06FaBca3a9a1](https://etherscan.io/address/0x9257B149889A76c7A86BFfA5820f06FaBca3a9a1) | | DelegationController | [0x06dD71dAb27C1A3e0B172d53735f00Bf1a66Eb79](https://etherscan.io/address/0x06dD71dAb27C1A3e0B172d53735f00Bf1a66Eb79) | | DelegationPeriodManager | [0x54a663E39621D2E644F6B9b6966CDf66db973ab3](https://etherscan.io/address/0x54a663E39621D2E644F6B9b6966CDf66db973ab3) | | Distributor | [0x2a42Ccca55FdE8a9CA2D7f3C66fcddE99B4baB90](https://etherscan.io/address/0x2a42Ccca55FdE8a9CA2D7f3C66fcddE99B4baB90) | | ECDH | [0x1A77D7617f919e20F8E0fA98A292DEAF1072b77E](https://etherscan.io/address/0x1A77D7617f919e20F8E0fA98A292DEAF1072b77E) | | KeyStorage | [0x921a97c815E4E7508D1aD639b56A21E942a3a152](https://etherscan.io/address/0x921a97c815E4E7508D1aD639b56A21E942a3a152) | | NodeRotation | [0xEC4EA4802Cb323645B87441AEB5622c800d72CCd](https://etherscan.io/address/0xEC4EA4802Cb323645B87441AEB5622c800d72CCd) | | Nodes | [0xD489665414D051336CE2F2C6e4184De0409e40ba](https://etherscan.io/address/0xD489665414D051336CE2F2C6e4184De0409e40ba) | | Pricing | [0x39c289a3EF68127C272dE21F3db67B0CDeCDFEE1](https://etherscan.io/address/0x39c289a3EF68127C272dE21F3db67B0CDeCDFEE1) | | Punisher | [0xbcA0eCdD44203DE76AF389d5F9931015529b7F1E](https://etherscan.io/address/0xbcA0eCdD44203DE76AF389d5F9931015529b7F1E) | | Schains | [0x0fCa003F483313869ee54e86B281348980B4cbf6](https://etherscan.io/address/0x0fCa003F483313869ee54e86B281348980B4cbf6) | | SchainsInternal | [0x836Df73065Cb143bdDF3106e46783d43C12C6012](https://etherscan.io/address/0x836Df73065Cb143bdDF3106e46783d43C12C6012) | | SkaleDKG | [0xfcc84F7b6d88d671C6a1841549c0b2E70110884f](https://etherscan.io/address/0xfcc84F7b6d88d671C6a1841549c0b2E70110884f) | | SkaleManager | [0x8b32F750966273cb6D804C02360F3E2743E2B511](https://etherscan.io/address/0x8b32F750966273cb6D804C02360F3E2743E2B511) | | SKL Token | [0x00c83aeCC790e8a4453e5dD3B0B4b3680501a7A7](https://etherscan.io/address/0x00c83aeCC790e8a4453e5dD3B0B4b3680501a7A7) | | SKALEVerifier | [0x32F50e2a898F14687f2a714D8b2D405317eB4641](https://etherscan.io/address/0x32F50e2a898F14687f2a714D8b2D405317eB4641) | | SlashingTable | [0x1a7bB775611b58375a3177Dcf3D8E4f7F6d2ed4B](https://etherscan.io/address/0x1a7bB775611b58375a3177Dcf3D8E4f7F6d2ed4B) | | TimeHelpers | [0x05946b1b80ce4DE235350d8955c5c751860D5399](https://etherscan.io/address/0x05946b1b80ce4DE235350d8955c5c751860D5399) | | TokenState | [0x4eE5F270572285776814e32952446e9B7Ee15C86](https://etherscan.io/address/0x4eE5F270572285776814e32952446e9B7Ee15C86) | | ValidatorService | [0x840C8122433A5AA7ad60C1Bcdc36AB9DcCF761a5](https://etherscan.io/address/0x840C8122433A5AA7ad60C1Bcdc36AB9DcCF761a5) | | Wallets | [0xbAec960713a6c41d391C93AE42128d72C916965f](https://etherscan.io/address/0xbAec960713a6c41d391C93AE42128d72C916965f) | | SyncManager | [0xBC896522b1649dc2e43bC093d08665822529d087](https://etherscan.io/address/0xBC896522b1649dc2e43bC093d08665822529d087) | ### SKALE Allocator [Section titled “SKALE Allocator”](#skale-allocator) > All the following contracts are deployed on Ethereum Mainnet. | Name | Address | | --------------- | --------------------------------------------------------------------------------------------------------------------- | | Allocator | [0xB575c158399227b6ef4Dcfb05AA3bCa30E12a7ba](https://etherscan.io/address/0xB575c158399227b6ef4Dcfb05AA3bCa30E12a7ba) | | ContractManager | [0xC04A10Fd5e6513242558f47331568aBD6185a310](https://etherscan.io/address/0xC04A10Fd5e6513242558f47331568aBD6185a310) | | Escrow | [0x7A7d709332d10786adCf35FD83608F656a7b4a30](https://etherscan.io/address/0x7A7d709332d10786adCf35FD83608F656a7b4a30) | | ProxyAdmin | [0x9B1E4A9Fe5142346E1C51907f0583e6aC663b8A0](https://etherscan.io/address/0x9B1E4A9Fe5142346E1C51907f0583e6aC663b8A0) | | ProxyFactory | [0xBc81979091a5A7A50b80e490024Bcbc336216f9b](https://etherscan.io/address/0xBc81979091a5A7A50b80e490024Bcbc336216f9b) | ## Predeployed Contracts [Section titled “Predeployed Contracts”](#predeployed-contracts) > The following contracts are deployed on each SKALE Chain | Address | Contract | Description | | ------------------------------------------ | -------------------------------- | ------------------------------------------------------------------------------------------------------------------------------------------------------------------------------------------------------------------------------------------------------------------------------------------------------------------------------------------------------------------------------------------------------------------- | | 0xD2001000000000000000000000000000000000D2 | Context | Allows setting of new owner address, otherwise returns: • SKALE Chain Name • Owner address | | 0xD2002000000000000000000000000000000000D2 | Config Controller | Allows owner to: • add and remove addresses from the deployment whitelist • to check whether an address is on the whitelist • enable/disable Free Contract Deployment mode - allow any account to deploy contracts on the SKALE Chain • enable/disable Multi Transaction Mode (MTM) multiple transactions from the same account been included in the one block *Note: currently, when MTM set, it’s always enabled* | | 0xd2bA3e0000000000000000000000000000000000 | Etherbase | Allows owner to send sFUEL to any address. Etherbase collects sFUEL from all spent transactions. | | 0xD2c0DeFACe000000000000000000000000000000 | Marionette | Predeployed smart contract on Skale chain that is controlled by external entity. Marionette executes commands that come from the mainnet if the chain owner is a mainnet contract. | | 0xD244519000000000000000000000000000000000 | MultiSigWallet | Increases security by requiring multiple parties to agree on transactions before execution. Allows owner to: • add and delete other wallet owners • add new transactions to the pending queue • change the number of required confirmations from other owners | | 0xD1000000000000000000000000000000000000D1 | ProxyAdminPredeployed | Allow owner to change implementations of predeployed contracts | | 0x1820a4B7618BdE71Dce8cdc73aAB6C95905faD24 | ERC1820 Registry | See | | 0xd2aAa00000000000000000000000000000000000 | Proxy Admin | --- | | 0xd2AAa00100000000000000000000000000000000 | Message Proxy | IMA Bridge message proxy contract | | 0xd2aaa00200000000000000000000000000000000 | Key Storage | Contract to hold common BLS public key | | 0xD2aaa00300000000000000000000000000000000 | Community Locker | Handles communication with exit gas wallet | | 0xd2AaA00400000000000000000000000000000000 | TokenManagerETH | Bridging contract for ETH | | 0xD2aAA00500000000000000000000000000000000 | TokenManagerERC20 | Bridging contract for ERC-20 tokens | | 0xD2aaa00600000000000000000000000000000000 | TokenManagerERC721 | Bridging contract for ERC-721 without tokenURI | | 0xD2Aaa00700000000000000000000000000000000 | ETHC | The default ETH token on all SKALE Chains mapped to TokenManagerETH | | 0xD2aAA00800000000000000000000000000000000 | TokenManagerLinker | Links TokenManagers to MessageProxy | | 0xD2aaA00900000000000000000000000000000000 | TokenManagerERC1155 | Bridging contract for ERC-1155 | | 0xd2AaA00a00000000000000000000000000000000 | TokenManagerERC721 With Metadata | Bridging contract for ERC-721 Tokens with tokenURI | ## Precompiled Contracts [Section titled “Precompiled Contracts”](#precompiled-contracts) > The following contracts are available on each SKALE Chain in addition to default Ethereum precompiled contracts (i.e ecrecover, sha256, modexp, …). | Address | Function | Description | Sender who can call | | ------- | ------------------------ | ------------------------------------------------------------------------------------------------------------------------- | ------------------- | | `0x0A` | readChunk | Reads chunk from file from specific position with specific length. | Any | | `0x0B` | createFile | Creates an address for an empty file. | Filestorage only | | `0x0C` | uploadChunk | Uploads 1MB chunk of data from specific position in specific file by file owner. | Filestorage only | | `0x0D` | getFileSize | Returns size of file. | Any | | `0x0E` | deleteFile | Deletes file from filestorage system. | Filestorage only | | `0x0F` | createDirectory | Creates directory in filestorage system. | Filestorage only | | `0x10` | deleteDirectory | Deletes directory in filestorage system. | Filestorage only | | `0x11` | calculateFileHash | Calculates and writes SHA256 hash of file in same directory `._hash` | Filestorage only | | `0x12` | logTextMessage | Logs a message with severity (0=Normal, 1=Debug, 2=Trace, 3=Warning, 4=Error, 5=Fatal). Used for IMA SKALE Chain testing. | Any | | `0x13` | getConfigVariableUint256 | Returns SKALE Chain config uint256 for IMA SKALE Chain contracts. Used for reading BLS common public key. | Any | | `0x14` | getConfigVariableAddress | Returns SKALE Chain config address for IMA SKALE Chain testing. | Any | | `0x15` | getConfigVariableString | Returns SKALE Chain config string for IMA SKALE Chain testing. | Any | | `0x16` | fnReserved0x16 | Reserved. | Any | | `0x17` | getConfigPermissionsFlag | Returns SKALE Chain config boolean for IMA SKALE Chain testing. | Any | | `0x18` | getBlockRandom | Return a random number based on BLS threshold signature common coin of the current block. | Any | | `0x19` | getIMABLSPublicKey | Returns relevant BLSPublicKey according to block timestamp. | Any | ## Other Contracts [Section titled “Other Contracts”](#other-contracts) > The following are available on both mainnet and tesntet of the following SKALE Chains: Calypso, Europa, Nebula, Titan | Name | Address | | ---------- | ------------------------------------------ | | Multicall3 | 0xcA11bde05977b3631167028862bE2a173976CA11 |
# Get Started with SKALE
> Explore the various solutions available within the SKALE Ecosystem
SKALE is a network of interconnected Layer 1 blockchains built different to scale gaming, AI, DeFi, and other decentralized applications. This page applications similar to a table of contents and provides an introduction to the various products and tools available within the SKALE Ecosystem. ### For Developers [Section titled “For Developers”](#for-developers) Interested in building on the fastest blockchain in the world with zero gas fees? You can start building on SKALE in minutes with one of the SKALE Hubs. SKALE Hubs are SKALE Chains designed to be shared by many projects instead of being dedicated to a single application. Checkout some of the most popular developer docs below! | Section | Description | | --------------------------------------------------------------- | ------------------------------------------------------------------- | | [Intro to Solidity](/building-applications/solidity-quickstart) | A quick introduction to the most popular language on SKALE | | [Zero Gas Fees](/building-applications/gas-fees) | Jump start your knowledge of how to use zero gas fees on SKALE | | [Picking a Chain](/building-applications/pick-a-chain) | Checkout the various SKALE Hubs to determine where to build | | [SKALE vs Ethereum](/building-applications/skale-vs-ethereum) | Coming from Ethereum or another EVM? Checkout the comparision guide | > Join the SKALE team in [Discord](https://discord.gg/skale) to inquire about building on SKALE! ### For sChain Owners [Section titled “For sChain Owners”](#for-schain-owners) Interested in having your own blockchain? It has never been easier to have your own blockchain with the full securiy of a Layer 1. | Section | Description | | ------------------------------------------------------------- | ------------------------------------------------------- | | [Intro to SKALE Chains](/run-a-skale-chain/intro-to-schains) | Learn more about SKALE Chains and how one can be yours | | [Customization Options](/run-a-skale-chain/customize-schain) | Checkout ways you can customize your SKALE Chain | | [Setup Requirements](/run-a-skale-chain/setup-requirements) | Understand the setup requirements for a new SKALE Chain | | [Pricing & Payments](/run-a-skale-chain/pricing-and-payments) | Explore the SKALE Network Pricing Model | > Join the SKALE team in [Discord](https://discord.gg/skale) to inquire about your own chain. ### For Validators [Section titled “For Validators”](#for-validators) Real blockchains require validators or node operators to run the network. SKALE being a network of Layer 1’s requires strong validator operators to be a part of the network. Check out some of the most common resources below to get started as a validator. | Section | Description | | -------------------------------------------------------------------- | ----------------------------------------------------------------- | | [Overview](/run-a-skale-node/overview) | The perfect starting point to become a SKALE Validator | | [Compliance Requirements](/run-a-skale-node/compliance-requirements) | Checkout the compliance requirements to ensure consistent rewards | | [Frequently Asked Questions](/run-a-skale-node/faq) | Explore the commonly asked questions from validators | > Have questions? Join the SKALE [Discord](https://discord.gg/skale) to inquire about running a SKALE Node!
# Intro to SKALE
> An introduction to the SKALE Network
## Q: What is SKALE? [Section titled “Q: What is SKALE?”](#q-what-is-skale) SKALE is a network of Layer 1 blockchains called SKALE Chains. Every SKALE Chain operates independently and can be compared to a mini Ethereum, while still leveraging the shared security of the broader SKALE Network. ## Q: Why does SKALE exist? [Section titled “Q: Why does SKALE exist?”](#q-why-does-skale-exist) SKALE was created to solve the scalability and usability issues of Ethereum. Over the past 5 years it has evolved into one of the few truly innovative blockchains in the world and is home to hundreds of builders interested in leveraging decentralized technology without being limited by gas fees, slow transaction times, congestion, and archaic user experiences. ## Q: Is SKALE a Layer 1, Layer 2, or Layer 3? [Section titled “Q: Is SKALE a Layer 1, Layer 2, or Layer 3?”](#q-is-skale-a-layer-1-layer-2-or-layer-3) Every SKALE Chain is a Layer 1 blockchain. SKALE is not a Layer 2 or Layer 3 solution. SKALE Manager — the brain of SKALE — does live on the Ethereum mainnet today, however, each and every SKALE Chain maintains its own state independently of Ethereum and leverages the SKALE shared validator pool, not Ethereum validators. > SKALE is not a rollup, sidechain, or state channel solution. Every SKALE Chain maintains its own local ledger across a subset of SKALE Nodes. ## Q: How are there zero gas fees? [Section titled “Q: How are there zero gas fees?”](#q-how-are-there-zero-gas-fees) The SKALE Network — which is governed by the SKALE DAO — has a blockchain-as-a-service style fee structure in place. SKALE Chain Owners are in charge of paying into the SKALE Network for their SKALE Chain each month in a process similar to “rent”. This fee structure is designed to be predictable and transparent while also being as stable as possible to ensure that chain owners can plan for the future while taking advantage of superior unit economics in the short term. > For more on SKALE Chain Pricing, checkout the [SKALE Pricing Page](/run-a-skale-chain/pricing-and-payments). ## Q: What is the SKL token used for? [Section titled “Q: What is the SKL token used for?”](#q-what-is-the-skl-token-used-for) The SKL token is the utility token of the SKALE Network. It is used for: | Use Case | Description | | ---------- | ---------------------------------------------------------------------------------- | | Staking | SKL is staked by validators to create nodes and secure the network | | Bounties | SKL is rewarded back to validators each month in the form of bounties | | Payment | SKL is used to pay for SKALE Chain on the Europa Hub | | Governance | SKL is used to calculate voting power and meter proposal creation in the SKALE DAO | > For more on the SKL token, deep dive [here](/how-skale-works/skl-token). ## Q: Is SKALE EVM compatible? [Section titled “Q: Is SKALE EVM compatible?”](#q-is-skale-evm-compatible) Yes, SKALE Chains are EVM compatible. This means that developers can deploy their Solidity smart contracts to SKALE Chains with little to no modification. SKALE Chains are also compatible with the vast majority of Ethereum tooling and infrastructure such as [Foundry](https://foundry.sh), [MetaMask](https://metamask.io), [Remix](https://remix.ethereum.org), and more! Caution Please note that SKALE Chains are not 100% compatible with Ethereum. There are some differences in the way that SKALE Chains operate with the zero gas fee model as well as other operational pieces of Ethereum that do not make sense on SKALE. For the full comparision, checkout the [SKALE vs Ethereum](/building-applications/skale-vs-ethereum) page. ## Q: Is there a main “SKALE chain”? [Section titled “Q: Is there a main “SKALE chain”?”](#q-is-there-a-main-skale-chain) No, there is no main “SKALE chain”. Every SKALE Chain is independent and operates on its own. The SKALE Network is a collection of many chains. If you are a user looking to start using SKALE, head over to the [Getting Started](https://skale.space/get-started-on-skale) page on the SKALE website. If you are a developer looking to start building on SKALE, head over to the [Pick a Chain](/building-applications/pick-a-chain) page in the docs for a deeper dive into the different chains available.